How To Set Different Wallpapers For Virtual Desktops In Windows 10
Windows 10 has a new Settings app that handles the more commonly used settings a user might need to change. This includes personalization settings which can no longer be accessed from the Control Panel app. The transition from Control Panel to Settings app hasn’t been smooth with users needing to jump through quite a few hoops if they want to set a different wallpaper on multiple desktops. Thankfully, it’s still doable which isn’t something that can be said for virtual desktop. With virtual desktops, you can only set one wallpaper and it will appear on all of them. Win 10 Virtual Desktop Enhancer is a little app that looks to fill this gap. It lets you set different wallpapers for different virtual desktops. It also adds a little icon in the system tray to let you know which desktop you’re currently on.
Win 10 Virtual Desktop Enhancer is built for 64bit installations. If you’re running a 32bit installation, you will need to install AutoHotKey to use.
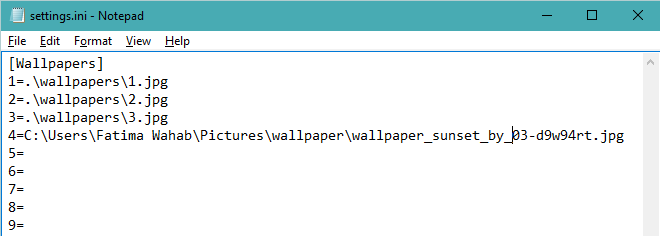
If you’re running a 64bit installation, install Visual C++ Redistributable for Visual Studio 2015 (link at the end). Download and extract Win 10 Virtual Desktop Enhancer. Open the Settings.ini file in Notepad and enter the path for the wallpapers you want to set against the virtual desktop you want to set it for.
The first three entries are for desktops 1 – 3 and wallpapers are duly provided in a Wallpapers folder at the app’s route. You can keep these or add a different wallpaper as shown for virtual desktop 4. For best results, we recommend copying the wallpapers you want to use to the Wallpapers folder you get when you extract Win 10 Virtual Desktop Enhancer.
Once you’ve set the wallpaper, run the EXE file called virtual-desktop-enhancer. Add a new virtual desktop and it’s wallpaper will change in a few seconds.
If you’re running a 32bit installation, install AutoHotKey (link at the end), and run the file named ‘virtual-desktop-enhancer.ahk’.
Win 10 Virtual Desktop Enhancer supports keyboard shortcuts; LeftAlt+` (the button under the ‘Esc key) will take you to the Task View mode i.e. it will mimic Win+Tab. Using LeftAlt with a number key from 1-9 will let you select the virtual desktop that corresponds to that number.
Win 10 Virtual Desktop Enhancer is still in Beta so if you can’t get it to work for you, consider letting the developer behind it know.
Download Win 10 Virtual Desktop Enhancer
Download Visual C++ Redistributable for Visual Studio 2015 From Microsoft

Hi.
It does not work for me. How can I contact to you tell the information in order you to fix it?
https://www.microsoft.com/en-us/p/virtual-desktop-enhancer/9npq3fkglngq
Thank