How To Set The Windows Spotlight Image As Your Wallpaper In Windows 10
You can customize the the Windows 10 lock screen image. You have the option to set an image of your choice as the lock screen background or set up a slideshow. A third option lets you enable ‘Windows Spotlight’ which finds photos from Bing and sets them as your wallpaper. They’re stored locally on your system as temporary files. If you really like a photo, you can hunt it down and set it as your desktop wallpaper. If you’d like to automate this, give Lock Screen Reflection a try. It’s a free Windows utility that will set the Windows Spotlight image as your wallpaper. It works only if you have Windows Spotlight turned on for the lock screen. Here’s how you can set the Windows Spotlight image as your wallpaper, both manually and via an app.
Manually Set Windows Spotlight Image As Your Wallpaper
Step 1: Find where Windows 10 Spotlight images are saved. To do so, open File Explorer and enter the following location. Replace ‘User Name’ with your own user name.
C:\Users\User Name\AppData\Local\Packages\Microsoft.Windows.ContentDeliveryManager_cw5n1h2txyewy\LocalState\Assets
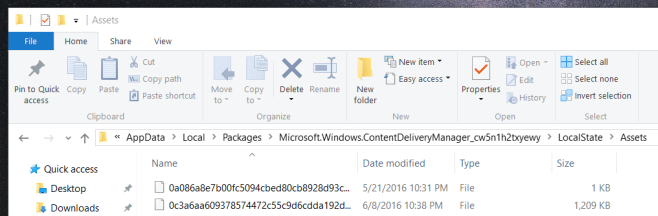
The folder you open will contain lots and lots of unidentified files.
Step 2: Copy all the files in this folder to a different location. The files are a mix of wallpaper images and small thumbnails used by Windows 10 for ads. To make the sorting process easier, sort the files by size. The wallpaper images will obviously be larger.
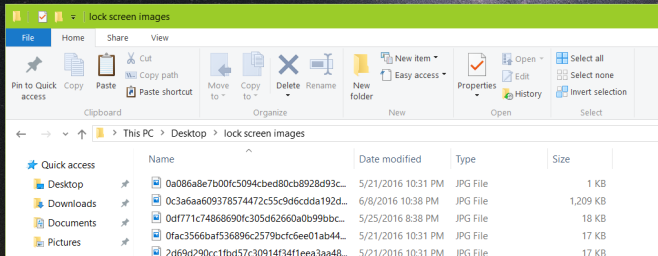
Step 3: Rename the images with a .JPG extension. You can use a batch rename tool like the one that comes with IrfanView to add the extension. You should know that not all files in this folder are images. Some are just system junk files that the Photos app or IrfanView will not be able to open. Don’t fret about them and look for the Spotlight image you want to set as the desktop background. You might want to move it to the Pictures folder where it will be easier to find than in the clutter of the folder you copied them all to.
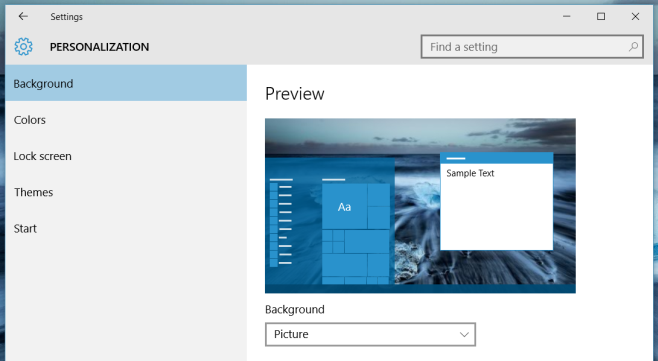
Step 4: Open the Settings app, go to the Personalization group of settings. In the Background tab, select the image and you’re all done.
Rinse and repeat when you see something new that you like.
Automatically Set Windows Spotlight Image As Your Wallpaper
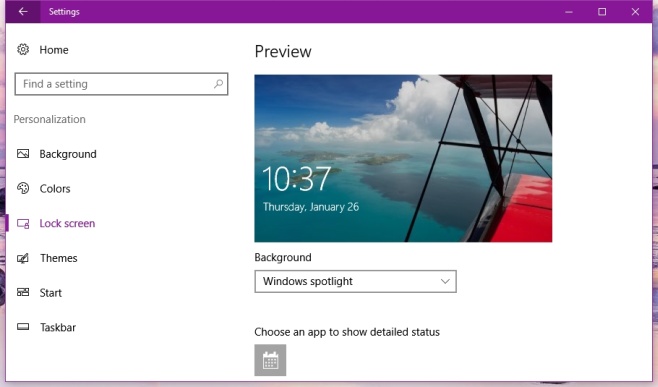
Enable Windows Spotlight Images; open the Settings app. Go to the Personalization group of settings and select Lock Screen. Open the Background drop-down and select ‘Windows Spotlight’ from the options. Give it a few seconds to update your lock screen image.
Lock Screen Reflection does not need to be installed. Every time you have a lock screen image you like simply run the app. It will update the wallpaper to match your lock screen. Lock Screen Reflection doesn’t run automatically nor does it periodically check for new images on the lock screen. What it does is make the entire process of setting the image much shorter.
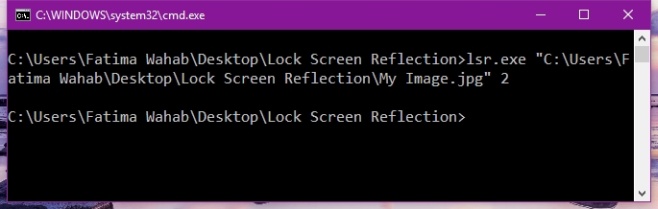
You can use the command line to get Lock Screen Reflection to set an image as tiled, centered, etc. By default, an image is stretched. To set a different layout, pass the following command;
lsr.exe "C:\images\My Image.jpg" 2
Where ‘2’ is the ‘stretched layout. The following styles can be applied. Check out the Readme file for the app for more details.
0 for Tiled
1 for Centered
2 for Stretched
3 for Fit
4 for Fill
Lock Screen Reflection doesn’t have a UI which is a shame. For anyone shy about using the Command Prompt, the app might be slightly off-putting. If you’re okay with the image being stretched to fill your desktop, using Lock Screen Reflection to set the Windows Spotlight image as your wallpaper is pretty simple. If you want to customize the layout, it’s a bit complicated. Simplifying it is something the developers should consider.
Download Lock Screen Reflection

This only applies to the lock screen and the article FAILS to mention that!
You can use powershell to copy and rename if you want. Not sure how often the files are changed.
$backgroundPath = “C:\Users\$env:USERNAME\AppData\Local\Packages\Microsoft.Windows.ContentDeliveryManager_cw5n1h2txyewy\LocalState\Assets”
$path = “D:\Users\$env:USERNAME\Pictures\Backgrounds”
robocopy $backgroundPath $path /MIN:414951
$files = gci $path -Exclude *.jpg | select -ExpandProperty name
foreach($file in $files)
{
Rename-Item -path $path\$file -NewName “$file.jpg”
}
Love you, its great! Thanks
This has a Trojan virus. Dont download!
I used the manual method. A quick way to do it is just copy the files to a temp location and use “ren” in a command prompt. “ren *.* *.jpg” will add the .jpg extension to all the files in less than a second.
I don’t mean to troll… but you can also grab the location of the currently cached file, copy it to a static location, and refresh the user prefs.
@echo off
set wallpaperLocation=C:wallpapers
FOR /F “tokens=3* USEBACKQ” %%F IN (`reg query “HKCUSoftwareMicrosoftWindowsCurrentVersionLock ScreenCreative” /v LandscapeAssetPath`) DO (
SET spotlightLocation=%%F
)
COPY /Y %spotlightLocation% %wallpaperLocation%dynamic_wallpaper.jpg
COPY /Y %spotlightLocation% %wallpaperLocation%*.jpg
reg delete “HKEY_CURRENT_USERcontrol paneldesktop” /v TranscodedImageCache /f
reg add “HKEY_CURRENT_USERcontrol paneldesktop” /v wallpaper /t REG_SZ /d %wallpaperLocation% /f
reg add “HKEY_CURRENT_USERcontrol paneldesktop” /v WallpaperStyle /t REG_SZ /d 2 /f
RUNDLL32.EXE user32.dll,UpdatePerUserSystemParameters
Download link at the bottom leads to an article about Animal Crossing.
not working on windows 10 insider preview
Hmm, I’m sorry to hear that. Can you provide me with the build that you are using?
i’m currently using insider build 16288.1
You can use command prompt to rename all files in directory. Open cmd in that directory. Type “ren *.* *.png”.
i just right clicked and ‘opened’ in Paint and ‘saved as’ a jpg
Very nice.
and if this could run as a background service that rotates across those images that would be great.
This^