Kernel Mode Heap Corruption in Windows: How to Fix This Error
There are few things worse than your computer letting you down the moment you need it the most. You might be working on an important project for office or school, or enjoying a multiplayer game with a friend when you get suddenly interrupted by a Blue Screen of Death (BSOD) message that cripples your PC.
BSOD errors can be fixed, depending on the severity of the stop code. But the integrity of your data is not guaranteed, and that’s why it’s essential to regularly perform backups.

What is Kernel mode heap corruption?
Kernel mode heap corruption is a blue screen error code that paralyzes your computer. It indicates a problem with the system kernel, which can be triggered by a software or hardware problem. It often appears alongside other BSODs like PFN LIST CORRUPT, which also signals system instability or memory-related issues.
Here are some unfortunate events that can trigger stop code Kernel mode heap corruption:
- Incompatible or obsolete graphics driver
- Unsupported or conflicting applications
- Faulty system updates
- Outdated Windows
- RAM issues
- Hard disk or system corruption
- Overclocking
- Outdated or poorly configured BIOS
- New hardware devices
- The GPU card was not correctly inserted
- Malware infection
- Insufficient disk space
How to fix Kernel mode heap corruption on Windows 10
You can try multiple approaches to repair the Kernel mode heap corruption error on your Windows 10 machine by inspecting your hardware and software. If you’re dealing with a related stop code, this kernel mode BSOD fix may also help, and this kernel bugcheck troubleshooting guide covers another common BSOD. It’s important to arm yourself with patience because it might take a while to find the source of the stop code.
Before getting started, it’s wise to back up your files and applications and set up a system restore point. As mentioned at the beginning of this article, the safety of your data is not guaranteed with blue screen errors.
1. Start Windows 10 in safe mode
In severe scenarios when you don’t even get the chance to use your computer at all, you can start Windows 10 in safe mode to disable any non-essential services, processes and drivers that might contribute to stop code Kernel mode heap corruption.
How to boot Windows 10 in safe mode:
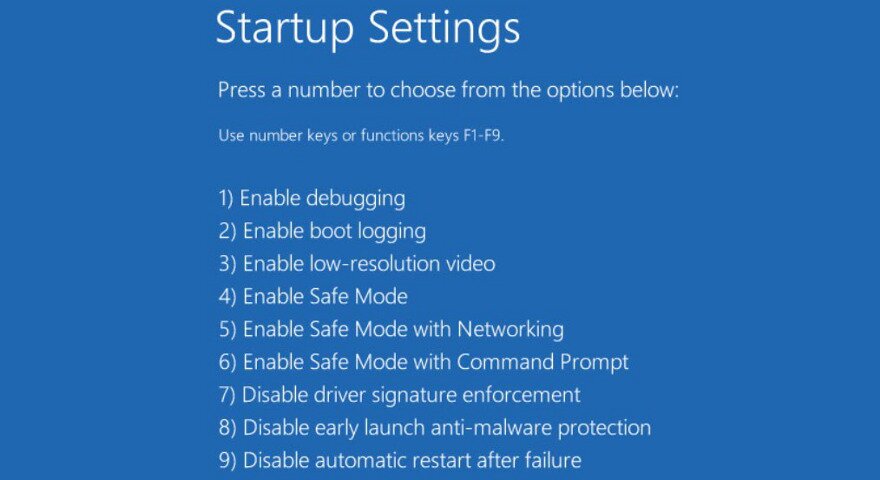
- Turn on your PC and immediately switch it off during boot. Do this three times to trigger Windows troubleshooting mode
- Choose Troubleshoot

- Select Advanced options and go to Startup Settings

- Click Restart and press F4 to boot Windows in safe mode



2. Roll back your graphics driver
If you have recently updated your graphics driver without using a driver updating tool, you might have accidentally installed an incompatible version that causes display issues. In turn, this can lead to the Kernel mode heap corruption error.
But you should be able to fix this issue by rolling back your graphics driver. Here’s what you need to do:
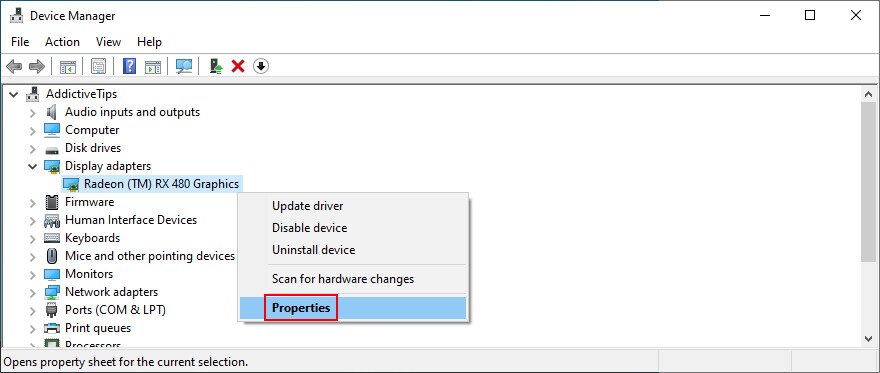
- Right-click the Start button and go to Device Manager

- Extend the Display adapters group by clicking the arrow next to it
- Select your display driver, right-click it, and go to Properties

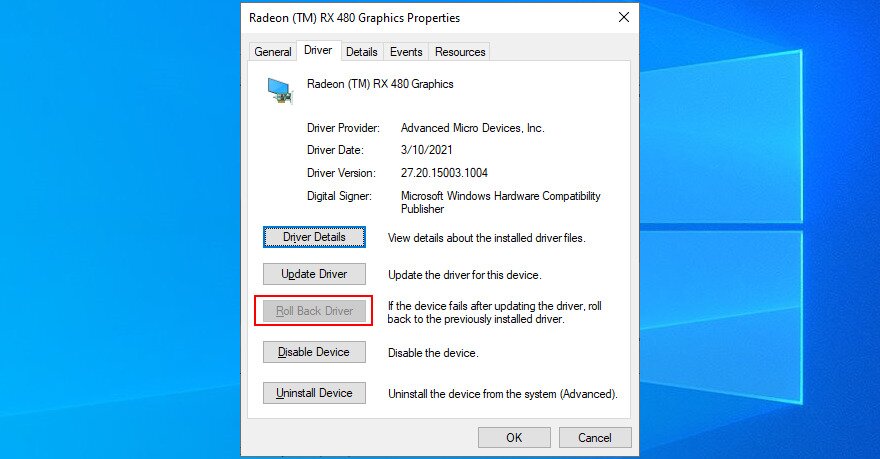
- Switch to the Driver tab
- Click Roll Back Driver and follow the on-screen instructions

If the Roll Back Driver button is greyed out, it means that no previous driver versions are saved on your computer, so you can’t use this solution. Proceed to the next.
3. Update your graphics driver
On the other hand, perhaps your graphics driver hasn’t been updated for a long time. Obsolete drivers are the source of all types of computer problems, so you should get on that right away.
How to update your video driver:
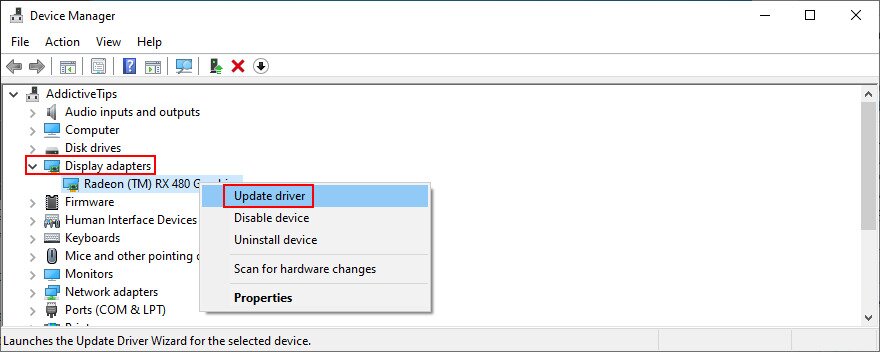
- Press Win key + R, type devmgmt.msc, and press Enter
- Right-click your GPU driver and select Update driver

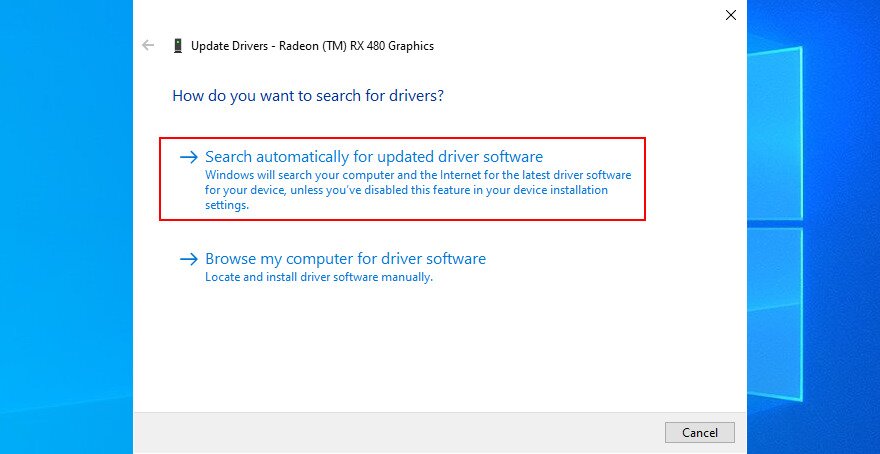
- Click Search automatically for updated driver software

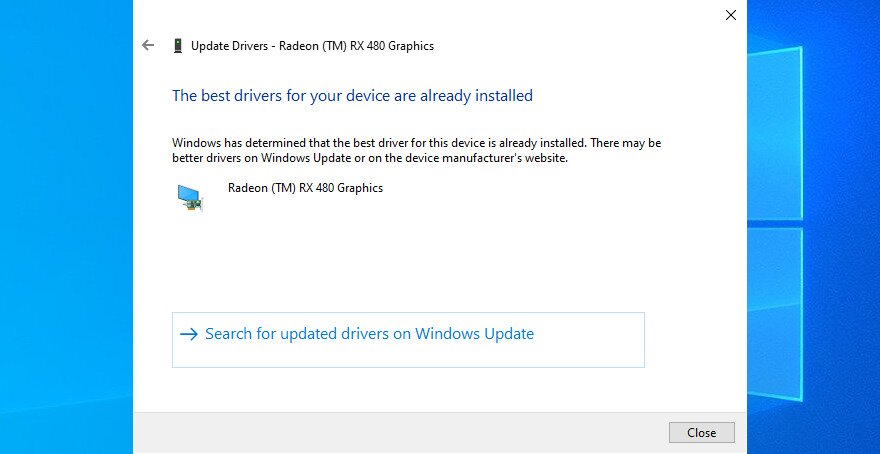
- The online search could take a while. If it comes back empty handed, click Search for updated drivers on Windows Update

- Reboot your PC when it’s done
4. Run Program Compatibility Troubleshooter
If you have recently installed programs that aren’t fully compatible with your operating system, then stop codes like Kernel mode heap corruption are bound to happen.
You may have tried to run such applications in compatibility mode for older Windows versions, but this can be problematic, too. However, you can use the built-in Program Compatibility Troubleshooter to find and eliminate unsupported applications from your PC.
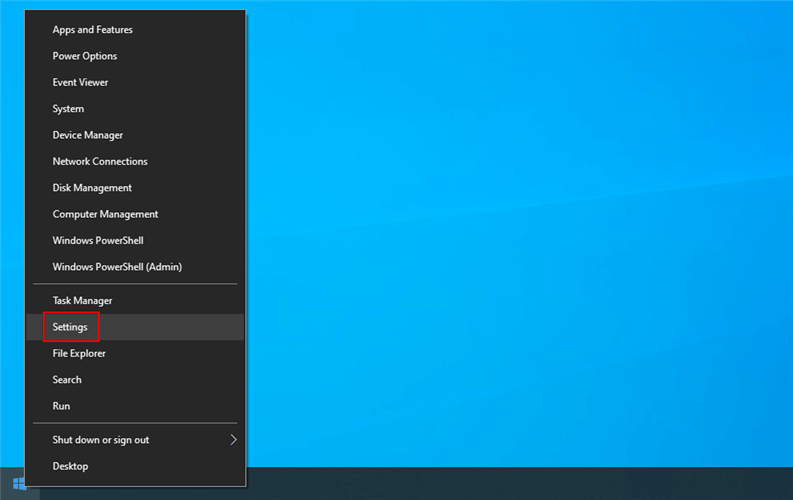
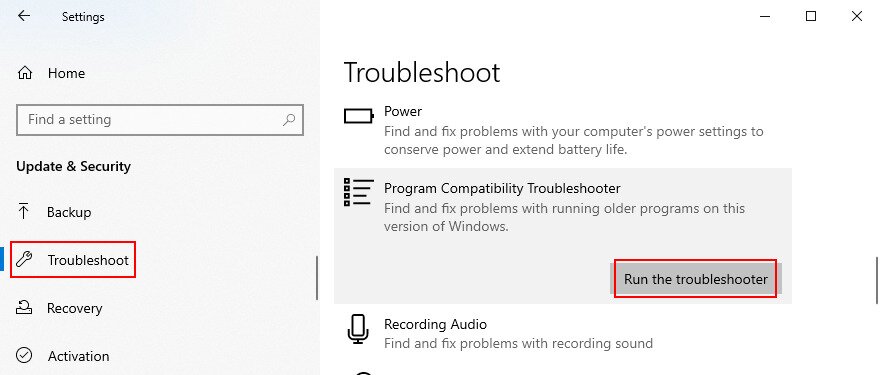
- Right-click the Start button and go to Settings

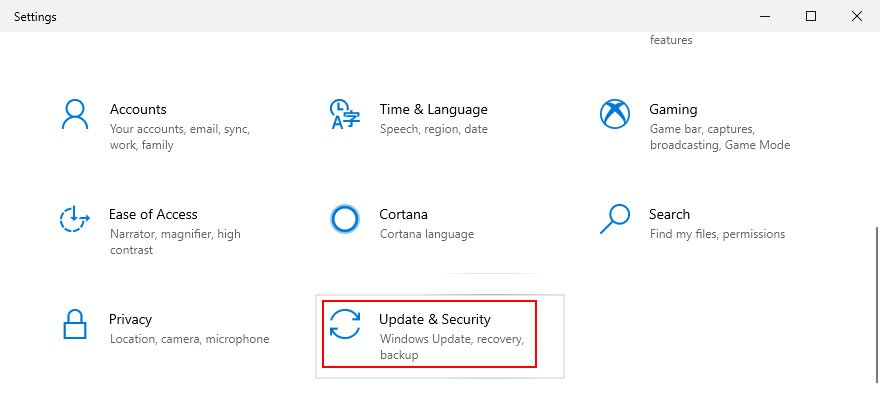
- Select Update & Security

- Go to Troubleshoot on the left side
- Select Program Compatibility Troubleshooter
- Click Run the troubleshooter and follow the on-screen instructions

- Restart your computer and check for BSOD errors
5. Uninstall recent or suspicious apps
In addition to compatibility issues, programs may conflict with each other, causing blue screen errors like Kernel mode heap corruption. For example, if you have multiple antivirus programs installed, and each comes with a real-time engine, then the apps will likely crash.
Similar problems can be caused by suspicious applications, such as free antivirus or VPN tools for Windows. What you have to do is remove the guilty tools to restore your computer’s stability.
How to uninstall recent programs:
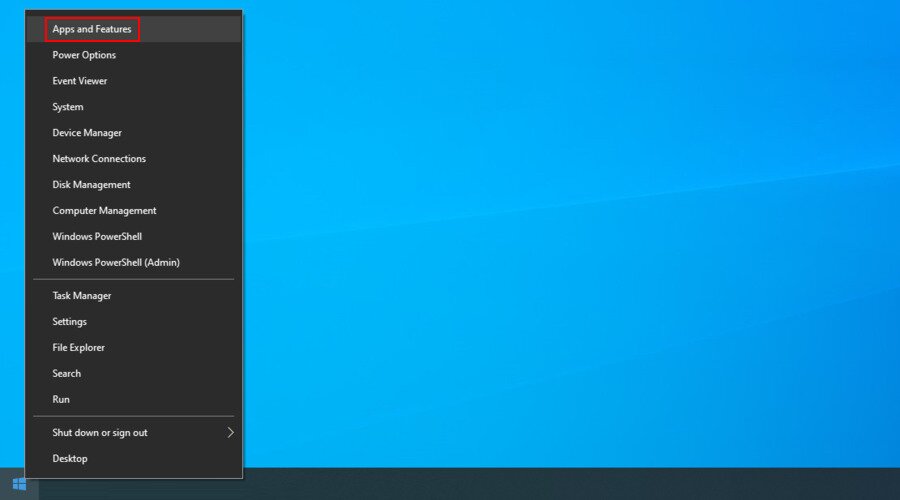
- Right-click the Start button and go to Apps and Features

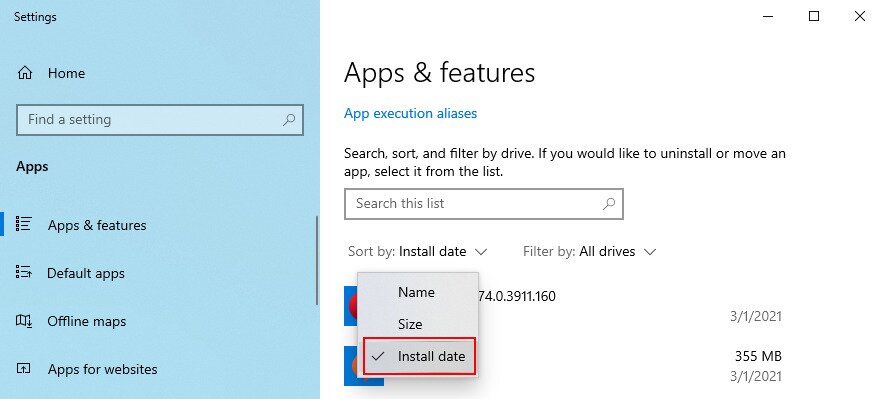
- Set Sort by to Install date (newest first)

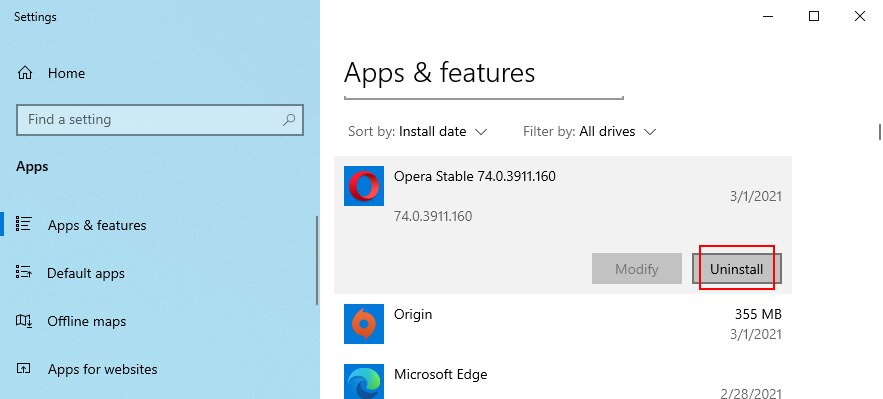
- Click the first unknown or suspicious program in the list and click Uninstall

- Click Uninstall again to confirm and follow the on-screen instructions
- Reboot your PC. If you still get BSOD errors, remove the next suspicious program from the list.
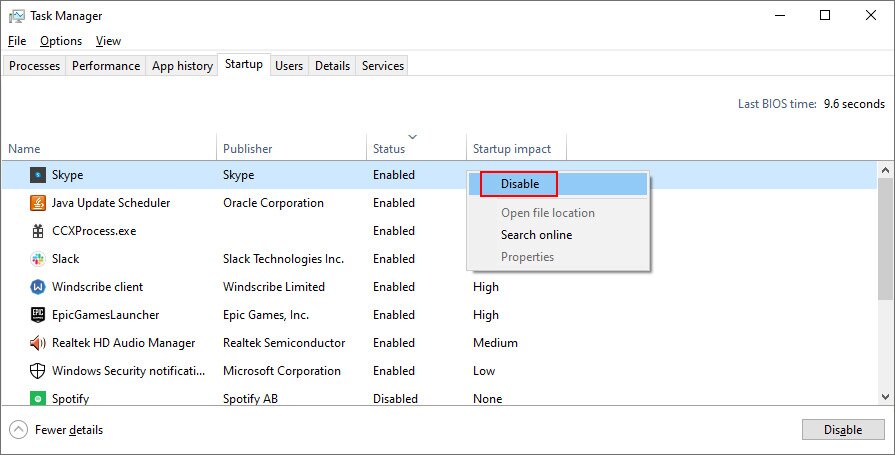
6. Disable startup apps
Startup programs can be problematic because they activate specific processes and services before Windows fully boots. To eliminate this risk, you should prevent applications from automatically running every time you turn on your computer, especially the ones with Internet access like security programs.
How to deactivate startup programs:
- Right-click the Windows 10 taskbar and go to Task Manager

- Switch to the Startup tab
- Click the Status column to sort all apps by status (Enabled first)
- Select each startup app with the Enabled status and click Disable

- Restart your PC and check for BSOD errors

7. Uninstall Windows updates
Although Microsoft has noble attempts when it comes to releasing Windows updates, it sometimes fails miserably. Many users report experiencing computer problems with certain system updates, including blue screen errors.
What you can do is uninstall the most recent updates in order to restore the stability of your operating system. Here’s what you need to do:
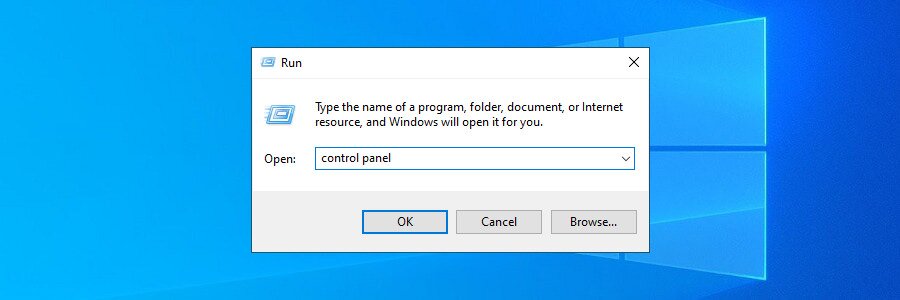
- Press Win key + R, type control panel, and hit Enter

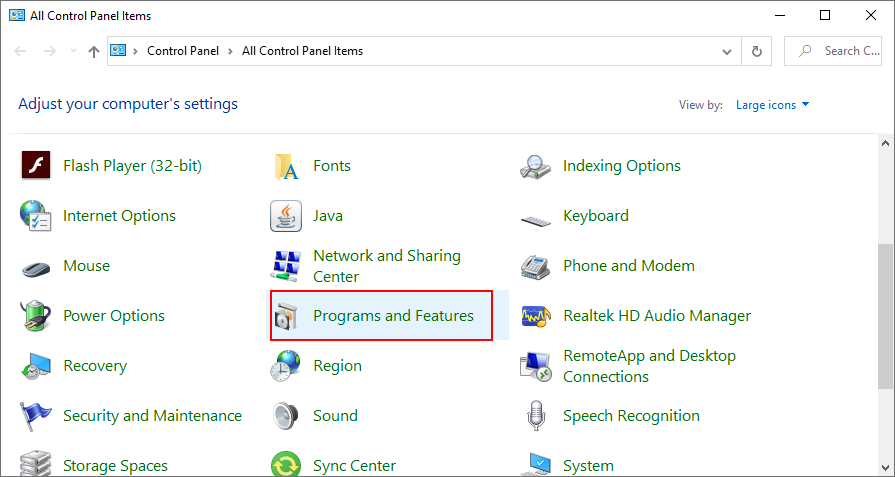
- Click Programs and Features
![Windows 10 shows how to access Programs and Features from Control Panel]()
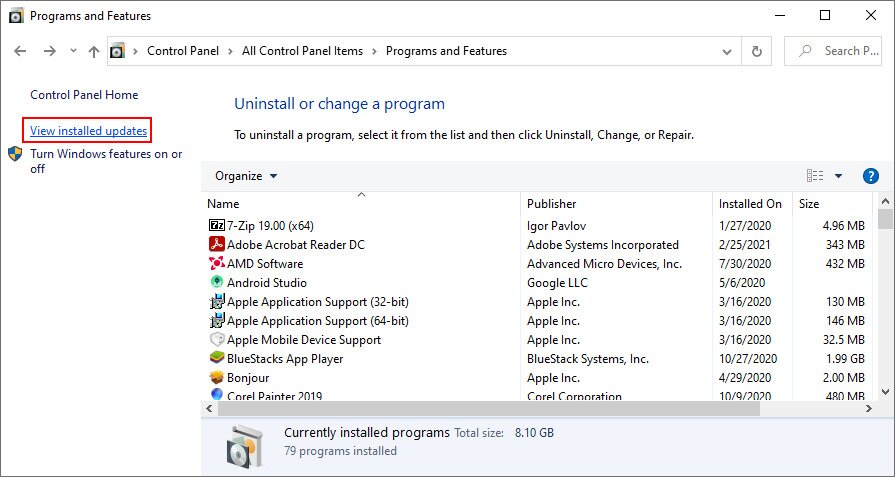
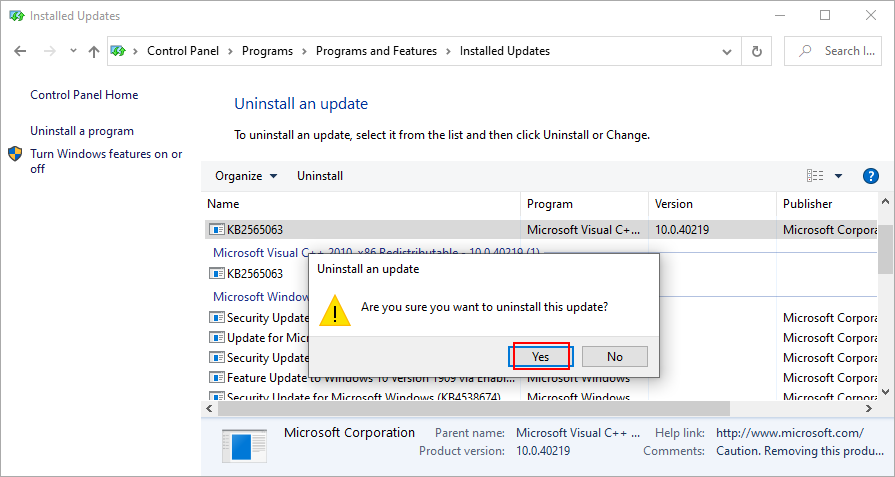
- Click View installed updates

- Click the Installed On column to sort the items (newest first)
- Double-click the first entry. When prompted to confirm the uninstall, click Yes
![Windows 10 shows how to confirm Windows updates removal]()
8. Run Windows Update
On the other hand, if your operating system is outdated, it’s no wonder that you receive blue screen errors such as Kernel mode heap corruption. It’s necessary to equip your computer with the latest features, improvements, hotfixes, and security patches to get it working properly.
How to use Windows Update:
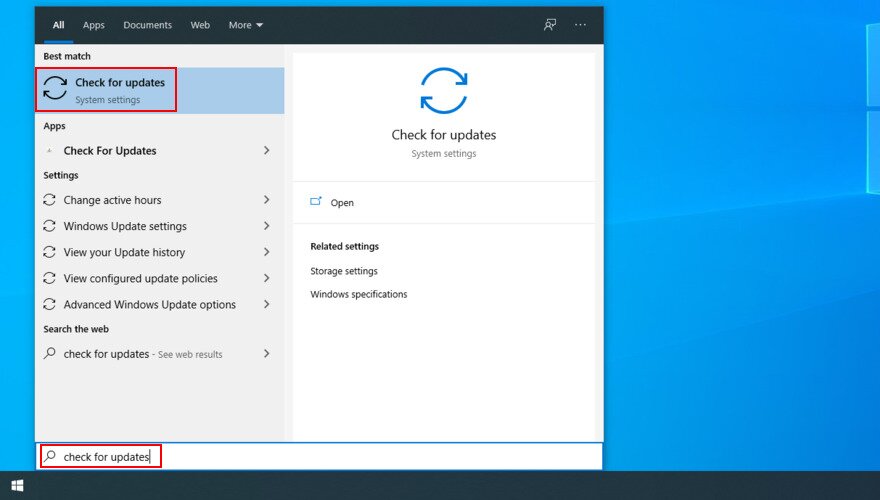
- Press the Windows key, type check for updates, and press Enter

- Windows should start looking for updates right away. Wait until the task is complete
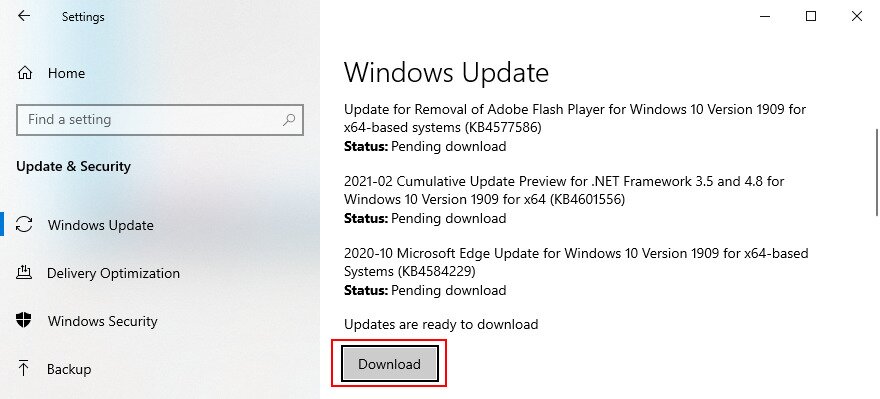
- If there are any pending updates, click Download. It might take a while, so make sure to not turn off or restart your PC during this time

- When the updates are complete, Windows will prompt you to reboot your PC. You might have to do this several times
- Check if you still receive blue screen errors
9. Fix the system memory
System memory issues affect the entire operating system and running applications. In certain cases, they can even lead to blue screen errors such as Kernel mode heap corruption.
However, you can swiftly check your RAM and fix any errors by turning to a practical tool built into the operating system: Windows Memory Diagnostic. Here’s how to use it:
- Save all ongoing projects and exit all applications
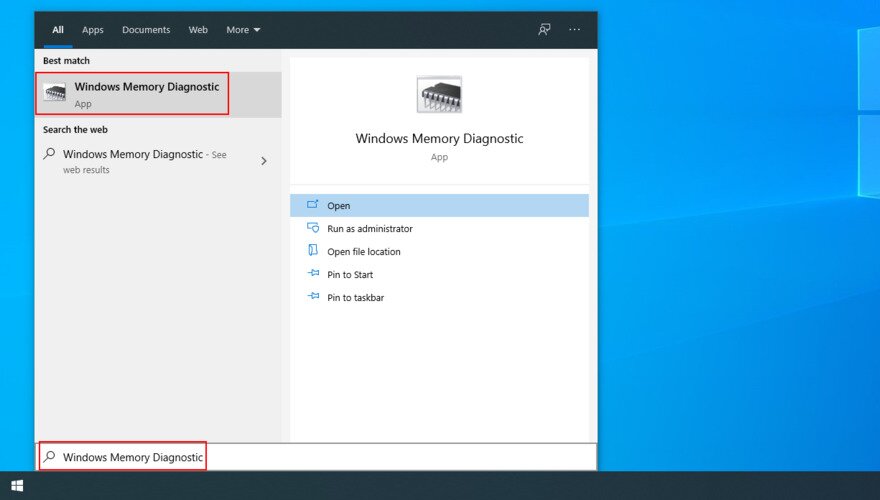
- Press the Windows key, type Windows Memory Diagnostic, and hit Enter to launch this app

- Click Restart now and check for problems (recommended)

- Wait until the diagnosis tool does its job during reboot
- Check your PC for BSOD errors
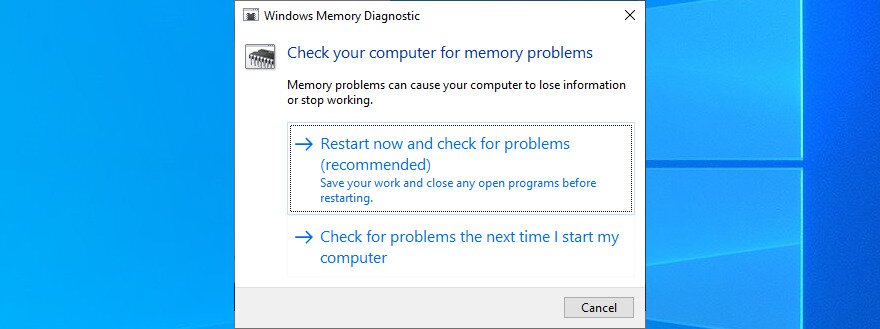
If you prefer a more advanced tool that shows you in-depth information about your memory card, we suggest using MemTest86.
10. Fix corrupt hard disk and system files
Bad sectors on your hard disk or corrupt files in your operating system can lead to severe PC performance issues as well as Blue Screen of Death errors like Kernel mode heap corruption.
However, it’s possible to fix HDD and OS errors without having to resort to third-party software applications. Windows has built-in repair tools called CHKDSK (Check Disk), SFC (System File Checker), and DISM (Deployment Image Servicing and Management).
How to fix HDD errors with CHKDSK:
- Press Win key + R, type cmd, and press Ctrl + Shift + Enter to launch Command Prompt as admin

- Type
chkdsk c: /f. If your OS is installed on another partition, replacec:with the correct driver letter. Press Enter
- When asked to confirm the scheduled task at the next system reboot, type y and hit Enter
- Restart your computer

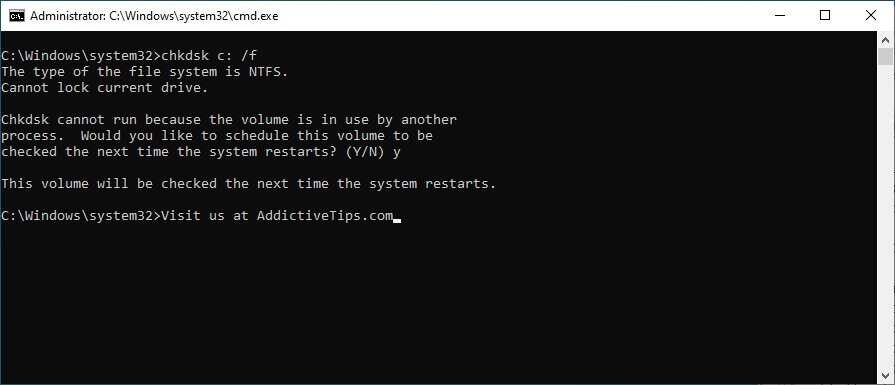
You can count on CHKDSK to repair damaged files that led to hard drive failure. However, if it doesn’t solve your BSOD problem, you should turn to SFC.
How to fix system errors with SFC:
- Open Command Prompt as admin
- Type
sfc /scannowand press Enter
- Wait until the tool does its job
- Exit CMD and reboot your PC
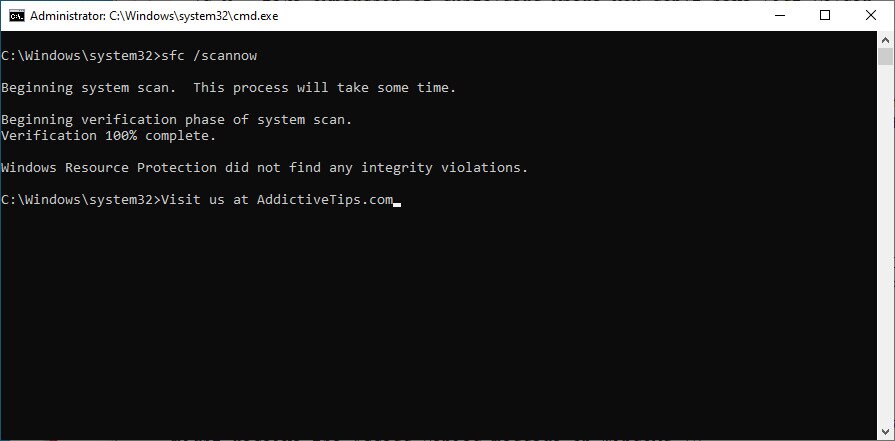
CHKDSK should fix common issues with the system files. But if stop code Kernel mode heap corruption is persistent after using this tool, proceed with DISM.
How to fix component store errors with DISM:
- Launch CMD with elevation rights
- Run
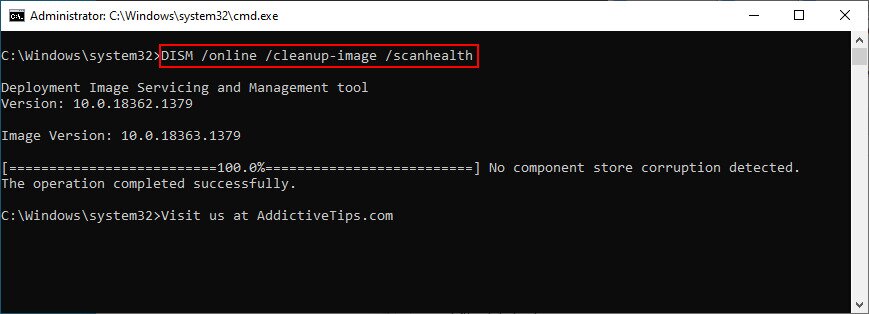
DISM /online /cleanup-image /scanhealthand wait until the scan is complete
- If it reports any issues, fix them by running
DISM /online /cleanup-image /restorehealth - Restart your computer and relaunch CMD as admin
- Run SFC and restart your PC one last time
11. Disable overclocking
Overclocking tools are used by gamers to get more juice out of their hardware, in order to improve their gaming performance. However, if it’s not done properly and if a cooling system isn’t supplied, your computer will start displaying blue screen errors to protect itself from overheating.
To fix this problem, you can either amp up your cooler, double-check overclocking settings, or turn off overclocking altogether. The last option is the surest one.
If you have a third-party overclocking tool installed, make sure to turn it off and reset the clock parameters to normal. Otherwise, you can disable overclocking in BIOS.
12. Restore BIOS to default
Since we’re on the topic of BIOS, it’s a good idea to reset its options to default if you or someone else with access to your computer has tampered with BIOS settings.
If you don’t have advanced skills to know exactly what you’re doing there, you could end up causing BSOD errors such as Kernel mode heap corruption. Here’s how to reset BIOS to default:
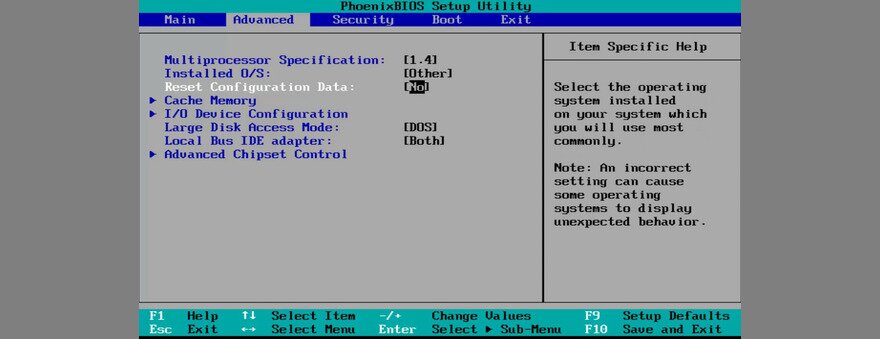
- Reboot your PC and, before Windows starts, quickly press the key or key combination displayed on the screen to enter your computer’s BIOS mode
- Locate the advanced settings
- Enable the option that resets configuration data

- Save the current BIOS settings and exit
- Wait until Windows boots and check for BSOD errors
13. Update BIOS
It may not seem like it, but BIOS is a very important part of your operating system. And, just like Windows, it needs to be updated every now and then to avoid compatibility and stability issues. Here’s what you need to do:
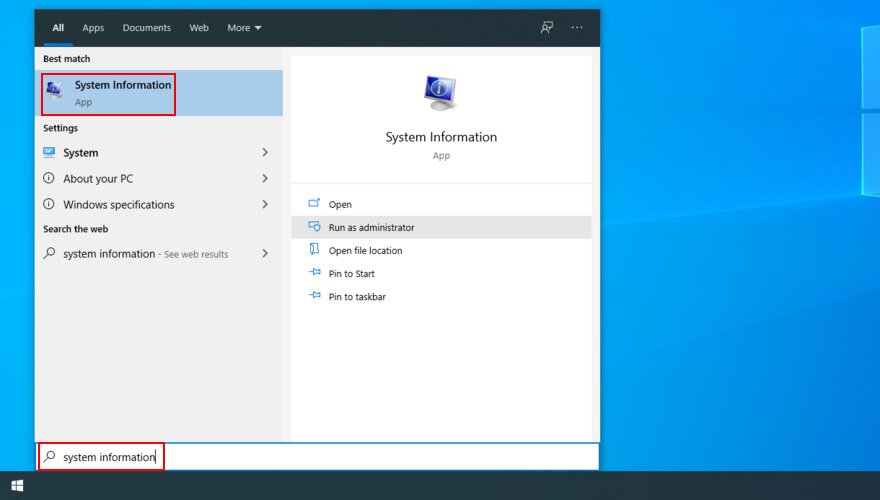
- Press the Windows key, type system information, and press Enter to open this app

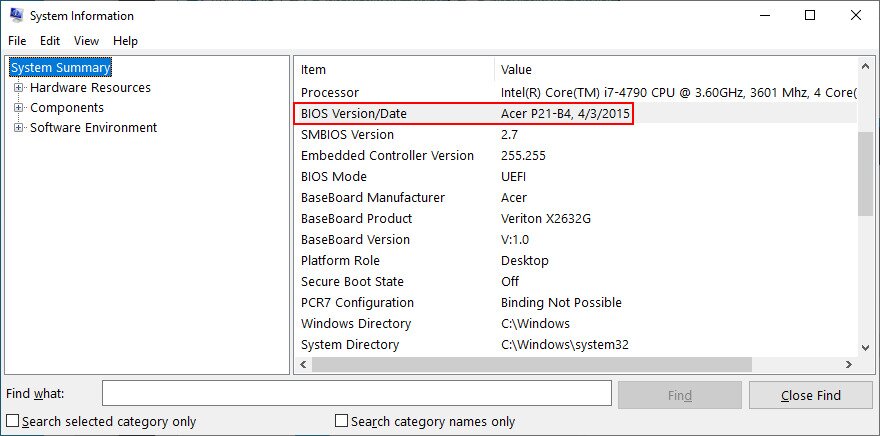
- Go to System Summary and write down the BIOS Version/Date

- Open a web browser and go to the website of your BIOS manufacturer
- Download a newer BIOS version and copy the file to a USB flash drive
- Reboot your computer and enter BIOS mode
- Create a backup of the current BIOS version and copy it to the USB flash drive for safekeeping
- Start the BIOS update and follow the given instructions
- Be careful to not switch off your computer during the update
- Boot Windows and check for BSOD errors
14. Remove peripheral devices
If you have recently purchased or received a new piece of hardware, like a Wi-Fi adapter, a webcam, or a pen drive, it might cause system functionality issues when you connect it to your computer.
For example, the autoplay feature of USB flash drives can be easily infected with malware. To put this theory to the test, shut down your computer and remove all peripheral devices, except your keyboard and mouse.
In the following step, turn your PC back on to confirm that you’re no longer getting blue screen errors. Carefully reconnect one device at a time until you spot the one that causes functionality problems.
15. Reattach the GPU card
Since you’re already checking your hardware components, it might be a good idea to take your computer apart if you’re skilled enough for this task. Remove and reseat all components while paying special attention to the GPU card.
Some users report that they received stop code Kernel mode heap corruption after inserting the GPU card in the wrong slot. But the issue was quickly resolved after making the correction.
16. Check your PC for malware
Cyber-criminal attacks can be devastating for unsuspecting and unprotected computers. Certain malware agents are powerful enough to disarm the antivirus system and take over critical processes and services.
If you were recently infected with malware, it could be the reason why stop code Kernel mode heap corruption is so persistent.
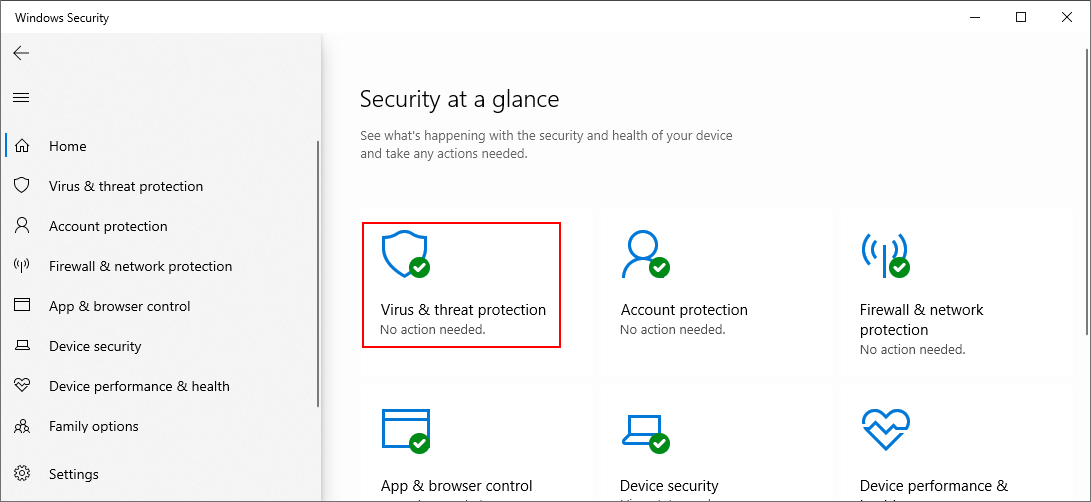
How to run a malware scan with Windows Defender:
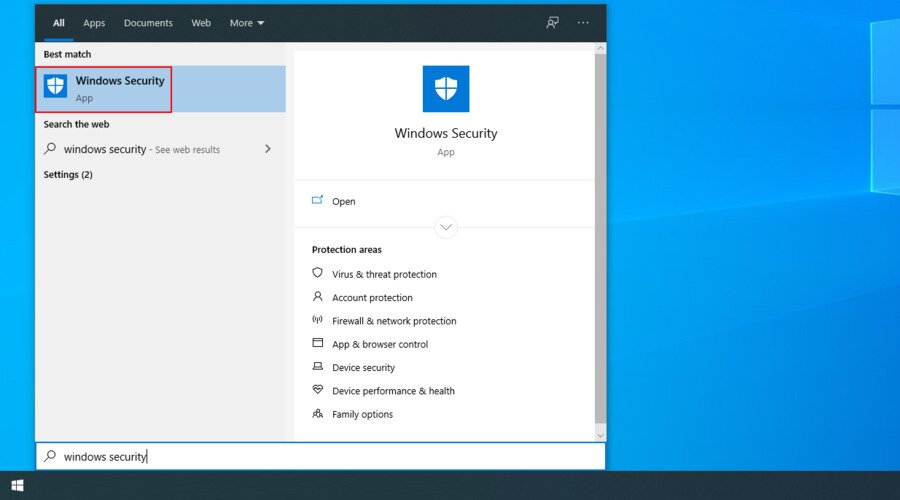
- Press the Windows key, type Windows Security, and launch this app

- Select Virus & threat protection
![Windows 10 shows how to select Virus and Threat Protection]()
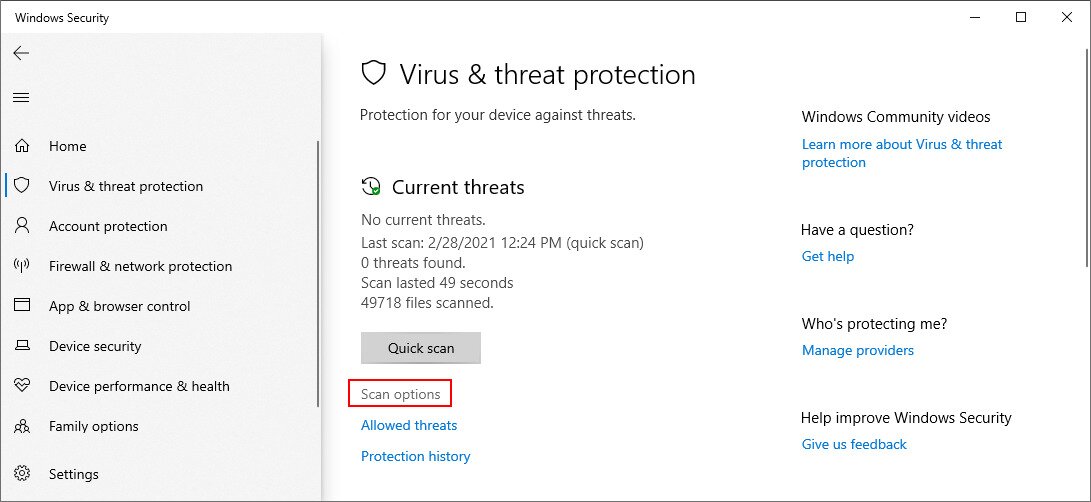
- Click Scan options

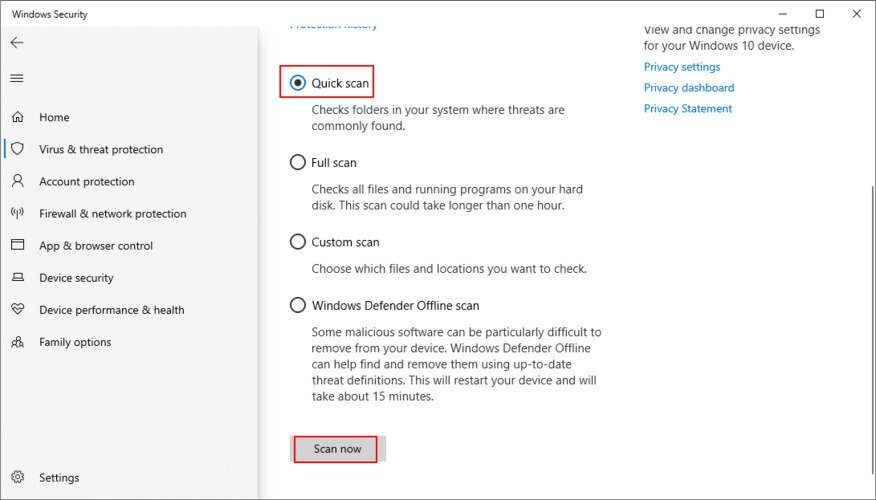
- Select Quick scan and click Scan now

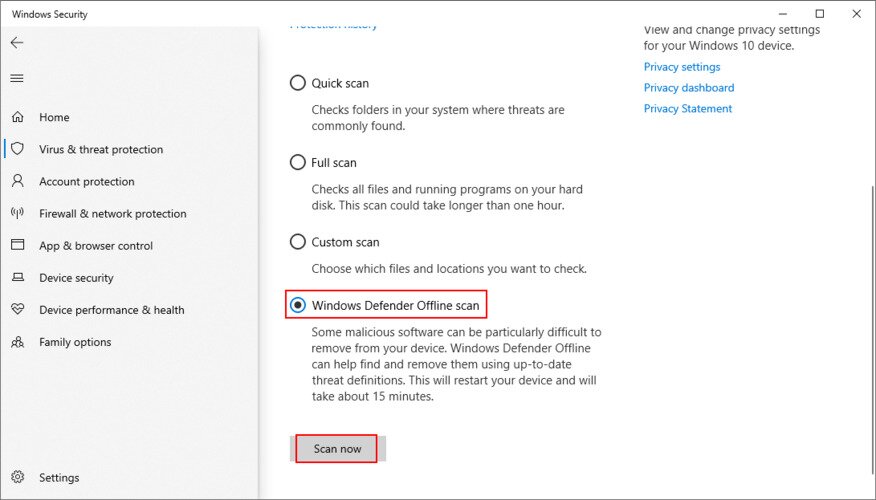
- If nothing shows up in the results, run Windows Defender Offline scan mode

- Restart your PC and check for BSOD errors
If you have another Internet security installed that takes over the role of Windows Defender, use that application instead to check your PC for malware.
17. Check your free disk space
Your operating system needs a constant amount of free disk space. Otherwise, it will not able able to execute its processes properly. In time, this can trigger Blue Screen of Death messages such as Kernel mode heap corruption.
You can easily resolve this matter by allocating more disk space to your Windows partition. To do this, you can turn to a third-party partition manager or use Disk Management, the built-in Windows utility.
How to use Disk Management:
- Press Win key + R, type diskmgmt.msc, and press Enter
- Pick a big partition that doesn’t contain Windows, right-click it, and select Shrink Volume

- Set the new volume size and click Shrink

- Right-click the Windows partition and select Extend Volume
- Specify the new partition size
- Complete the task and reboot your PC
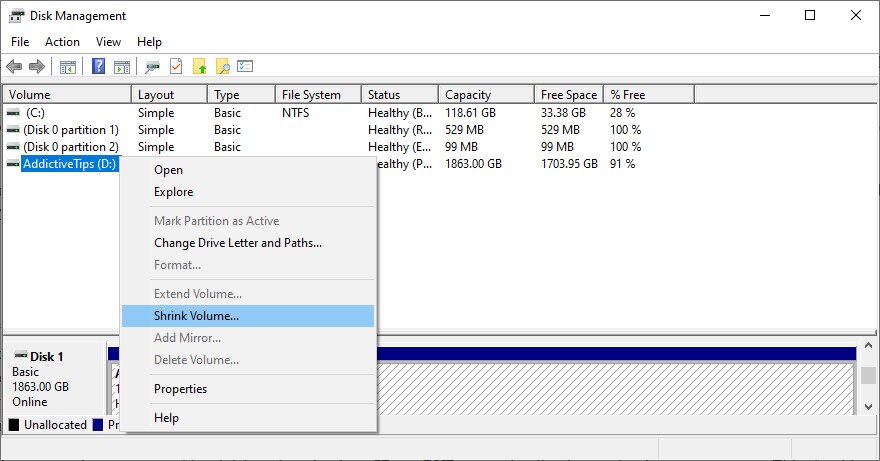
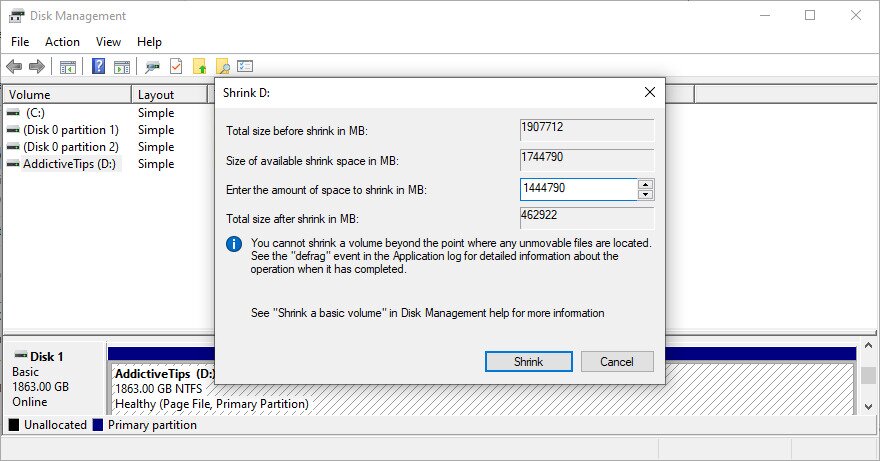
If you can’t afford to redistribute your free disk space, you can either attach an external hard disk or remove existing files from your computer. Think about any non-essential large data that occupies your disk space.
For example, treasured photos and family videos can be copied to an external hard disk or uploaded to a cloud account for safekeeping. You can also uninstall large applications or games you don’t play anymore.
When it comes to junk files found in Windows and programs, you can turn to a system cleaner. Or, if you don’t want to install anything else on your PC, you can use the Disk Cleanup tool instead.
How to use Windows Disk Cleanup:
- Make sure to sign in to Windows 10 using the admin account
- Head over to the Downloads and Recycle Bin folders. Save or restore any files you might need later since these locations will be cleared
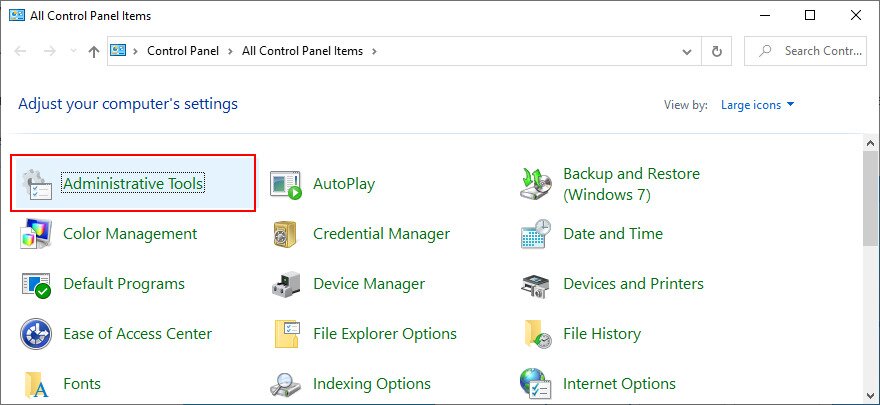
- Press Win key + R, type control panel, and hit Enter
- Select Administrative Tools

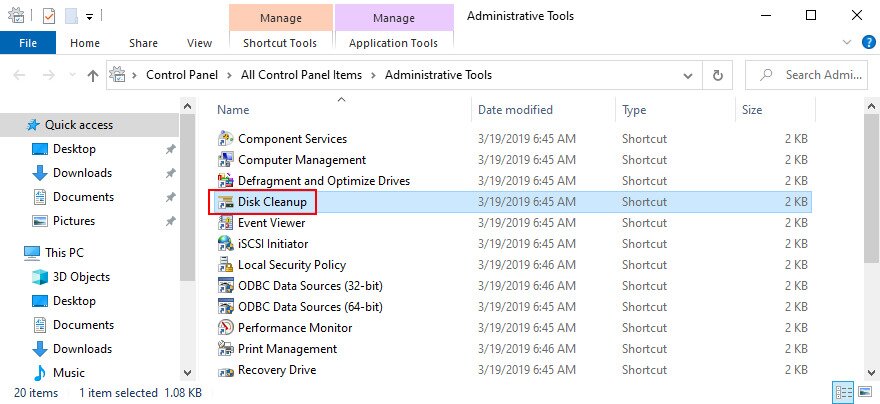
- Double-click to launch Disk Cleanup

- Select the Windows partition (usually C:) and click OK
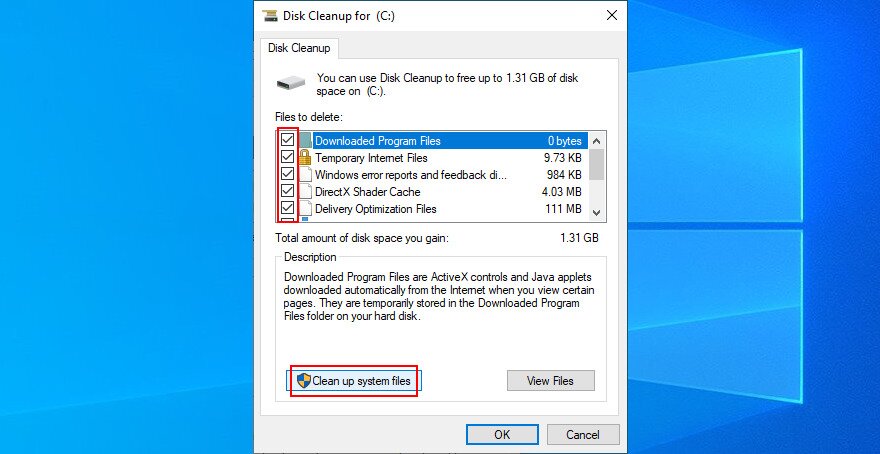
- At Files to delete, select everything and click Clean up system files

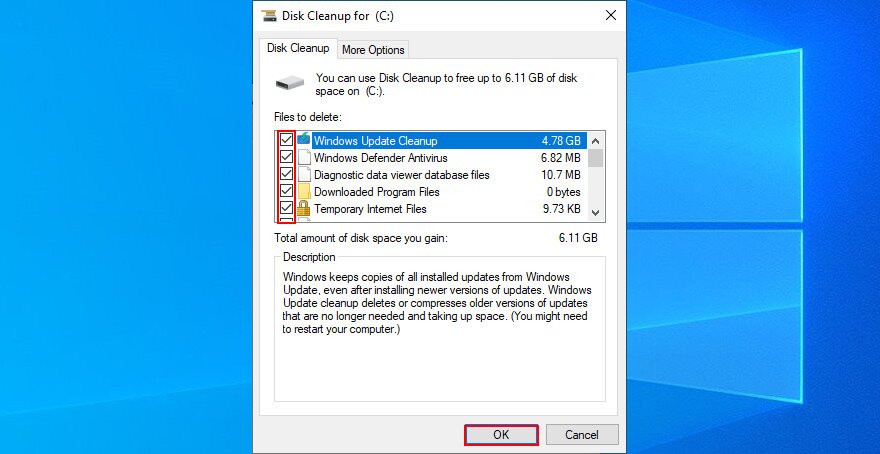
- Once the file search is over, include everything in the selection again and click OK

- The cleanup job might take a while. Don’t use your computer during this time
- When it’s over, restart your PC
18. Roll back Windows 10
If you haven’t managed to locate the root of stop code Kernel mode heap corruption until this point, it’s time to resort to Recovery mode. It will fix your computer in case it was affected by a software event that happened recently.
You should take some precautions, though, since Recovery mode will remove any programs that you installed after the restore point was created.
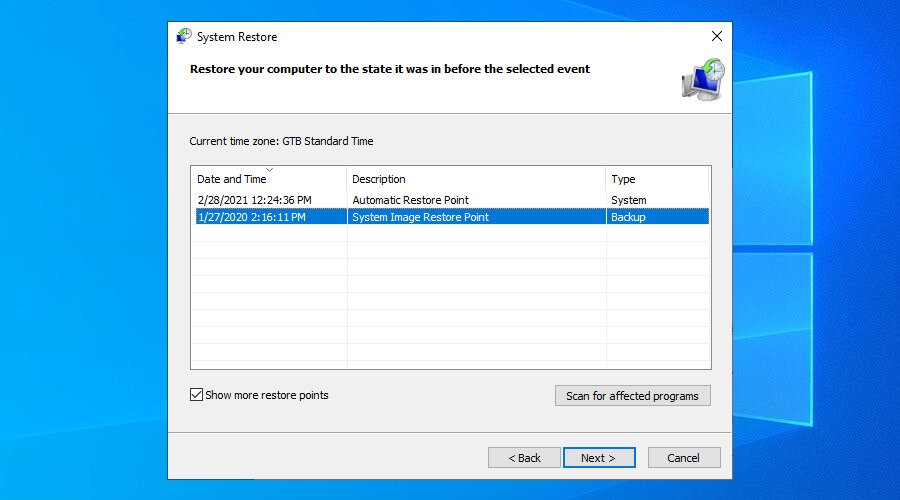
How to use System Restore:
- Log in to Windows 10 as the PC admin
- Press Win key + R, type control panel, and hit Enter
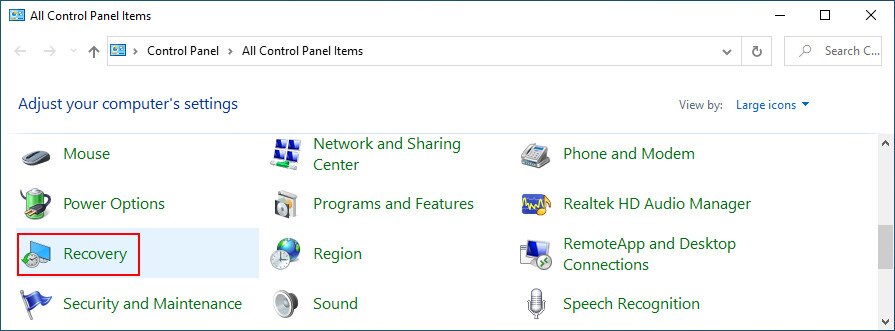
- Select Recovery

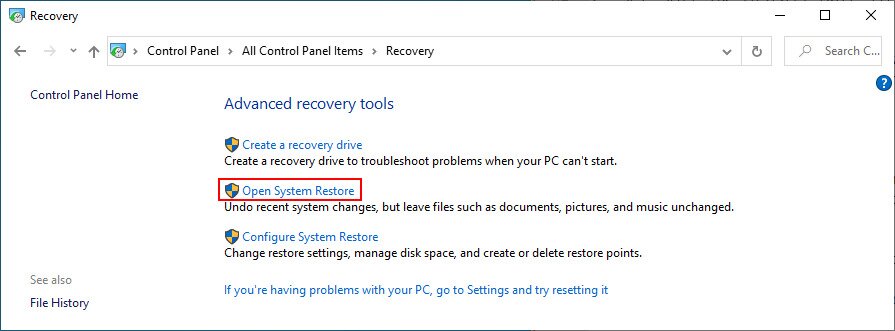
- Click Open System Restore

- Choose a restore point. You can click Scan for affected programs to see which applications will disappear after the restore

- If you’re not pleased with the displayed options, check Show more restore points
- Click Next and follow the instructions
- Restart your PC. If Recovery mode worked, check if you still get BSOD errors
19. Use BlueScreenView
Further investigation might be needed to find the corrupt files that caused stop code Kernel mode heap corruption. You can do this using a blue screen dump viewer like BlueScreenView.
It’s a small, practical, and free application that monitors your computer, captures all data about blue screen errors, and gives you the possibility to examine minidumps.
How to use BlueScreenView:
- Download BlueScreenView from the official website
- Fire up the tool and open the DMP file created by Kernel mode heap corruption
- Find out which driver files are connected to the stop code
- Open Device Manager to reinstall and update those drivers
20. Use Event Viewer
If you don’t want to install a third-party application like BlueScreenView, then we suggest using Event Viewer. It’s a reliable tool built into Windows that captures all logs and events, so you can use it to discover more about the Kernel mode heap corruption BSOD error.
How to use Event Viewer:
- Restart Windows right after you get the BSOD error
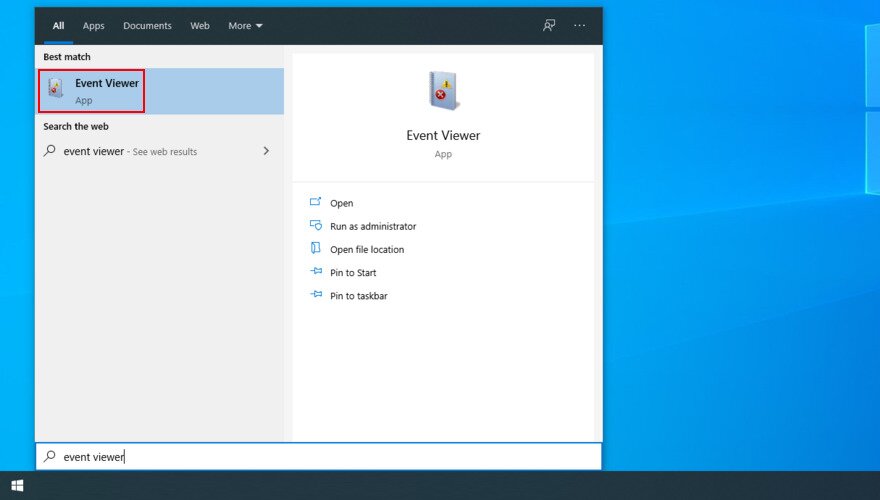
- Press the Windows key, type Event Viewer, and open this app

- Open the Windows Logs folder and go to System

- Select the first error in the list and check out its description
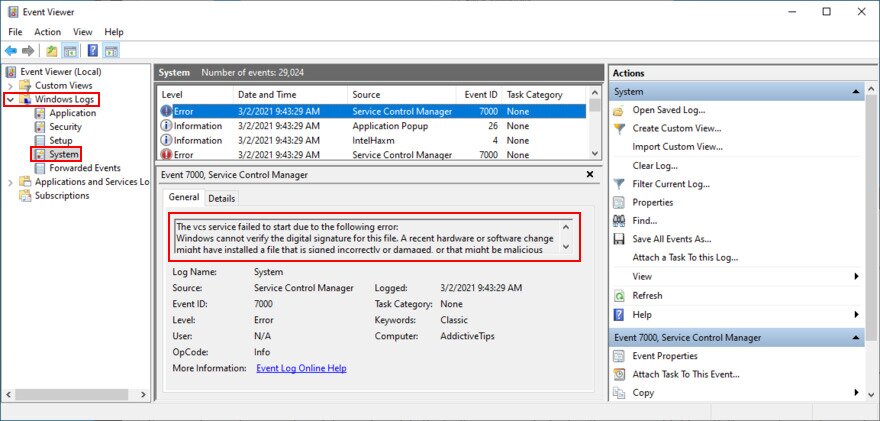
You can use details from the description to find an online solution. And, if you can’t find one, then you can report it to the Microsoft official forum and wait until you get an answer from an expert.
Conclusion
To sum up, Kernel mode heap corruption is an annoying Blue Screen of Death error that can be triggered by a software or hardware problem. However, you should be able to fix it without performing a factory reset on Windows 10.
For instance, you can start Windows 10 in safe mode, roll back or update your graphics driver, run Program Compatibility Troubleshooter, uninstall recent or suspicious apps, as well as disable startup programs.
It’s also a good idea to run Windows Update and uninstall the faulty updates, fix the system memory, repair corrupt hard disk and system files, disable overclocking, restore BIOS to default, and keep BIOS updated.
Moreover, you can remove peripheral devices, reattach your GPU card, check your PC for malware, inspect your free disk space, and use System Restore. More details can be obtained by using BlueScreenView or Event Viewer.
Did any of these solutions fix stop code Kernel mode heap corruption? Tell us about your experience with this dreadful BSOD error in the comment area below.
