Include Mouse Cursor In Your Mac Screenshots Using Grab Utility [Tip]
We review screenshot apps on and off for both Mac and Windows. As with most Mac apps, finding a feature rich free app that takes great screenshots is pretty hard, and there wasn’t a free app (as far as we found) that let you capture the mouse in your screenshots. On Windows, it is super easy to do so with the likes of Greenshot. For Mac, there is actually an built-in way to do this (provided you’re using OS X Lion). The Grab utility that comes pre-installed on your Mac not only has an option to capture the cursor, but also lets you choose what the cursor will look like. For those who haven’t given Grab a spin yet, it lets you capture the entire screen, an area of the screen, a window, and take a time delayed screenshot of the entire screen.
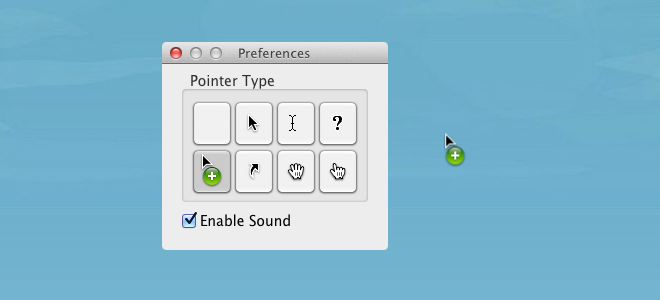
Launch Grab (you can find it in the Utilities folder in Applications) and open its preferences. You will see eight different buttons, each depicting one of the forms the cursor takes. Different arrow and hand variations can be picked, and the cursor will take that form whenever you use Grab to take a screenshot.

This method works when capturing the entire screen or a window, but not when you’re capturing a selected region. For those that don’t use Grab, you will need to use the app’s hotkeys to capture screenshots, as the default Mac ones will not work for this app. Under default settings, to capture a window, hit Command+W, to capture an area, hit Shift+Command+A, for the entire screen, Command+Z, and for a time delayed shot, hit Shift+Command+Z.

Frankly, I can’t even remember the hotkeys for the native Mac screen capture…
CMD + ALT + SHIFT + 3 and CMD + ALT + SHIFT + 4