Porn on Kodi: Best Adult Add-ons & Privacy Tips for 2026
This guide is intended for adults aged 18+ in jurisdictions where accessing adult content is legal.
Kodi can put a huge variety of content on your screen — including your smart TV — and that includes porn delivered through a wide range of adult add-ons. The platform’s flexibility makes accessing adult content straightforward, but it also raises real questions about privacy: who can see what you’re streaming, and how do you keep that information to yourself?
This guide covers the best porn add-ons for Kodi in 2026, how to install them on PC, Firestick, and Android TV, and how to stay private while you do it.

Why Use a VPN for Kodi Adult Addons
The best VPNs add a privacy layer between Kodi and the internet. Without one, your ISP can see exactly what you’re streaming — and many ISPs actively throttle streaming traffic, which means slower speeds and more buffering specifically when you’re watching video. That’s a problem worth solving before you start.
There’s also a less-discussed risk: adult browsing activity logged by ISPs can potentially be exposed in data breaches or compelled through legal subpoenas. A VPN encrypts your traffic so none of that is visible. It also replaces your IP address with an anonymous one, which stops trackers before they can identify you.
VPNs also unblock geo-restricted adult content that may not be available in your region — a common issue with international adult sites.
NordVPN—The Best VPN for a Private Kodi Experience

NordVPN doesn’t discriminate against certain types of traffic. If you want to watch porn on Kodi, it will encrypt your connection and keep your activity private — no throttling, no logging, no exposure.
NordVPN uses its own protocol, NordLynx, which is built on WireGuard. It delivers the best balance of speed and privacy currently available, which means you can stream without worrying about lag. Your ISP sees nothing but encrypted traffic, and NordVPN’s verified no-logs policy means your activity isn’t stored anywhere.
NordVPN operates a large server network across 100+ countries (current figures available on nordvpn.com), so you can spoof an IP in any country and access content that’s blocked in your region. One click connects you and relocates you digitally — it’s genuinely simple to use.
Read our full NordVPN review.
- Very fast speeds make this a strong choice for 4K streaming
- Different IP addresses aervers
- Torrenting/P2P explicitly allowed
- “Double” data protection
- 24/7 Live Chat.
- Some servers can have average d/l speeds
- Apps can sometime be slow to connect.
How to Install Kodi Adult Add-ons
Most of Kodi’s adult add-on content is packaged in third-party repositories. These zip files are hosted and These steps apply to Kodi 21 Omega and Kodi 20 Nexus. If you’re on an older version, the menu layout may differ slightly, but the core steps are the same.
Most adult add-on content is packaged in third-party repositories. These are zip files hosted by the Kodi community that make add-on discovery, installation, and updates easier. Each repository contains a different set of add-ons — you find one with content you want, install it, then pick your add-ons from there.
Here are the general steps:
- Allow installations from unknown sources to enable third-party add-ons (see below).
- Enter the repository URL provided by the add-on developer or community.
- Use the “Install from Zip File” option to add the repository to Kodi.
- Find the add-on inside the repository and install it.
- Open the add-on and adjust any settings if you wish.
- Allow any dependencies to install if prompted.
Before installing any adult add-on, you need to enable Unknown Sources in Kodi. On a PC or Mac, click the gear icon at the top of the home screen. On a TV or Firestick, navigate to the gear icon using your remote — it’s in the same position on the home screen.
- Open Kodi and click the gear icon to enter the System menu.
- Go to System Settings > Add-ons.
- Toggle the slider next to Unknown Sources.
- Accept the warning message that appears.
Note: Unofficial Kodi adult add-ons, such as the ones mentioned below, may include links to pirated streams or content. Addictive Tips does not condone or encourage any violation of copyright restrictions. Please consider the law, the rights of content creators, and the risks associated with piracy before accessing copyrighted material without permission.
Installing Kodi Adult Add-ons on Firestick and Android TV
If you’re running Kodi on an Amazon Firestick or Android TV device, there’s one extra step before you can install third-party add-ons. Android-based devices require you to enable Unknown Sources at the system level — separate from Kodi’s internal toggle.
The easiest way to sideload Kodi add-on repositories on Firestick is using the Downloader app, which is available free from the Amazon Appstore.
- On your Firestick, go to Settings > My Fire TV > Developer Options.
- Enable Apps from Unknown Sources (or “Install Unknown Apps” on newer Fire OS versions).
- Download and open the Downloader app from the Amazon Appstore.
- In Downloader, enter the repository URL for the add-on you want to install.
- Download the zip file, then open it to install the repository.
- Open Kodi, go to Add-ons > Install from Repository, and install your chosen add-on from there.
On Android TV (non-Firestick), the path to Unknown Sources is typically Settings > Security & Restrictions > Unknown Sources, though this varies by device manufacturer. Once enabled, you can use the same Downloader method or transfer the zip file via USB.
Navigation within Kodi on Firestick uses your remote’s directional pad. The gear icon is in the top-left of the home screen. Use the back button to navigate between menus.
Top Kodi Porn Addons in 2026
There’s no shortage of adult add-ons for Kodi, but finding ones that are currently working and well-maintained is the real challenge. Here’s a quick overview of the best options available right now:
- Cumination — aggregates hundreds of adult sites with advanced filtering and frequent updates.
- Ultimate Whitecream (UWC) — pulls content from dozens of free porn platforms including tubes, cam sites, and live streams.
- Area 69 X — a consistently recommended add-on with broad content coverage and straightforward navigation.
- XXX-O-DUS — well-organized by genre with support for Virtual Reality content.
- The Crew — a general-purpose add-on with a dedicated adult section built in.
- FapZone — focused on curated scenes with fast playback.
- Bellesa — a cleaner interface with a focus on ethically produced adult content.
Detailed installation guides for the most popular options are below.
Cumination
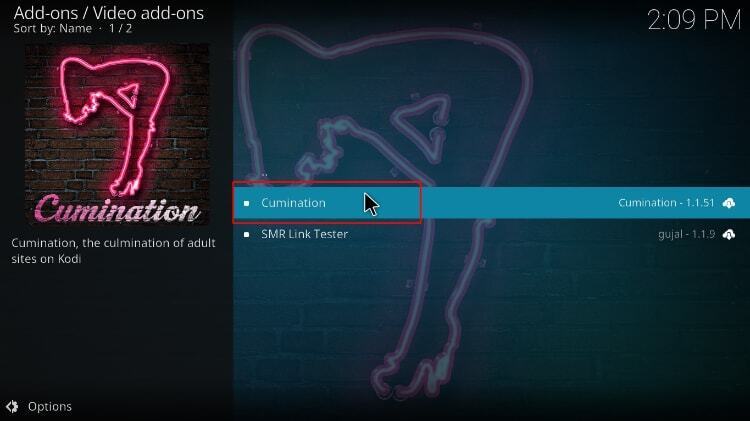
Cumination is one of the most comprehensive adult add-ons available for Kodi. It aggregates content from hundreds of free and premium websites and presents everything in a well-organized interface. During testing, the search function returned relevant results across all major categories, and streams loaded quickly on a standard broadband connection.
- Massive library spanning multiple niches and content types
- Advanced filtering and sorting options
- Frequently updated and actively maintained
- Supports browser-based streaming and external playback
How to install Cumination:
- Open Kodi and go to Settings > File Manager > Add Source.
- Click <None> and enter the Cumination repository URL. Check the official Cumination GitHub page for the current URL, as repository addresses change periodically.
- Name the source (e.g., “Cumination”) and click OK.
- Return to the main menu, go to Add-ons, and click the open box icon.
- Select Install from Zip File, choose the Cumination source, and install the repository zip.
- Once installed, go to Install from Repository > Cumination Repo > Video Add-ons > Cumination and click Install.
Repository URLs change frequently. If the link above doesn’t work, check the official Cumination community thread for the latest URL.
Ultimate Whitecream

Ultimate Whitecream (UWC) is a bare-bones add-on that fetches content from dozens of popular free porn providers — everything from tube sites to cam platforms to live streams — and organizes it in a clean, tree-style interface. During testing, streams from multiple sources loaded without buffering on a standard connection, and the ad-free experience is a genuine advantage over visiting these sites directly.
What’s on UWC?
UWC starts with a few broad categories: scenes, movies, tubes, and live webcams. Pick one, and you’re taken to a secondary screen showing available sources. Webcams, for example, include MyFreeCams, Cam4, and several others. Click a category and you’ll either see a list of videos or further subcategories to narrow down your content type. You get access to these streams without intrusive ads — a feature that, on its own, makes UWC worth checking out.
How to install UWC:
- Open a web browser and visit the current UWC repository page. Check http://team-crew.github.io — if this URL has moved, search for “UWC Kodi repo” in the Kodi community forums for the latest link.
- Download the file named
repository.thecrew-[version].zip. - Open Kodi and go to Add-ons > open box icon > Install from Zip File.
- Select the UWC repo zip you downloaded.
- Once installed, go back to the open box menu and choose Install from Repository.
- Select the repo, open Video Add-ons, choose Ultimate Whitecream, and click Install.
Repository URLs for community add-ons change frequently. If the link above doesn’t work, check the official UWC community thread for the current URL.s without intrusive ads, a feature that, on its own, makes the UWC adult add-on worth checking out.
Area 69 X
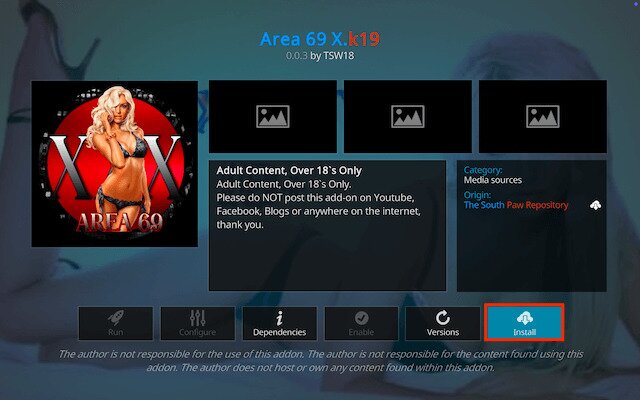
Area 69 X is one of the most consistently recommended adult add-ons in the Kodi community right now. It covers a broad range of content categories and is known for reliable stream sources and straightforward navigation. If you’re looking for a well-maintained alternative to UWC or Cumination, this is worth installing.
- Wide content library across multiple categories
- Clean, easy-to-navigate interface
- Regularly updated with new sources
- Works on PC, Firestick, and Android TV
How to install Area 69 X:
- In Kodi, go to Settings > File Manager > Add Source.
- Enter the Area 69 X repository URL. Check the add-on’s community thread or GitHub page for the current URL, as these change periodically.
- Name the source and click OK.
- Go to Add-ons > Install from Zip File, select your new source, and install the repository zip.
- Then go to Install from Repository > Area 69 X Repo > Video Add-ons > Area 69 X and click Install.
XXX-O-DUS
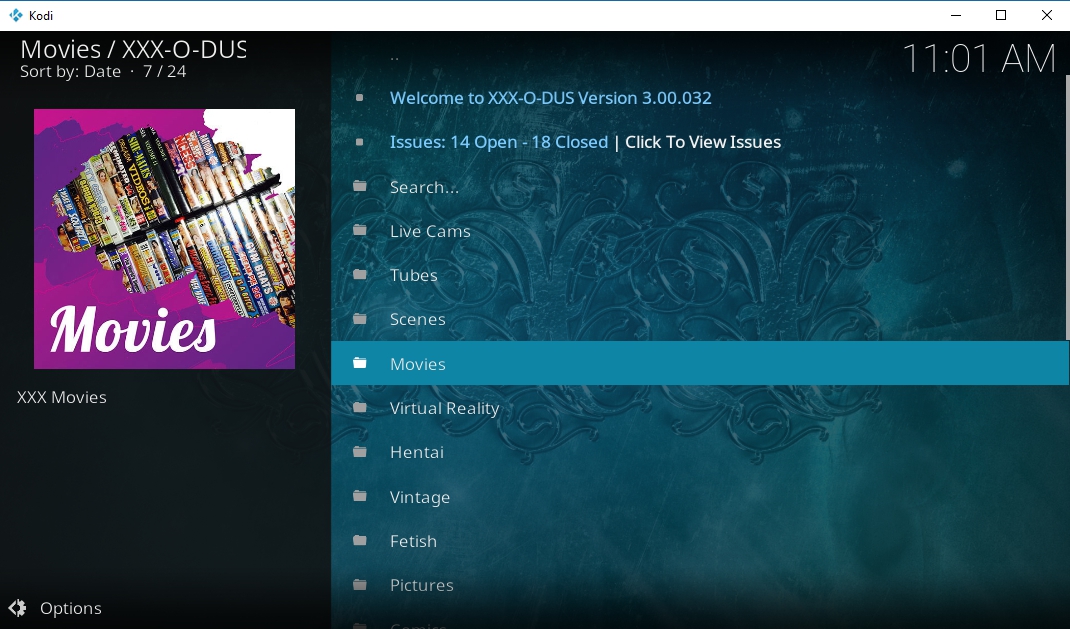
XXX-O-DUS is a well-structured streaming add-on designed for users who want organized adult video content inside their media center. It stands out because it categorizes content by genre and even includes support for Virtual Reality (VR) videos, making it easier to browse and watch different types of scenes.
What It Is
XXX-O-DUS is an adult-focused add-on commonly used with media platforms like Kodi. It pulls content from multiple sources and sorts it into clear categories such as popular scenes, studios, and VR sections. The interface is simple and designed to help users quickly find the type of content they want without complicated navigation.
How to Install
- Open Kodi and go to Settings (gear icon).
- Select File Manager → Add Source.
- Enter the repository URL that hosts the XXX-O-DUS add-on and give it a name.
- Return to the main menu and select Add-ons.
- Click Install from ZIP file and choose the repository you added.
- After installing the repository, select Install from Repository.
- Find XXX-O-DUS and click Install.
- Once installed, the add-on will appear in your Video Add-ons section.
The Crew
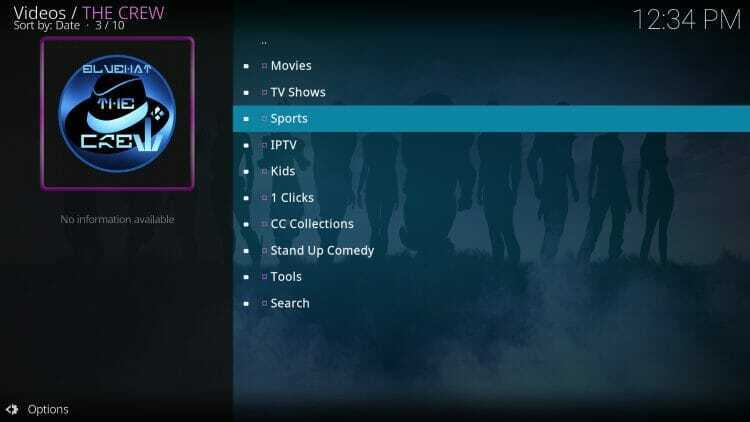
The Crew is one of the most popular all-in-one Kodi add-ons, offering a wide range of streaming categories including movies, TV shows, sports, and a built-in adult section. Its versatility and frequent updates have made it a go-to choice for many users
What It Is
The Crew is a multi-purpose streaming add-on that aggregates content from various online sources. While it primarily focuses on mainstream entertainment, it also includes a dedicated adult category for users who want that option within the same add-on. The interface is organized with clear menus, making navigation straightforward.
How to Install
- Launch Kodi and open Settings.
- Go to File Manager and choose Add Source.
- Enter The Crew repository URL and name the source.
- Return to Add-ons on the Kodi home screen.
- Select Install from ZIP file and choose the repository source you added.
- Install the repository file.
- Click Install from Repository → The Crew Repo.
- Select Video Add-ons → The Crew → Install.
FapZone
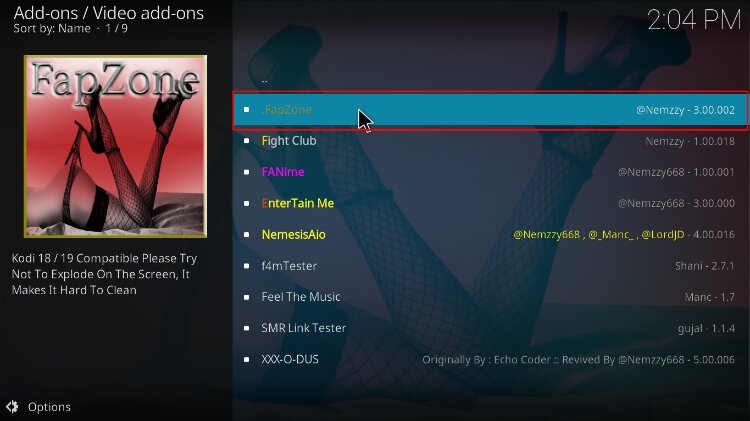
FapZone is an adult streaming add-on known for its curated library and fast playback. Instead of overwhelming users with too many categories, it focuses on delivering popular scenes and reliable streaming links.
What It Is
FapZone is a Kodi add-on dedicated to adult video content. It collects scenes from several well-known platforms and organizes them into simple sections such as trending videos, categories, and studios. Because it prioritizes fewer but more reliable sources, users often experience faster loading times and smoother playback.
How to Install
- Open Kodi and access Settings.
- Select File Manager → Add Source.
- Add the repository URL that hosts the FapZone add-on.
- Navigate back to the main menu and open Add-ons.
- Click Install from ZIP file and select the repository source.
- Install the repository package.
- Choose Install from Repository.
- Locate FapZone under Video Add-ons and click Install.
Bellesa
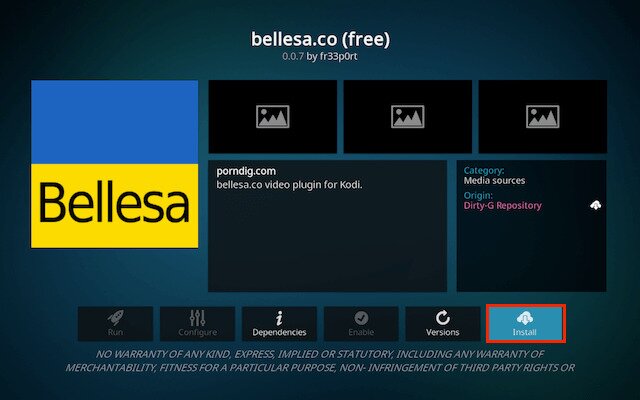
Bellesa is an adult content platform known for its clean interface and emphasis on ethically produced videos. The add-on version allows users to browse and stream content within their media center environment.
What It Is
The Bellesa add-on provides access to content from the Bellesa platform, which focuses on curated scenes with a more polished presentation and user-friendly browsing experience. It emphasizes professionally produced videos and organizes them into easy-to-navigate categories.
How to Install
- Start Kodi and open Settings.
- Go to File Manager and select Add Source.
- Enter the repository URL that includes the Bellesa add-on.
- Return to the Add-ons section from the home screen.
- Choose Install from ZIP file and select the repository you added.
- Install the repository package.
- Click Install from Repository and locate Bellesa.
- Select Install, and the add-on will appear in Video Add-ons once installation completes.
Are Adult Addons for Kodi Legal?
The online porn industry can be a shady place to visit, as are many of Kodi’s unofficial add-on repositories. Put the two together, and you’ve got the potential for something truly scary. Fortunately, this just isn’t the case. Most porn add-ons for Kodi are as functional and easy to use as the rest of the software’s extra content. And because they all access free porn sites, not pirated paid content, they aren’t violating any obvious copyright terms. Better still, you don’t have to put up with annoying or invasive advertisements, making Kodi and the right porn add-ons safer than you might think.
It’s important to note that the legality of the above adult add-ons may differ depending on your location. If you’re underage, or if it’s otherwise against the law to access pornographic content where you reside, stick to using Kodi for movies and TV shows, not adult content. These adult add-ons are not designed to help you break the law, nor does Addictive Tips condone actions in this regard.
Are Kodi Porn Add-ons Safe?
Kodi itself is safe to use. It doesn’t include any content whatsoever, and its code is entirely open-source. The add-ons you can install may bend those rules a little, however.
Some unofficial content is capable of pulling videos from a wide range of sources, including pirate sites. Rarely will you actually encounter viruses or anything malicious, but it’s always a good idea to take a few precautions, just in case.
The best thing you can do to stay safe on Kodi is to stick with reputable repositories at all times. Make sure an adult add-on has a good reputation, and always download from verified sources, not third-party distributors. Using official repositories and keeping Kodi updated significantly reduces your risk of catching something.
If you’re worried about privacy, assume that you could be logged by ISPs or content providers (unless you use a VPN). Keeping your VPN, virus scanner, and firewall active at all times is also a good idea.
Tip: We verify each add-on featured in our articles, as well, so if it’s listed above, everything was safe and accessible at the time of writing.
Conclusion
Kodi’s wild and untamed add-ons community has something for just about everyone, including adult content aficionados. These add-ons provide convenient gateways to official sites and free porn, all within Kodi’s familiar UI.
Just remember a few things as you get going: prioritizing trusted sources like those we listed above, keeping add-ons updated, and using a VPN helps keep your privacy in check as you explore the world of adult content.
Frequently Asked Questions
Is watching porn on Kodi legal?
In most countries, viewing adult content is legal for adults, but laws vary by location and the type of content that’s being watched.
Do Kodi porn add-ons host illegal content?
Most adult add-ons link to publicly available websites rather than hosting the content themselves.
Can my ISP see that I’m using Kodi porn add-ons?
ISPs can usually see anything that isn’t encrypted, which is why many people choose to use a VPN to watch porn.
Are Kodi porn add-ons free?
Most are free and link to free porn sites, but some may integrate premium services.
Don't miss this great deal
