How to Get the Microsoft Teams Machine Wide Installer
Microsoft Teams can be used for free, and by individuals in their own personal capacity. It is, however, most often used by organizations. An organization will normally purchase Microsoft Teams Exploratory licenses for employees and assign them via company email addresses. Organizations handle the entire process, so end users don’t install Microsoft Teams themselves.
Microsoft Teams Machine Wide Installer
Installing Microsoft Teams isn’t hard, regardless if you install it on Windows or if you install it on macOS. That said, organizations that provide computers or laptops to their employees will equip it with everything they need to work, and this includes apps like Microsoft Teams.
To that end, you can use a machine wide installer for Microsoft Teams.
Microsoft Teams: Machine Wide Installer vs Normal Installer
Businesses use Teams this way to reduce manual installation. Here are some facts about the Microsoft Teams machine-wide installer:
- The machine-wide installer installs the same version as the normal installer, with all the same features.
- System admins use it to automate the installation.
- The machine-wide installer automatically installs Microsoft Teams for each new user configured on a system.
- It installs Teams in each user’s personal folder.
- Admins can manage the settings for Microsoft Teams installed through the machine-wide installer by using Group Policy on Windows.
- They can also update settings for all users by running scripts on the target machine.
Use Microsoft Teams machine wide installer
You can run the Microsoft Teams machine-wide installer on any system where you have admin access. However, you should only install it on a system configured to run with Active Directory. If you install it elsewhere, you don’t gain any benefit and you may create problems later—for example, Teams may keep reinstalling itself after you remove it.
Note: Microsoft no longer supports the classic Team client, and it will stop working after June 30, 2025. These directions are for the new Microsoft Teams.
Follow these steps to install Teams on a computer with multiple users:
- Log in to the system you want to install Microsoft Teams on. You can log in remotely, but you must use an admin account.
- Download the Microsoft Teams machine wide installer from Microsoft.
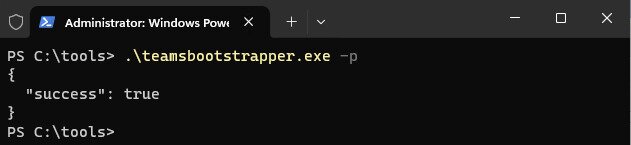
- Open PowerShell in the folder where you stored the download. Run the file named teamsbootstrapper.exe.
- Enter this command: .\teamsbootstrapper.exe -p. You should see a success message to indicate that the command completed without errors.
You can also install Teams with the offline installer. The process works almost the same as above, but you’ll need to download the MSIX and run a slightly different command. If you choose this method (use Microsoft’s link above for the MSIX file), make sure you download the correct file. Use the x86 file for 32-bit machines and the x64 file for 64-bit computers.
You can also deploy Teams across a group of computers. Follow these general steps:
- Download the EXE file installer from Microsoft.
- Use Intune, Microsoft Endpoint Configuration Manager, or Group Policy to distribute the installer to the computers.
- Launch the installer on each computer to install Teams.
How to Prevent/Disable Automatic Start
Now that you know how to install Teams, how do you keep it from automatically launching every time you start your computer? If you use this program often, it’s likely no problem. However, many users find the automatic start distracting and feel that it makes their boot times sluggish. It can also take up RAM and CPU functions that you might need for more important things.
The following couple of sections will cover how to deal with this annoyance, step by step.
Using Group Policy to Prevent Automatic Start
For IT administrators looking to manage automatic start across multiple devices, using Group Policy settings is a great way to centralize this preference, especially in enterprise environments.
However, it is important to note that setting Group Policy after you’ve already deployed Teams can lead to some issues, so try to avoid that if possible. The reason being that Teams can sometimes use a per-user configuration when a user initially logs in. This means that these initial settings may stay in place even after you deploy Group Policy changes. This could mean that Teams might prioritize the initial settings instead of your new changes.
Managing this can be a pain, so avoid it if possible. If you know in advance, you won’t need to modify startup settings after installation. Now let’s move on to the instructions for using Group Policy to prevent Teams from starting automatically. Here’s how:
- Open the Group Policy Editor (gpedit.msc)
- Go to Computer Configuration
- Go to Administrative Templates
- Go to Microsoft Teams
- Find the following policy, “Prevent Microsoft Teams from starting automatically after installation”
- Enable this policy, then exit
Can You Use Installer Parameters to Disable Auto Start?
A previous option was for IT administrators to prevent Teams from automatically starting by using specific installer parameters, such as through command-line options. However, it is important to be aware that with the discontinuation of the classic Teams client, this comes with some challenges. The old MSI installer is no longer supported, so the previous commands no longer work.
Your best bet to put parameters and configurations in place is still going to be Group Policy. It’s infinitely easier to manage. However, there is the option to use Powershell to create registry keys and values, if desired. Disabling auto start this way may be a little tricky, but here is a link to various Microsoft Teams Cmdlets through Powershell that you may find helpful. Meanwhile, the new method seems to be primarily through Group Policy or Registry Keys, rather than command-line prompts.
If you want a more granular solution, you can disable auto-start for newer versions of Microsoft Teams through the registry. Before you proceed, note that Microsoft has not published an official guide for this method.
The following information was obtained through various tech forums, which were then personally tested for accuracy. Because of this, be aware of possible bugs, errors, and even risks that may occur due to using the registry key in this manner.
The path for the registry key is as follows:
HKEY_CURRENT_USER\Software\Classes\Local Settings\Software\Microsoft\Windows\CurrentVersion\AppModel\SystemAppData\MSTeams_8wekyb3d8bbwe\TeamsTfwStartupTask
There are two “DWORD” values that should exist in the key:
State
UserEnabledStartupOnce
Set both values to “1” to stop Microsoft Teams from starting automatically. Confirm the change by checking Startup apps in the Windows Task Manager, where the status should show “Disabled.” If you set the “State” value to “2,” you enable Teams to start automatically.
- New-Item Property
- Update/add a new registry key value with Powershell
- Create a new folder on registry with Group Policy
It is highly recommended that you back up your registry prior to making any changes and test thoroughly before distributing such modifications, especially on larger scales.
Propagate Configuration Settings with Intune
It can be helpful for IT administrators to use Microsoft Intune, which is a cloud-based endpoint management solution. This enables them to manage compliance across multiple devices, such as in an enterprise environment.
Intune allows Microsoft teams to be configured, added, and assigned to workers and end users. It permits administration to:
- Support conditional access
- Instigate single-sign on for the organization/company
- Add Teams to Intune as a store app or built-in app (for iOS and Android)
- Create/assign configuration settings
- Mobile device management options
- Manage compliance settings across multiple devices
- Propagate configuration settings
Setting up Intune is a bit complicated, so here is a full set up guide for Intune. Otherwise, here is a streamlined guide to getting Intune:
- Make sure you meet the prerequisites and system requirements
- Sign up for or sign in to your Microsoft Intune account, remembering that you can’t combine an existing work or school account after signing up, so make sure your company doesn’t already have one
- Configure a custom domain name for your Intune tenant
- Add users from your organization to your account as applicable
- Add groups as applicable
- Manage Intune licenses
- Grant administrative permissions and manage roles
- Set the MDM authority so you can start mobile device management
- Customize the company portal
How to Deploy Microsoft Teams in VDI Environments
Virtualized desktop infrastructure (VDI) environments may necessitate their own specialized installations as well as specific hardware requirements. Virtualized settings are increasingly commonplace, so it’s important that IT administrators make sure end-user devices as well as the company’s IT systems are compatible and optimized for using Teams in virtual settings.
The system you use may require prerequisites before you can run the new version of Teams. Microsoft has several detailed instructions on how to deploy Teams in a virtual setting. This includes aspects such as compatible Windows versions, antivirus permissions, virtualization provider requirements, the list goes on. Their official guide should cover most VDI installation instructions.
Some particular system requirements to be aware of include:
- You need version 23306.3314.2555.9628 or higher to successfully install Teams
- Windows requirements include Windows 10.0.19041 or higher (except for Windows 10 LTSC for Teams desktop app)
– Windows Server 2019 (10.0.17763)
– Windows Server 2022 (20348.2402) or higher
– -Windows Server 2025 (26100.2886) or higher
– Windows Server 2016 is NOT supported
– WebView2 framework required in Windows Server and Windows 10/11 Multi-User environments
- Webview2 must be the most up to date version
- You need to add the new version of Teams to the antivirus and DLP applications
- Compatible with Azure Virtual Desktops, Citrix, VMware, and Windows 365
- You have to use the most up to date version of bootstrapper.exe to deploy the Teams client
Our Final Thoughts
The machine wide installer makes it easier to install Microsoft Teams for multiple users without a system admin intervening with each one. It is not an update tool. Microsoft Teams will update automatically as it does. The installer installs the same version that you can download from the main Microsoft Teams downloads page.
Frequently Asked Questions
What is the Microsoft Teams machine-wide installer?
The machine-wide installer installs Microsoft Teams on multiple profiles on a single computer. It ensures that Teams automatically installs for any user who logs in. Enterprises use it because it works best in large environments.
How does the Microsoft Teams machine-wide installer work?
After deployment, the installer adds a copy of Teams to the Program Files folder and schedules the app to install for new users when they log in for the first time. Each user then gets their own installation of Teams in their profile directory.
How the Microsoft Teams Machine-Wide Installer Is Set Up
Microsoft 365 Apps usually installs Teams automatically, but you can also install it manually by downloading the installer. IT administrators deploy it with tools like Microsoft Endpoint Configuration Manager or Group Policy.
How can I remove the Microsoft Teams machine-wide installer?
You can delete Teams through the Control Panel, just like any other software. For bulk removal, use PowerShell commands—they work best. If you uninstall Microsoft Teams from one profile, the machine-wide installer still remains.
What are the system requirements for the Teams machine-wide installer?
It supports Windows 10 and later versions. Each user requires a valid Microsoft Teams license.

Thank you! I have seen the machine-wide installer on many computers but didn’t understand what it was for or how it worked. It makes a lot more sense now 😀👍👍