A Guide To Channels In Photoshop
Channels are grayscale images that store different type of information including color information channels, alpha channels and sport color channels. A basic RGB image is basically a set of channels; red, green and blue. Where as CMYK images include cyan, magenta, yellow and black channels. Channels serves a couple of specific purposes. RGB/CYMK color channels give you indications on separate color channels contained within the image. Alpha channels are more widely used to either create, edit or save specific types of selections which can be applied as layer masks later on. In this guide we will review Photoshop color channels, modifying them and a complete look at channels panel.
This article is part of complete guide series, which also includes, complete guide to Photoshop Preferences, guide to Layers and guide to Type in Photoshop.

Channels
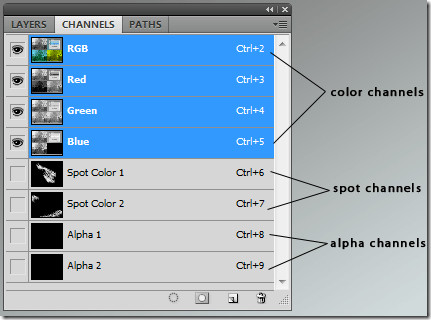
Color information channels are automatically created as soon as you open a new image. The image’s color mode determines the number of color channels created. Alpha channels store selections as grayscale images. Alpha channels can be used to create and store masks, which will let you manipulate or protect certain parts of an image. Spot color channels specify additional information pates for printing with spot color inks. A single image can contain up to 56 channels. Keeping in mind, all new channels have the same number of pixels and dimensions as the original image. The file size depends on the pixel information in the channel. Certain file formats, including TIFF and Photoshop formats, compress channel information and can save a lot of space.
Color channels are preserved, as long as you save a file in a format supporting the image’s color mode. Alpha channels are saved when you save a file in Photoshop, PDF, TIFF, PSD or raw formats. Saving in any other format which may cause channel information to be discarded.
Channels Panel

Spot channels are merged with color channels, splitting the spot color into its color channel components. Spot colors are special premixed inks used to process CMYK color inks. Each spot color requires its own plate on the process. Spot channels are required if you are planning to print an image with spot colors. They can be exported by saving document in DCS 2.0 or PDF format. Color and opacity for spot channels can be adjusted by double clicking on them, once created.
Masks are stored in alpha channels to save a selection more permanently. Alpha channel stores the selection as an editable grayscale mask in the channels panel. Once stored, you can reload the selection or even load it into another image at any time. Channels panel can be used to view any combination of channels in the document window. For instant, you can view an alpha and composite channel together to see how the changes affect and relate to the entire image. To show or hide a channel, click the eye column next to the channel. (composite, spot, or alpha).
As mentioned before, individual channels are displayed in grayscale. Individual channels in color can be viewed in RGB, CMYK or lab images. If more than one channel is active in the channels panel, the channels always appear in color. Default color can be changed by navigating to Edit > Preferences > Photoshop.

Created Alpha or Spot channels can be moved above the default composite channels only if the image is in Multichannel mode. To do so navigate to Image > Mode > Multichannel. Drag channel up or down in the channels panel to change the order of alpha or spot channels. Remember, Spot colors are overprinted in the order of their appearance from top to bottom in the panel. And to rename, double click the channel’s name in the Channels panel and enter a new name.

You can split channels of flattened images only. It becomes useful when you want to retain individual channel information in a file format that doesn’t preserve channels. To split channels, choose Split Channels from the Channels panel menu. The original image file is closed automatically and the individual channel appears in a separate grayscale image window. You can save and edit the new images separately.
Multiple grayscale images can be merged as the channels of a single image. The images required to be merged must be flattened, open, in grayscale mode and with same pixel dimensions. Choose Merge Channels from the Channels panel menu to merge channels.
It becomes time consuming and difficult to separate images from the background because of pixel details involved within a document. Channels can help users mask out complex objects within a document with clean and sharp edges. Duplicating layers, switching to channels palette, adjusting the levels, fine tune the mask and toggle between different channel views will help you achieve that goal.

it is really good and useful… thanks.. can i have your any SN ids?
Very useful. Thank you.