How To Resize, Group & Manage App Tiles In Windows 8 Start Screen
As most of us already know, Microsoft have ditched the Start button in Windows 8, replacing it with a Start Screen that uses Metro UI, with large tiles for launching apps. Many of these tiles can be customized in certain ways, to personalize your start screen to your taste. You can choose between tile sizes, static or live tiles, and organize the tiles into groups. You can also remove tiles from the Start screen, and add them back later. Read on for details on how to do all this to make your Start screen truly yours.
Today, with the release of Microsoft Windows 8 Consumer Preview, we are bringing you extensive coverage of all the new features in Microsoft’s latest operating system. This post is a part of our Windows 8 Week. To learn more, check out our complete coverage of Windows 8 Consumer Preview.
Types of Tiles
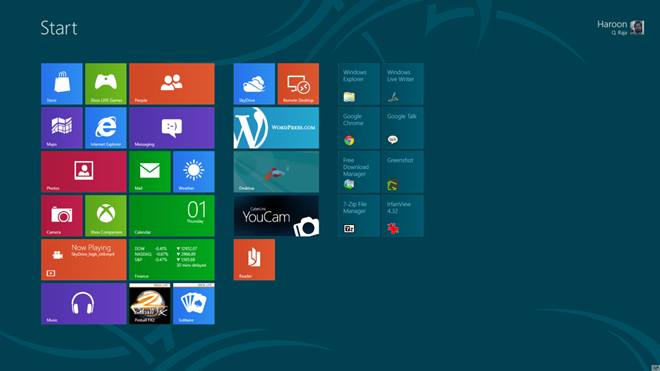
When you go to the Start screen. you see tiles for all your installed apps organized in a default manner. Whenever you install new apps, their tiles get added to this screen. These tiles can be broadly categorized into two categories: Metro apps and non-Metro (standard Windows) apps. The difference between tiles for Metro and non-Metro apps can be spotted at first glance – the Metro apps have custom-designed tiles while the tiles for non-Metro apps are basically squares with the app names and icons. In the following screenshot, you can see the difference between the tiles for Metro apps (the well-designed, colorful tiles in the left and center groups) and non-Metro apps (the eight tiles in the group on the right). Click the screenshot to see the large view.
The Metro tiles are the real deal of the new Start screen. Many (but not all) of these tiles can be presented as large, rectangular tiles or small, square tiles. Many of the Metro tiles can also have a live or static mode. In Live mode, they present not the tile icon but rather live information relevant to the app that gets updated or changed periodically, the same way that Windows Phone Live tiles do.
Selecting Tiles
To customize any of the tiles, you have to right-click them to select them first. Upon right-click, the tile gets selected, and a bar pops up on the bottom of the screen, showing you all the available options for the tile. Note that these options are different for different types of tiles. You may even continue right-clicking on multiple tiles to select more than one tiles at a time, and the options will update to contain only the operations that can be performed on all the selected tiles together. To deselect any file, simply right-click on it again.
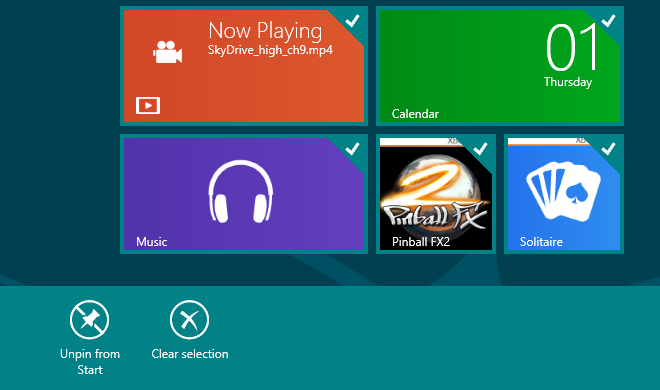
Available Actions
Upon selecting tiles, several actions become available, depending on the app. For Metro apps, these are usually limited to unpinning, uninstalling, choosing smaller/larger size and selecting live tile on/off.
.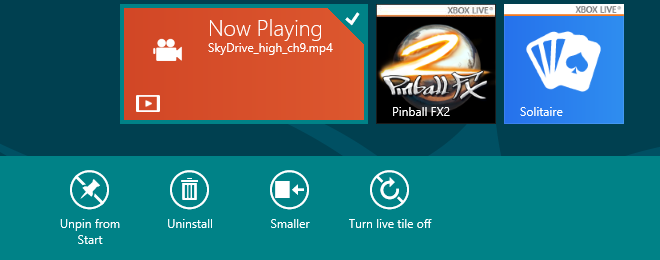
Note that some Metro apps might not have all these options available. For instance, some Metro apps don’t have a ‘Smaller’ or ‘Larger’ option while some might not have live tile capabilities.
When it comes to non-Metro apps however, all the options are pretty much the same. In addition to unpinning and uninstallation, you also get other options for pinning the app to taskbar, opening a new window, running the app as administrator and opening its file location.
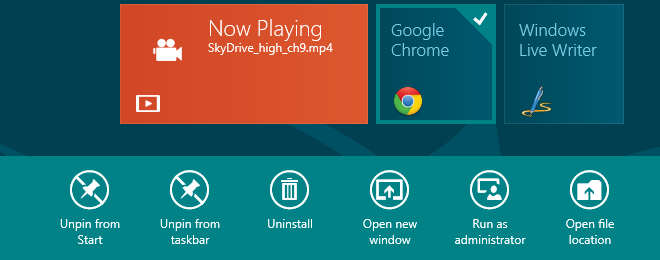
Unpinning (Removing) Tiles
Selecting any tile will give you ‘Unpin from Start’ as the first option. Just click on it and the tile will be gone from the Start screen. This will *NOT* uninstall the program, and the tile can be very easily added back, so feel free to remove tiles for any apps you don’t want showing up on the Start screen.
Pinning (Adding) Tiles
Right-click anywhere on the background of the Start screen (not on any tile) and you will see an ‘All apps’ button appear at the bottom. Click it to get a list of all your installed apps. Once there, right-click on any app and you will see the option ‘Pin to Start’ pop up at the bottom.
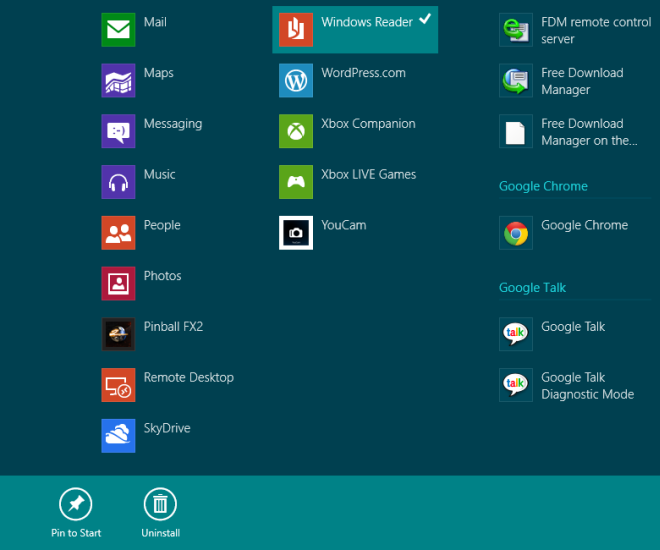
If you know the name of the app that you want to pin, you can also directly start typing that name while on the Start screen, and you will see the matches appear. Right-clicking on the desired app from those results will also give you the same option.
Note that if the app is already pinned on the Start screen, you will see the ‘Unpin from Start’ option instead in these views as well.
Resizing Tiles
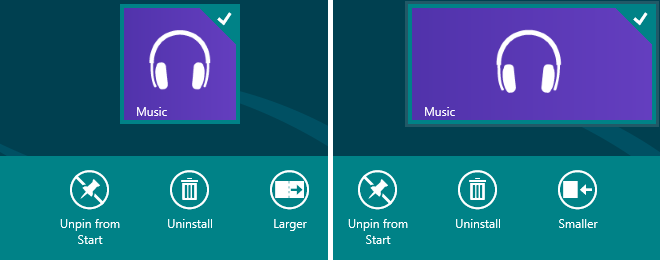
When you select a tile that can be resized, you will be presented with the option to do so, depending on its current size. If it is currently a large rectangular tile, you will see a ‘Smaller’ option, while if it is currently a small square tile, you’ll see a ‘Larger’ option. Just click on the appropriate option to get the tile in your desired size.
Organizing Tiles in Groups
It makes good sense to organize your app tiles into sections, keeping tiles for related apps together. On the Start screen, you can simply drag and drop tiles from one spot to another, and they will snap nicely to the grid, automatically shoving other tiles out of the way while keeping them aligned to grid as well.
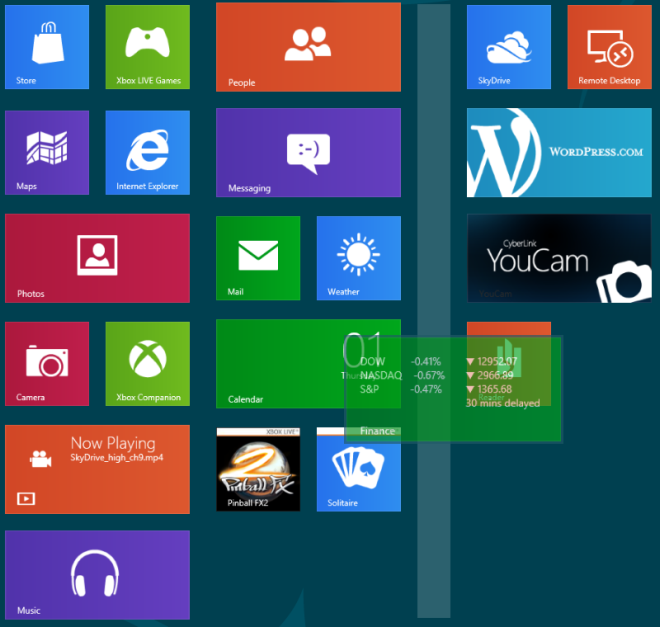
You can also move apps into different columns, with noticeable space between adjacent columns. Just drag an app’s tile horizontally and you will see a gray bar appear in the direction you are dragging it. Drop the tile on that gray bar and it will get a column of its own, into which other tiles can then be added the same way to make a group of apps.
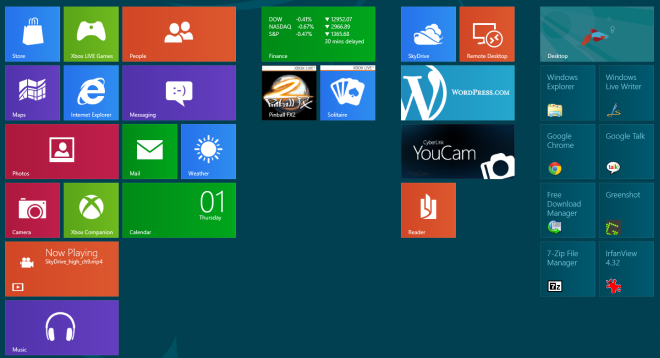
When it comes to removing a group, once all the tiles from a column are removed or dragged and dropped into other columns, that group automatically vanishes – no additional empty spaces left to be removed manually by you. Each of these groups can be given a separate name using the method described in our guide on creating and naming Windows 8 Start screen groups.
That’s pretty much it for Start screen tile management. Stay tuned for more of our Windows 8 coverage.

my search engine for internet is google. it seems to have gone minute. what have I done and how can I remedy?????
Let me resize Non-metro apps! 🙁
Ummm, non-metro apps are already resizable exactly the same way that they were in Windows 7.
Ummm, you obviously don’t understand what hes taking about.
u obviously r dumb
All true but you can’t make Metro place the tiles where you want and have them stay there. Example: Try to areange the tiles the way you want, say, alphabetically. Metro will let you move your tile, but then grab another and move it wherever it likes.
These tiles are not “well designed”. They look like they were designed like picture road signs. They’re ugly. Really ugly.
As for the non-metro apps…. All this time we;ve been trying ot make Windows look nice with nice looking icons, and now it’s all been thrown out and replaced with squares with icon in them… Brilliant! Any totally deranged half-wit would be happy with that…. However, I’m not, and I bet many others won’t be either….
This version of Windows is the best thing that’s ever happened to Apple… (Speaking of which, strange that Apple shares shot up on the same day the Windows 8 Beta gets relaeased… I wonder if it’s part of the reaction to the crappy UI)
Your post doesn’t make a lot of sense. What exactly is preventing you from making tiles that look how you want them to look? A number of mine are cycling through information, that’s not a square with an icon on it. I guess you just really miss faux drop shadows and beveling.
Regarding the shares: have you heard of the iPad 3? Perhaps you saw they released an invitation. Do you even read tech news? Frankly, I’m tired of all of the useless visual noise Apple loves to slap on to everything. Flat is the new glossy.
I thought microsoft put in the feature to have titles on each group?
Go to the lower right corner of your screen and press the “-“. It will show your entire tile layout. Right click the group you want to name, select “name group” from the bar that appears on the bottom of the screen. The rest is self explanatory.
I thought microsoft put in the feature to have titles on each group?