Quickly Switch Between Over 30 Popular DNS Servers From Windows System Tray
“How does the internet work?” You often get asked this question from your non-geek friends who spend half their time on Facebook or YouTube. While understanding every aspect of how it works isn’t as simple, there are certain technologies powering our world wide web that every internet user should know of. One of the them is the Domain Name System or DNS. Simply put, when you type a URL like Google.com in your browser’s address bar, it’s converted by your ISP’s DNS service into an Internet protocol understandable by computers and devices connected to the network, which determines how data is moved from point A to point B. Most people use the default DNS provided by their ISP, but if you’re facing issues with it, then one solution is to swap it with another one using a tool like ChrisPC DNS Switch. It’s a Windows tool that carries a huge list of presets from popular DNS servers that you can switch to, and allows power-users to specify custom DNS servers as well.
Changing DNS can help you troubleshoot multiple issues with your internet. For example, it can help you access websites that are blocked by your provider. And sometimes, changing DNS to a more reliable one like OpenDNS or Google DNS offers better browsing speed and improved security.
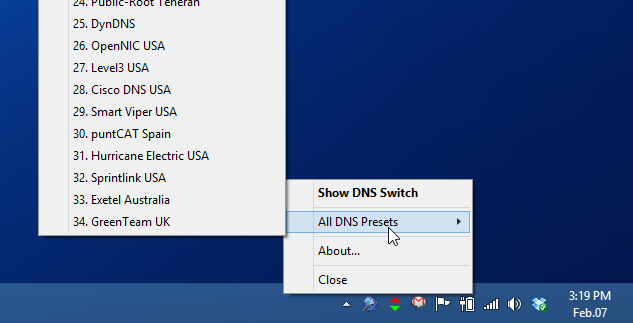
Once installed, ChrisPC DNS Switch sits in the system tray for swift access. You can switch DNS servers in a snap by right-clicking the application’s system tray and selecting from the many options in the ‘All DNS Presets’ sub-menu.

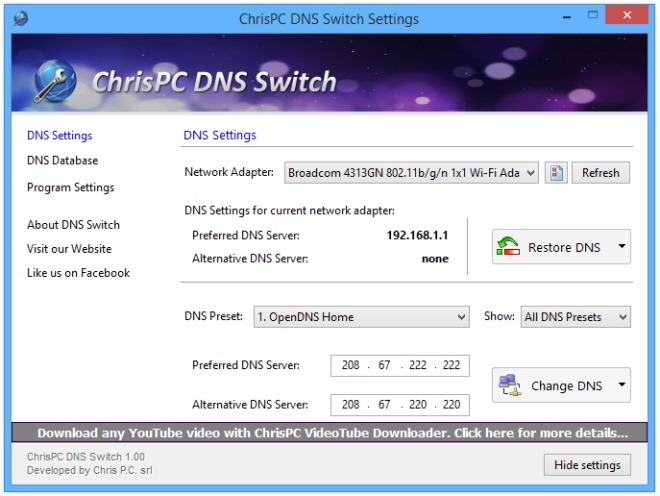
To access the application’s main interface, click the ‘Show DNS Switch’ option or simply double-click notification icon itself. From here, you can specify both primary and secondary DNS servers manually, or pick one from several choices in the drop down menu. As of this writing, ChrisPC carries over 30 different DNS servers in its arsenal, including OpenDNS, Google, Commodo, Norton and Yandex.

After specifying the DNS server, just click ‘Change DNS’ followed by ‘Yes’ in the confirmation dialog to apply the new settings. Whenever you need to revert changes, you can simply hit the ‘Restore DNS’ button.
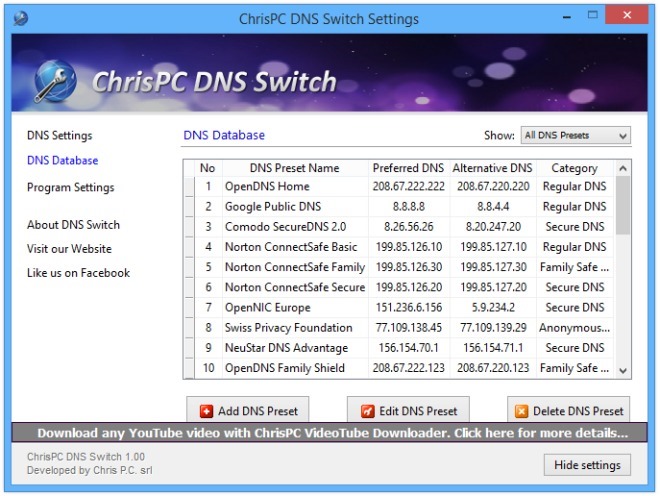
As mentioned earlier, you can add your own DNS presets. To do that, select ‘DNS Database’ from the left followed by ‘Add DNS Preset’ and specify your desired parameters. From this section of the application, you can also edit or delete existing presets, and from the description found under the ‘Category’ column (Family Safe, Regular, Secure), get a better idea of how a DNS server will effect your internet experience.

In a nutshell, ChrisPC DNS Switch is a fast and convenient way to switch between multiple DNS servers. It supports all recent Windows operating systems.

I use DNSjumper. It is much lighter and portable.