KMODE Exception Not Handled on Windows 10: How to Fix
KMODE EXCEPTION NOT HANDLED is one of the most dangerous BSOD errors on Windows 10 and older versions, because it usually leads to total system failure. On top of that, it might be difficult to determine the root of the problem for troubleshooting.
If you stumble upon this error only once and get it fixed by rebooting your PC, it’s not really an issue. It becomes problematic when you must face KMODE_EXCEPTION_NOT_HANDLED every time you launch Windows and try to work or play.
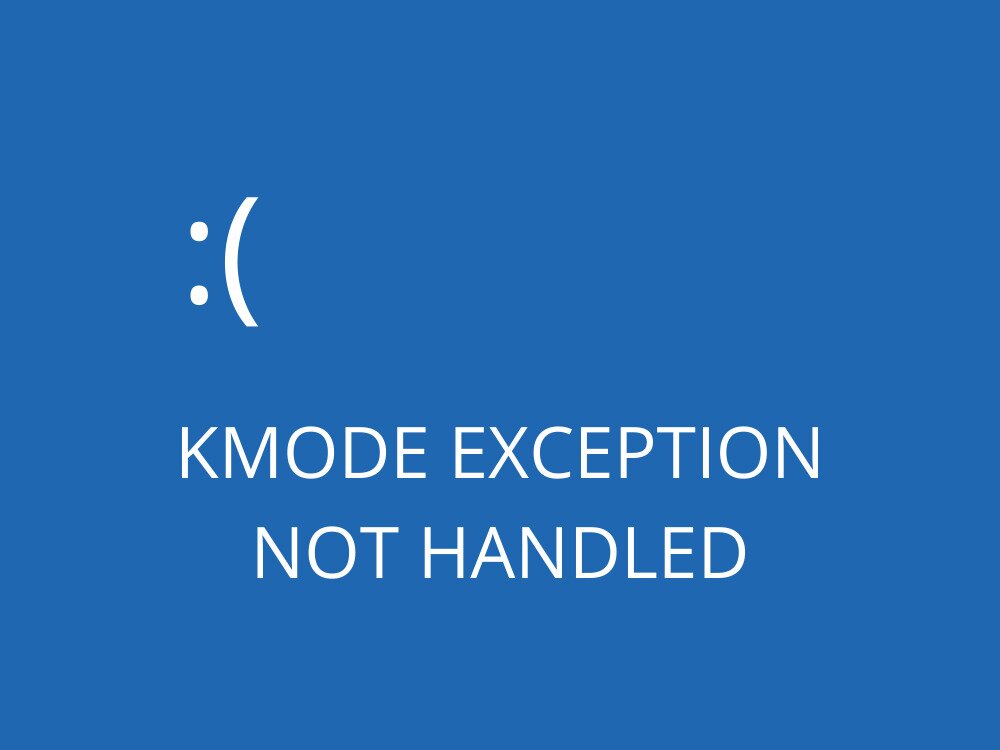
What causes the KMODE EXCEPTION NOT HANDLED stop code?
The stop code can be caused by various issues at the software level, hardware level, or both. For instance, installed programs could overwrite each other’s memory, resulting in conflicts, corrupt applications, system stability issues, and ultimately a full Windows crash.
If the processor’s kernel mode throws an exception error that can’t be identified by the error handler, this can lead to KMODE_EXCEPTION_NOT_HANDLED with 0x0000001E error code. This type of error is similar to other BSOD issues, and if you’re experiencing related problems, you may want to explore our exception not handled fix guide and other stop code solutions for additional troubleshooting steps.
Sometimes, the stop code is accompanied by a filename, which makes troubleshooting a lot easier since you can look up more information about the file on the Internet.
How to fix KMODE_EXCEPTION_NOT_HANDLED
There are multiple ways to repair a Blue Screen of Death message with the KMODE EXCEPTION NOT HANDLED BSOD error code, depending on its cause: software or hardware.
Since it’s hard to evaluate this, you should start with software solutions and work your way up to hardware fixes. It’s simpler that way.
Some of the following workarounds are suitable for casual users. However, we can’t overlook more elaborate solutions, so we reserved the last part for skilled individuals.
Before getting started, we strongly recommend you create a system restore point. It will spare you from headaches in case you make a wrong move and must undo all changes. Better yet, create a full system backup if you can.
Certain users don’t even get the chance to do something on their computer due to the KMODE_EXCEPTION_NOT_HANDLED error that sends their operating system into a restart loop. If you’re one of them, you can boot Windows in safe mode to load only the required drivers.
1. Disable Fast Startup
Fast Startup is a feature introduced in Windows 8 and migrated to Windows 10. It allows the operating system to boot, shut down, and wake up from hibernation faster because it doesn’t entirely turn off all processes, services, and drivers.
If the KMODE EXCEPTION NOT HANDLED BSOD stop code is caused by faulty drivers, then you should deactivate Fast Startup to prevent it from reloading all drivers while doing its job.
Here’s how to disable Fast Startup on Windows 10:
- Make sure you’re logged in as the administrator
- Press Win key + R, type control panel, and hit Enter

- Find and click Power Options

- Click Choose what the power buttons do on the left side

- Click Change settings that are currently unavailable

- Disable Turn on fast startup (recommended) and click Save changes

- Reboot your computer
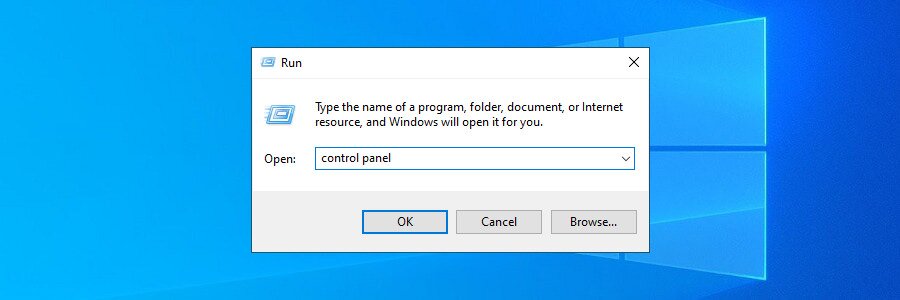
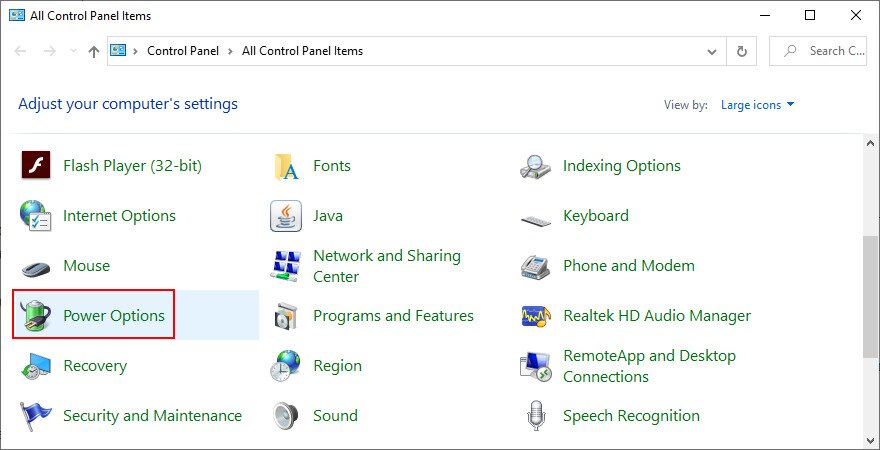
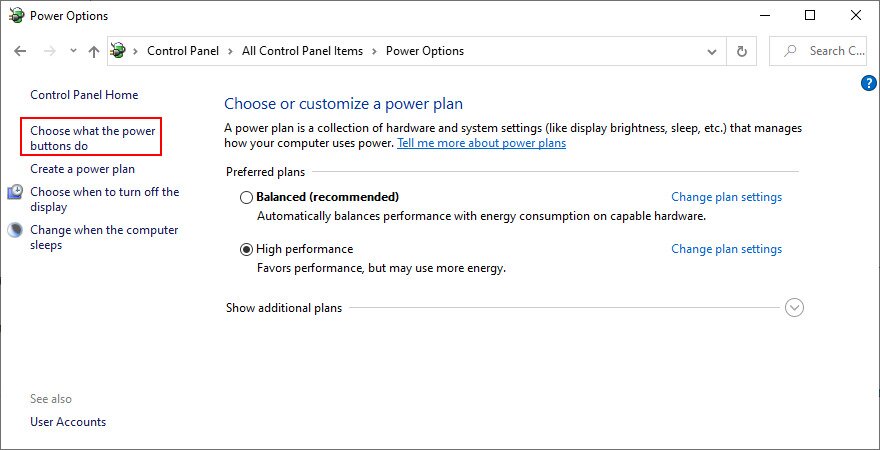
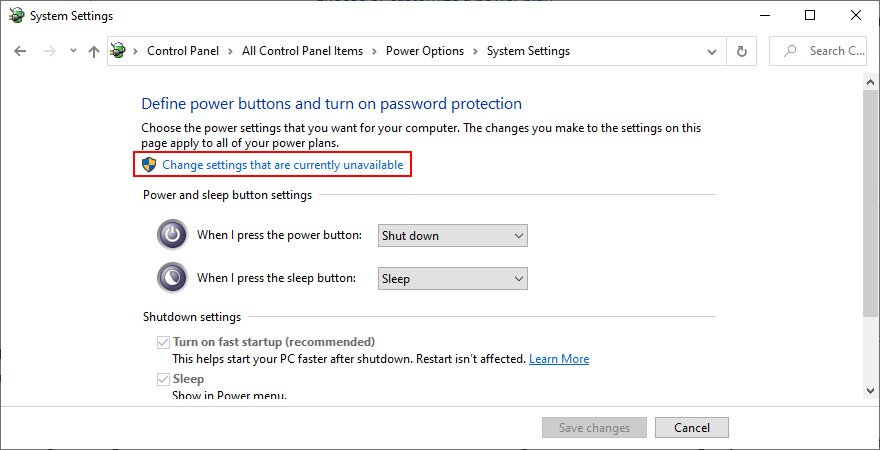
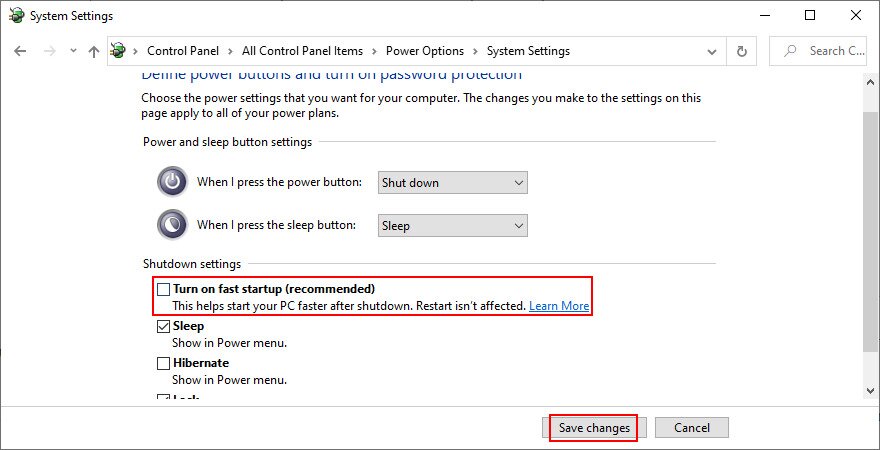
In certain cases, switching off Fast Startup is enough to fix the KMODE_EXCEPTION_NOT_HANDLED stop code. It should at least give you more time working on other solutions before Windows receives the BSOD message again.
2. Turn off startup programs
Startup programs are the ones that get launched automatically as soon as you boot Windows. You might have noticed that some applications do this as soon as you install them on your PC.
Having too many startup apps results in a slower boot time. If one of those programs overwrites the memory of another, it can lead to KMODE EXCEPTION NOT HANDLED.
You can fix this by disabling startup apps:
- Right-click the Windows 10 taskbar and select Task Manager

- Go to the Startup tab
- If you have numerous entries here, click Status to sort the apps (Enabled first)

- Right-click each entry with the Enabled status and select Disabled
- Restart your computer

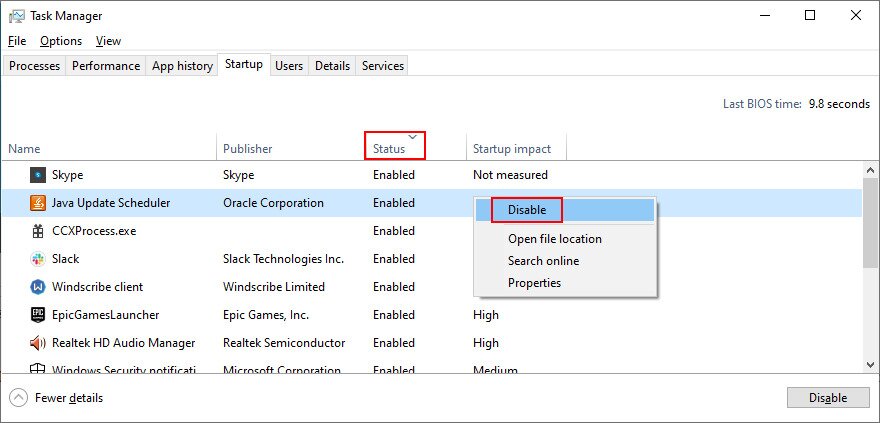
To conduct more research on startup programs, you can download Microsoft’s Autoruns utility from the official website. It shows the registry entry of each startup process and can check it for malware almost instantly by uploading its hash to VirusTotal.
Find out more information about turning off startup programs on Windows 10.
3. Uninstall recent applications
If you have recently installed software programs and began experiencing the KMODE EXCEPTION NOT HANDLED error right afterward, they could be the reason behind your troubles.
However, you should be able to fix this problem by removing the applications from your computer. For example, it has been reported that ON/OFF Gigabyte triggers the BSOD error, along with certain VPN services and antivirus tools.
Here’s how to remove recent programs:
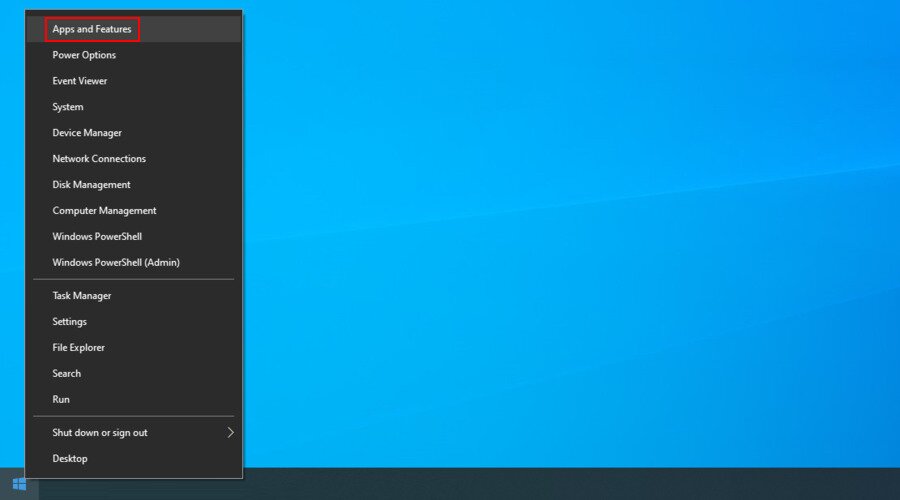
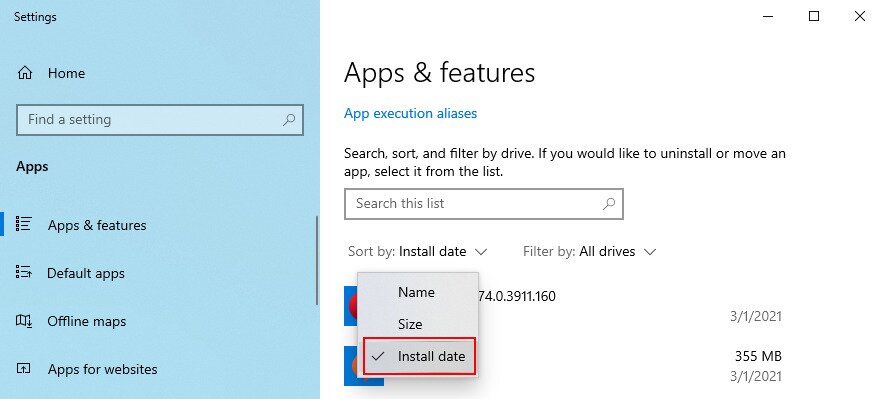
- Right-click the Windows 10 Start menu and select Apps and Features

- Set Sort by to Install date to list your apps by date (newest first)

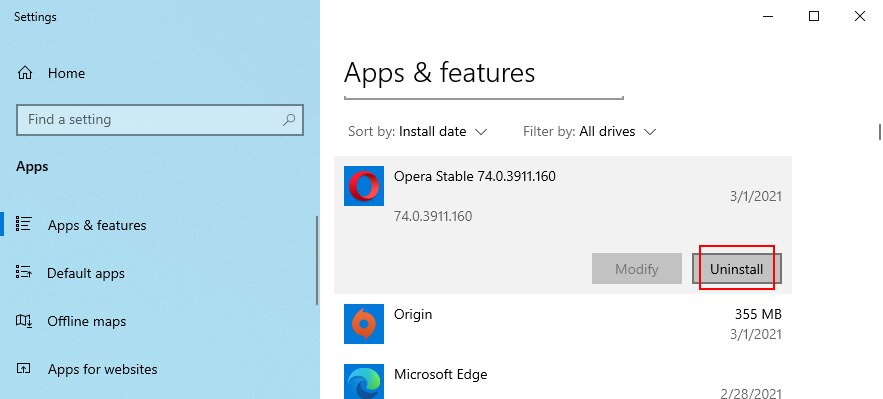
- Pick the first program. If you wish to eliminate any uncertainty, you can run a quick Google search to see if that application has caused troubles to other users, too. Then, click Uninstall and proceed with the removal process

- Restart your computer to see if you still get the KMODE_EXCEPTION_NOT_HANDLED error
4. Restore Windows to a previous checkpoint
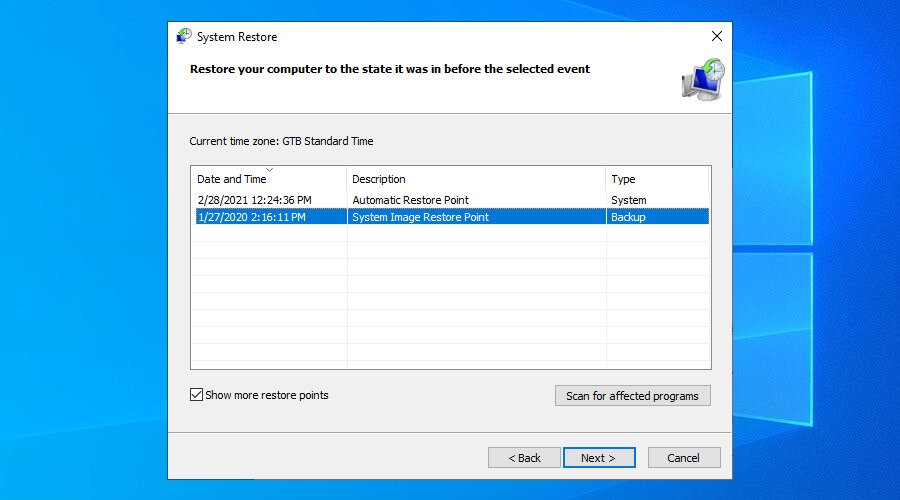
The easiest way to undo the damage caused by a bad driver or corrupt process is by using System Recovery. It’s not a reliable method, though, because it sometimes doesn’t work at all. But you can still give it a shot.
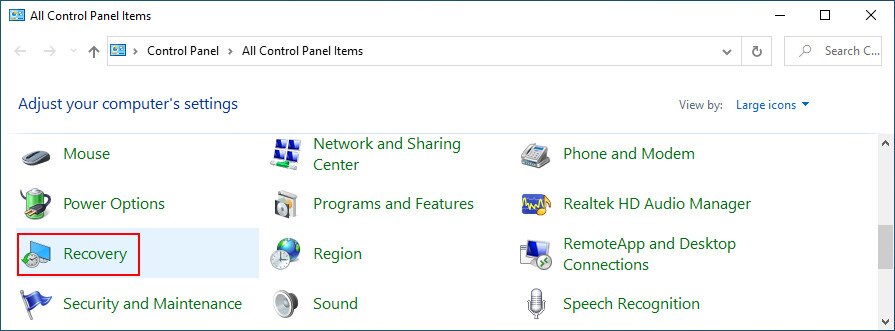
- Press Win key + R, type control panel, and hit Enter
- Click Recovery

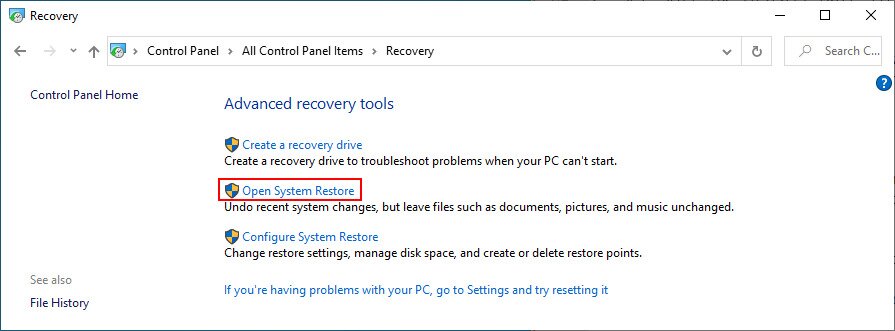
- Click Open System Restore

- Choose a checkpoint from the list, click Next, and follow the on-screen instructions.

5. Run a malware scan
A malware infection can do heavy damage on your operating system, even triggering BSOD errors like KMODE_EXCEPTION_NOT_HANDLED by overwriting data. So it’s a good idea to run a malware scan and clear your computer of any pests.
If you’re running Windows 10 and don’t have a third-party antivirus solution installed, then you have to use Windows Defender.
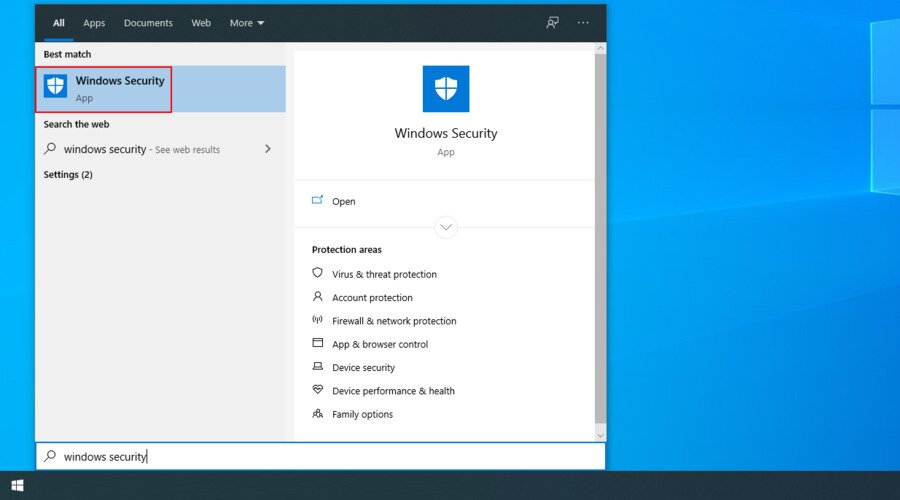
- Click the Windows 10 Start button, type Windows Security, and launch this app

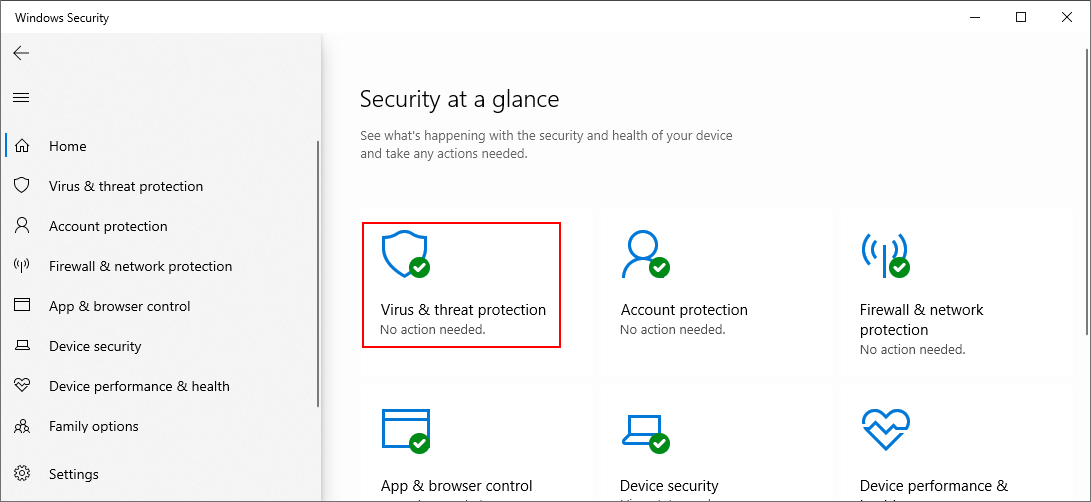
- Select Virus & threat protection
![Windows 10 shows how to select Virus and Threat Protection]()
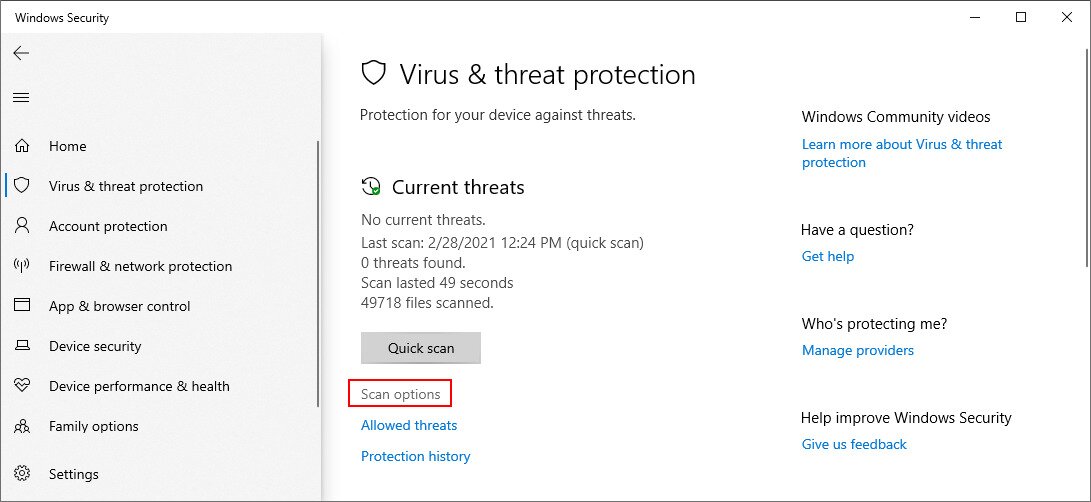
- Click Scan options

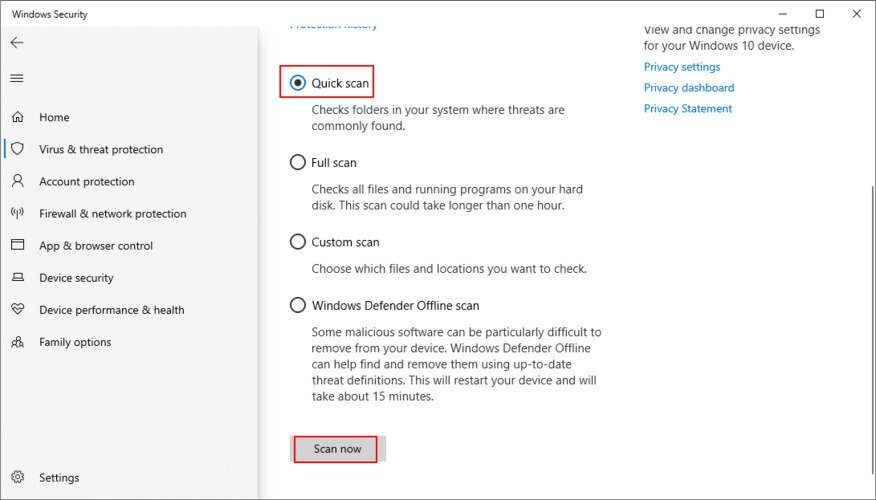
- Select Quick scan and press Scan now

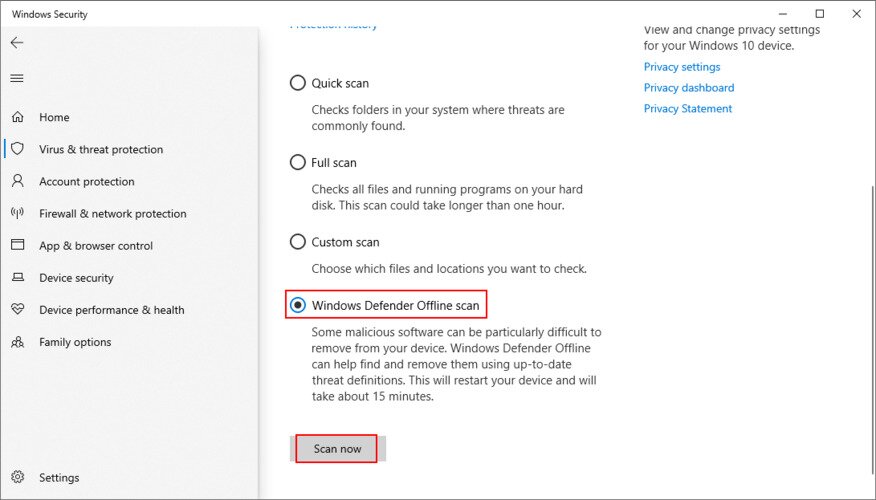
- If no malware results show up, run another scan using the Windows Defender Offline scan mode

6. Disable your antivirus software
Your anti-malware application may affect other running programs which are essential for Windows. This could also lead to the KMODE_EXCEPTION_NOT_HANDLED error code.
To fix this problem, you just have to deactivate your antivirus program. It’s usually impossible to end its process from Task Manager or exit the application due to security reasons.
However, you should be able to turn off the real-time detection engine. In the worst case scenario that you can’t do that, then simply uninstall the antivirus program.
7. Check your drivers to resolve KMODE Exception Not Handled
Obsolete, incompatible, missing, or faulty drivers are usually the cause of the KMODE EXCEPTION NOT HANDLED stop code. That’s why it’s essential to check if they are running properly. It’s a multi-part process.
Here’s how to reinstall drivers easily:
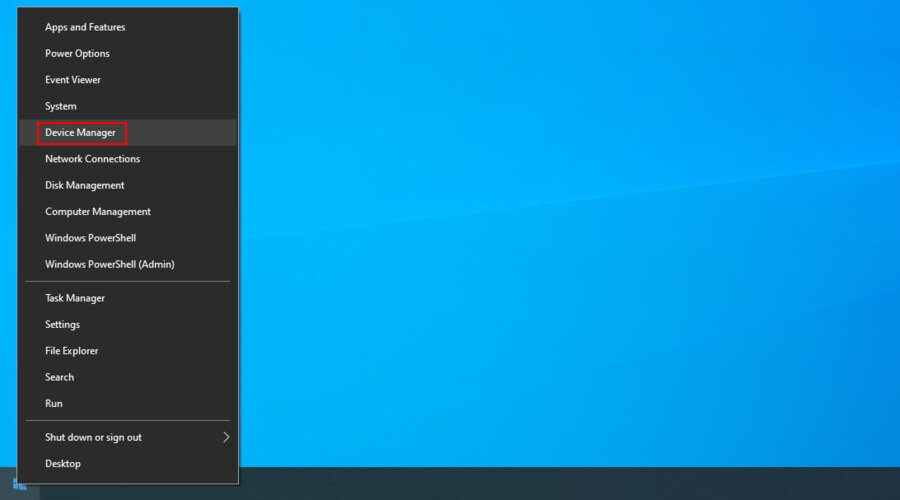
- Right-click the Windows 10 Start button and pick Device Manager

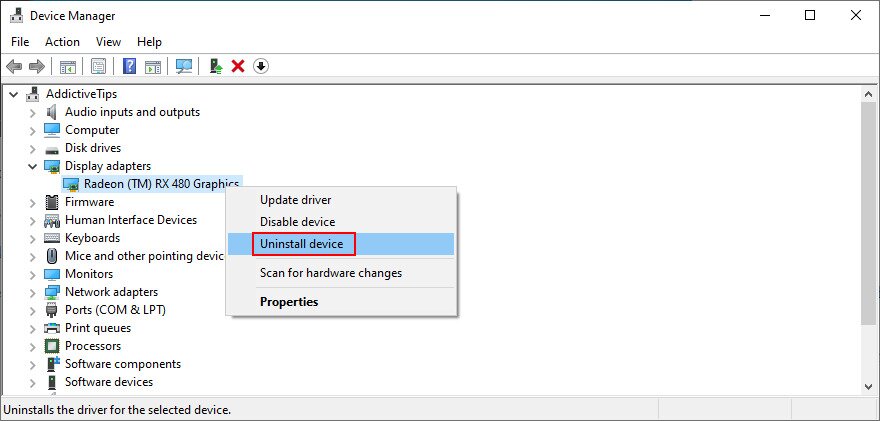
- Right-click a device from the list and select Uninstall device

- Reboot your PC. The driver will be automatically reinstalled by Windows
The method above is the equivalent of getting Windows to work properly by turning it off and on again. But it doesn’t always do the trick.
It’s possible that your drivers are outdated. You can try updating them by asking Windows to search for updated driver software automatically. Unfortunately, this method often fails.
As an alternative solution, you can look up the drivers on your manufacturer’s website. DriverVerifier is an excellent tool that can help you identify the drivers of your machine. You have to be careful, though, since there’s the risk of accidentally installing an incompatible driver.
Avoid third-party driver-updater utilities during BSOD troubleshooting — these tools can install incorrect or incompatible drivers, which may actually cause or worsen KMODE EXCEPTION NOT HANDLED crashes. Instead, follow this update order: install chipset, storage, network, and audio drivers from your PC or motherboard maker’s support page first, then install GPU drivers directly from NVIDIA, AMD, or Intel’s website.
If the crashes started right after a recent driver update, open Device Manager, right-click the affected device, select Properties, go to the Driver tab, and click Roll Back Driver to revert to the previous version.
Note: Driver Verifier is a diagnostic tool for identifying faulty drivers — it is not intended for general driver maintenance or updating.
If the error shows a .sys filename
When KMODE_EXCEPTION_NOT_HANDLED appears on screen, it sometimes names a specific file in parentheses — for example, kmode_exception_not_handled (rt64.sys). That filename is your most valuable clue, and a BlueScreenView dump reader can help you inspect the associated crash details. Here’s how to act on it:
- Write down or photograph the exact filename shown on the BSOD screen before the system restarts
- After rebooting, check C:\Windows\Minidump for a .dmp file, or look for MEMORY.DMP in C:\Windows — these crash dump files can be analyzed with tools like WinDbg to confirm which driver caused the fault
- Map the filename to its device class so you know exactly which driver to target. For example: rt64.sys or rt640x64.sys belongs to the Realtek network adapter driver; display driver filenames such as nvlddmkm.sys point to NVIDIA graphics, while atikmpag.sys or amdkmdag.sys point to AMD graphics; storage controller and Wi-Fi adapter drivers will have their own distinct filenames
- Go to the hardware maker’s official support page and download the latest driver for that specific device — or roll back to a previous version if the crashes began immediately after a driver update — then reinstall only that driver rather than doing a blanket driver cleanup
Targeting the named driver file is far more reliable than updating all drivers at once, and it significantly narrows down the source of the KMODE Exception Not Handled crash.
Use Driver Verifier to pinpoint a faulty driver
If you are still getting persistent KMODE crashes but no specific .sys filename is pointing you to the culprit, Driver Verifier is the most reliable way to force the bad driver to reveal itself. It works by applying extra stress checks to drivers at runtime so that a misbehaving driver crashes immediately and visibly rather than causing random, hard-to-trace BSODs. Think of it as a controlled stress test — not a tool to leave running during everyday use.
Before you start: create a system restore point so you have an easy recovery path if needed.
- Open an elevated Command Prompt (press Win + R, type cmd, then press Ctrl + Shift + Enter)
- Type
verifierand press Enter to open the Driver Verifier Manager - Select Create standard settings and click Next
- Choose Select driver names from a list, then click Next. Check only third-party (non-Microsoft) drivers — avoid verifying Microsoft-signed drivers, as this can cause unnecessary instability
- Click Finish and reboot. Let the PC crash naturally one to three times — each crash generates a new dump file in C:\Windows\Minidump that will name the offending driver
- Once you have identified the faulty driver (or after testing is complete), open an elevated Command Prompt and run
verifier /reset, then reboot to disable Driver Verifier
If Driver Verifier puts your PC into a boot loop and you cannot get back into Windows normally, use one of these recovery methods:
- Boot into Safe Mode or the Windows Recovery Environment (WinRE), open a Command Prompt, and run
verifier /resetfollowed byverifier /bootmode resetonbootfail, then restart - Alternatively, boot into WinRE, open Command Prompt, and run
verifier /reseton its own — this is usually sufficient to stop the loop
Once you have confirmed which driver is causing the crash, update or roll back that specific driver from the manufacturer’s support page, then verify the system is stable before moving on.
8. Free up disk space
Numerous computer problems are caused by insufficient disk space. Windows always needs room to carry out tasks, execute commands, and ensure that all programs are functioning correctly.
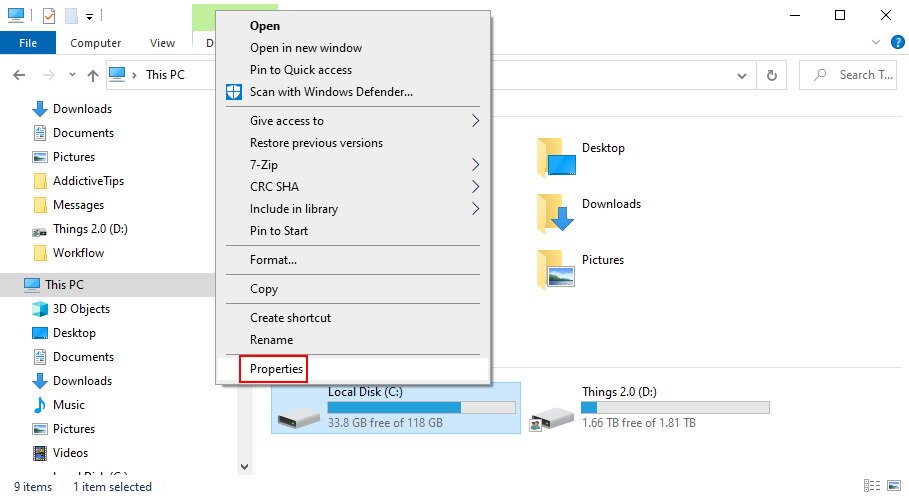
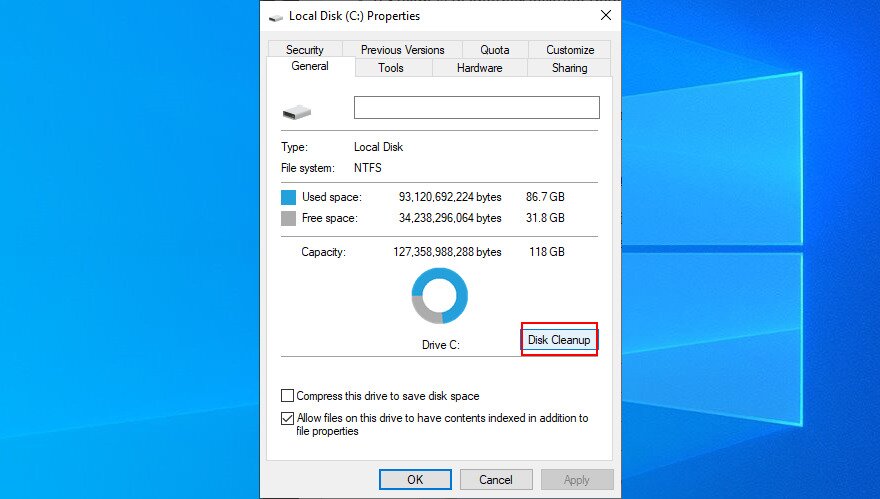
Have a look at the Properties panel of your partition where your OS is installed (it’s usually C:). If there’s only a small percent of free disk space available, it’s time to get more.
Copy files to another partition or an external storage device, upload them to the cloud, or simply delete the ones you don’t need anymore.
You can also use the Windows Disk Cleanup utility:
- Make sure you’re logged in with elevation rights
- Review your Recycle Bin and Downloads folder to copy any critical files you might need
- Open the Properties panel of the Windows drive (by default, it’s C:)

- Go to the General tab and click the Disk Cleanup button

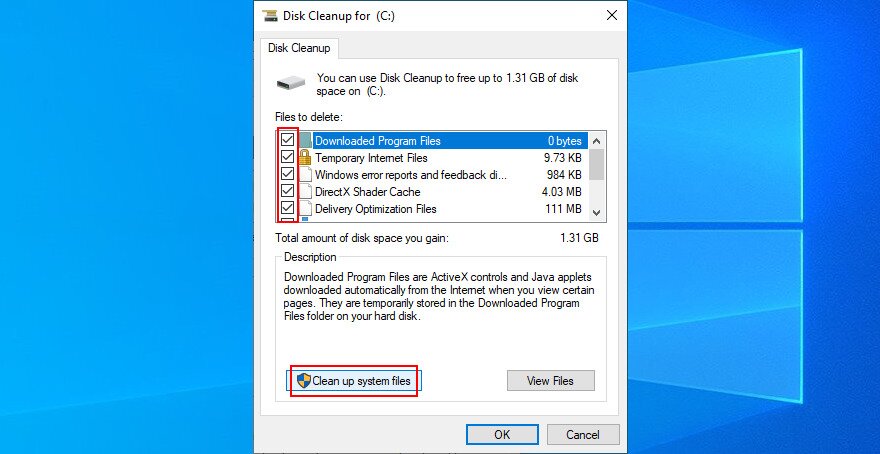
- Select everything from the list and click Clean up system files

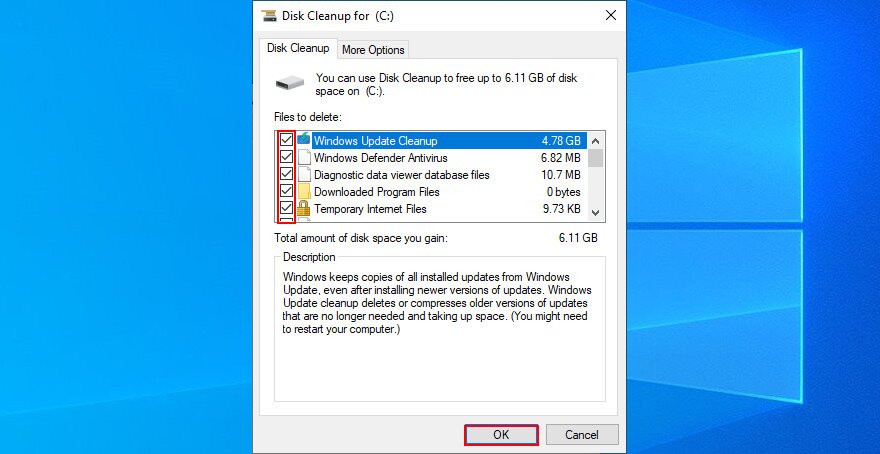
- Windows will run a scan. Once it finishes, select everything again, click OK and then Delete Files

9. Check your RAM
A faulty memory module could result in a fatal hardware issue by triggering BSOD errors and driver corruption, including KMODE Exception Not Handled. However, you can easily address it using the memory diagnostics program integrated into Windows.
- Save any ongoing projects and close all applications
- Click the Start menu, search for Windows Memory Diagnostic, and launch this app

- Click Restart now and check for problems

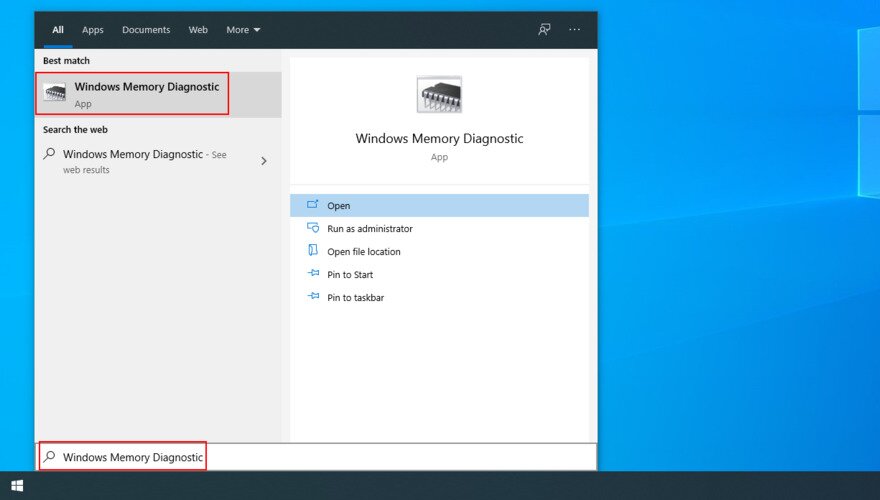
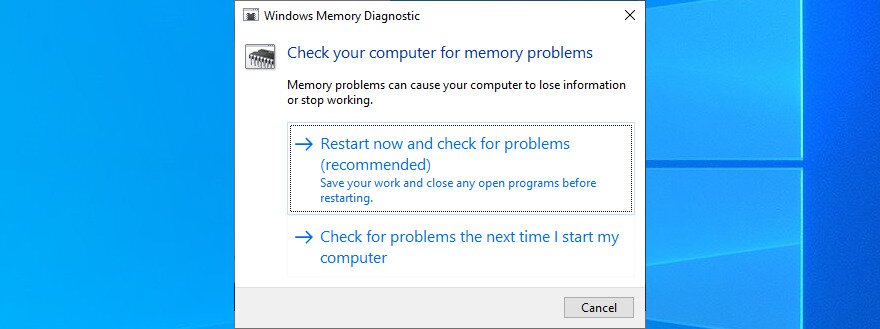
The tool will check your operating system for RAM issues during the next reboot and provide you with all the necessary details.
If you’re looking for a more advanced tool, check out MemTest.
10. Run a clean boot
To prevent Windows from running any extra drivers, processes and services at startup that would cause the KMODE EXCEPTION NOT HANDLED error, you can run a clean boot.
A clean boot works by disabling all non-Microsoft services and startup programs so that Windows loads with only essential components. This is a persistent configuration change that takes effect on the next reboot — it is not the same as ending currently running tasks in Task Manager, because any tasks you end will simply start again the next time Windows boots and will not give you a true clean boot environment.
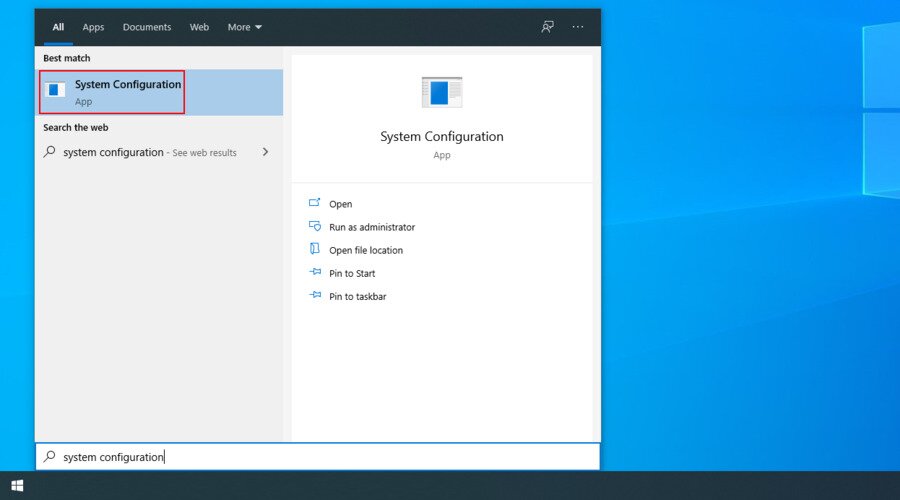
- Click the Start menu, type System Configuration, and open this app

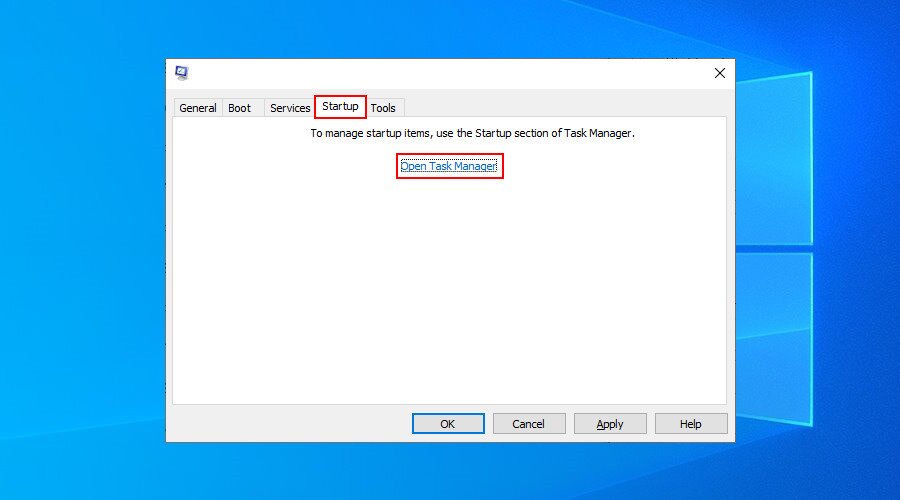
- Pick the Services tab, check Hide all Microsoft services, and click Disable all to disable only third-party services

Important: Always keep Hide all Microsoft services checked before clicking Disable all — disabling Microsoft services can break core Windows components and make BSOD troubleshooting significantly less reliable.
- Visit the Startup tab and click Open Task Manager

- In Task Manager, go to the Startup tab. Right-click each enabled startup item and select Disable. On Windows 11, you can alternatively go to Settings > Apps > Startup and toggle off each non-Microsoft app. Disabling these entries prevents them from launching at the next boot — this is what actually creates the clean boot environment.
- Reboot your computer and test for stability
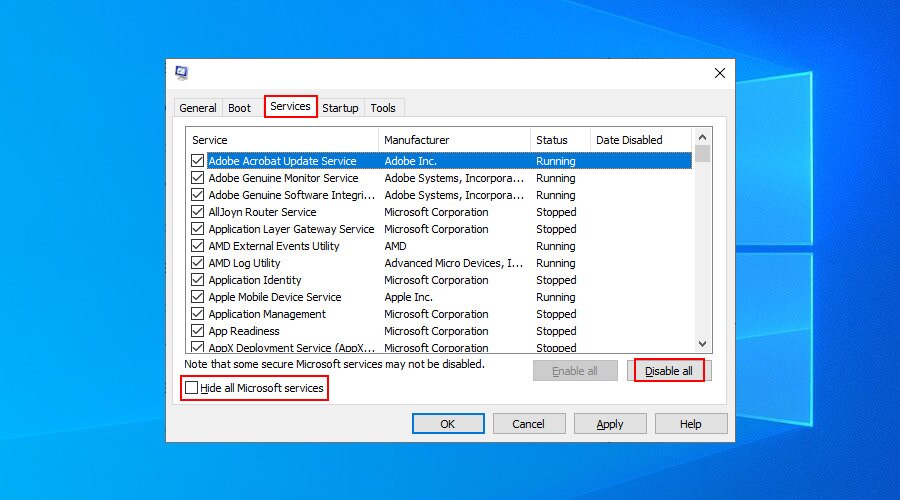
If the system is stable after a clean boot, a third-party service or startup item is the likely cause of your KMODE crashes. To identify the specific culprit, re-enable your disabled services and startup items in small batches — re-enable half, reboot and test, then narrow down from there. Once you find the batch that reintroduces the crash, disable items one at a time within that group until you isolate the offender.
11. Use Event Viewer
You can launch Event Viewer, the operating system’s own diagnostics utility, to find out more information about the BSOD error, including its triggering processes or services.
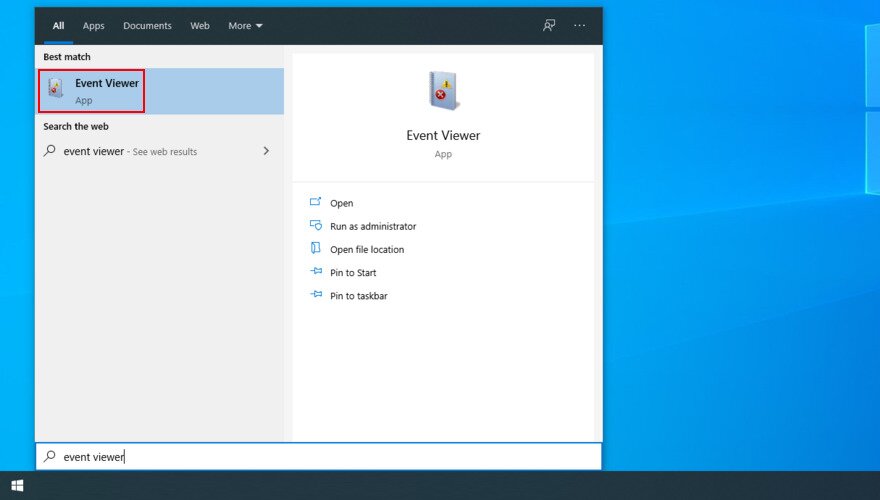
- Once your computer gets restarted after receiving the KMODE EXCEPTION NOT HANDLED stop code, immediately open the Start menu, type event viewer, and hit Enter

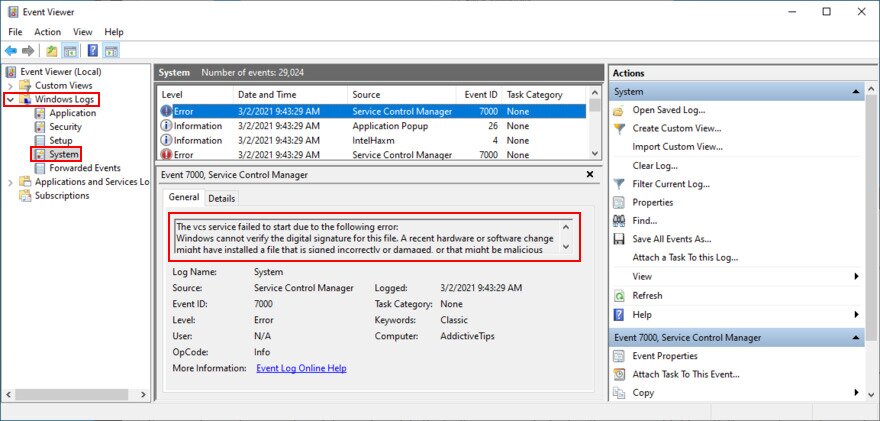
- In the Windows Logs folder on the left, select System

- Click the first (newest) Error you spot on the list and use the General tab to obtain more information about it
12. Fix system errors from CMD
You don’t really need to have any special skills in order to work with Command Prompt since you can copy and paste the commands below.
However, make sure to create a system restore point before proceeding. Furthermore, you should save any ongoing projects and close all applications.
Here’s how to run CHKDSK (Check Disk):
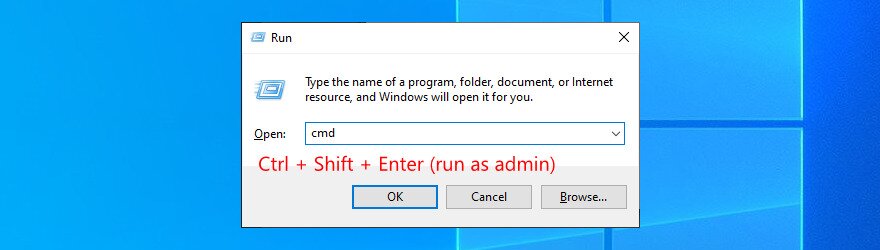
- Press Win key + R, type cmd, then press Ctrl + Shift + Enter to open Command Prompt with elevation rights

- If your OS resides in Local Drive C:, then type
chkdsk c: /f. Otherwise, replacec:with the correct letter of your partition
- You will be asked to agree with scheduling the disk checkup at the next system reboot. Type y and press Enter
- Restart your computer and wait until CHKDSK does its job
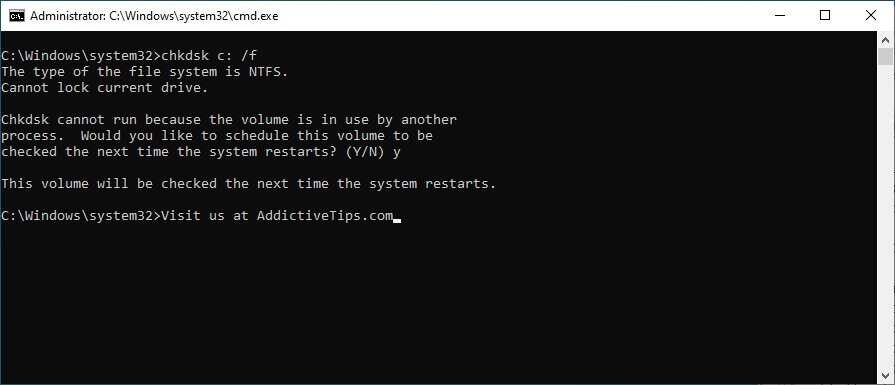
You can count on the Check Disk utility as a hard drive error fix to address any corruption at the hard disk level, which should help handle the KMODE EXCEPTION NOT HANDLED stop code and prevent further crashes.
Run SFC and DISM to repair Windows system files
CHKDSK checks the file system and disk for errors, but it does not repair Windows system files or the Windows component store. For that, you need two additional tools: System File Checker (SFC) and Deployment Image Servicing and Management (DISM). SFC scans and repairs protected Windows system files, while DISM repairs the underlying Windows component store that SFC depends on. If SFC cannot fix a corrupted file on its own, running DISM first gives it a clean source to work from.
Run them in this order from an elevated Command Prompt:
- Type
sfc /scannowand press Enter. Wait for the scan to complete — do not close the window. SFC will report whether it found and repaired any corrupted files. - If SFC reports that it found corruption but was unable to repair some files, run DISM to restore the component store: type
DISM /Online /Cleanup-Image /RestoreHealthand press Enter. This requires an internet connection so Windows can download replacement files from Microsoft. - After DISM completes, reboot your PC, then open an elevated Command Prompt again and run
sfc /scannowone more time to confirm the repairs were successful.
If you can only boot into the Windows Recovery Environment (WinRE) and cannot run SFC from within Windows normally, you can run an offline SFC scan. In a WinRE Command Prompt, first identify the drive letter assigned to your Windows installation (use dir to check), then run: sfc /scannow /offbootdir=C:\ /offwindir=C:\Windows — replacing C: with the correct drive letter if needed. This lets SFC repair system files without Windows being fully loaded.
13. Update BIOS/UEFI and return the system to stock settings
If you are experiencing repeated KMODE crashes with no clear .sys file culprit, crashes during gaming or heavy workloads, or crashes that started after enabling an XMP or EXPO memory profile, overclocking your CPU or GPU, undervolting, or making any other BIOS/UEFI changes, the root cause may be at the firmware or hardware-tuning level rather than in Windows itself. A clean reinstall will not fix instability that originates below the operating system.
Work through the steps below before moving on to hardware replacement:
- Restart your PC and enter the BIOS/UEFI setup by pressing Del, F2, or F10 during POST (the exact key varies by motherboard — check your manual or the on-screen prompt at startup).
- Find the option to Load Optimized Defaults or Load Setup Defaults — this is usually available under the Exit menu or via a dedicated key such as F5. Applying optimized defaults clears all custom settings including overclocks, XMP/EXPO profiles, and voltage adjustments.
- Explicitly disable any CPU or GPU overclocks, RAM speed profiles (XMP/EXPO), and CPU or GPU undervolts if they are still present after loading defaults. Run the system at fully stock speeds and voltages before drawing any conclusions about Windows or driver stability — these settings are a very common source of KMODE crashes that are misdiagnosed as software problems.
- Save changes and exit. Boot into Windows and test stability normally, including under the load conditions that previously triggered crashes.
- If the system stabilizes at stock settings, the fault is likely firmware, memory training, or an unstable tune rather than Windows itself. You can then re-apply settings one at a time to isolate the specific option causing the instability.
- Regardless of stability, check your motherboard or PC maker’s official support page for a BIOS/UEFI update. Firmware updates frequently include stability fixes, memory compatibility improvements, and microcode updates that resolve crashes at the hardware level. Download the update and follow the manufacturer’s flashing instructions carefully.
If the system is stable at stock settings after a BIOS update, you have confirmed the instability was firmware or tuning related. If crashes persist even at stock settings with updated firmware, continue to the hardware diagnostics steps in the next section.
14. If the error happens during Windows setup or survives a clean reinstall
If KMODE_EXCEPTION_NOT_HANDLED appears while installing Windows, immediately after a clean reinstall, or before any apps have been installed, that is a strong signal the problem is hardware or firmware-related rather than a software issue.
Crashes that persist across clean installs almost always point to a hardware fault or a BIOS/UEFI misconfiguration. Work through the steps below before spending more time on software fixes.
- Disconnect all non-essential USB devices and expansion cards (external drives, USB hubs, secondary storage, PCIe add-in cards other than your GPU) and attempt the installation or boot again with only the essentials connected
- Restart your PC and enter the BIOS/UEFI setup (typically by pressing Del, F2, or F10 during POST). Load the Optimized Defaults or Setup Defaults option to clear any custom settings that may be destabilizing the system
- Temporarily disable any overclocks, XMP/EXPO memory profiles, and CPU or GPU undervolts. Run the system at stock speeds and voltages first — these settings are a very common source of KMODE crashes that look like driver or Windows problems
- Update your BIOS/UEFI to the latest version from your motherboard or PC maker’s official support page. Firmware updates frequently include stability and memory compatibility fixes that resolve crashes at the hardware level
- Test with one RAM stick at a time, trying each stick in different slots. If you have two sticks, test each independently and compare results. A faulty stick or a problematic slot can cause persistent KMODE crashes that no amount of software troubleshooting will fix
- Run MemTest86 in addition to Windows Memory Diagnostic, as it performs a far more thorough test outside of the Windows environment. Let it complete at least one full pass — ideally two — and treat any errors as confirmation of a hardware memory fault
- Reseat your RAM sticks and storage drives. Remove and firmly reinsert each module and connector. While you are at it, try a different SATA port or NVMe slot for your storage drive, or swap in a different cable if you are using a SATA drive
- If possible, temporarily swap to your CPU’s integrated graphics by removing the discrete GPU and connecting your display directly to the motherboard’s video output. If the crashes stop, the discrete GPU or its slot may be the source of the problem
If you have worked through all of the steps above and KMODE EXCEPTION NOT HANDLED still occurs before Windows even finishes loading, the most likely culprits are a failing RAM module, a faulty storage drive, or an incompatible or unstable hardware configuration. At that point, professional hardware diagnostics or component replacement is the appropriate next step.
