Dual-Boot Android, Ubuntu Touch Or Firefox OS On Nexus 4 & 7 With MultiROM
The Nexus line of devices are amazing for offering users a great experience with no tie-ins with any manufacturer or carrier restrictions. In addition to the pure Android experience and official updates to the latest versions of the OS promised and pushed by Google directly during their lifecycle, Nexus devices are known for having immense customization possibilities, thanks to their easily unlockable bootloaders and extensive developer support on forums like XDA. Those developers end up achieving amazing feats on these devices due to their open nature. That’s exactly what Recognized Developer Tasssadar at XDA has accomplished with MultiROM – a multiboot method that lets you boot not just multiple Android ROMs but also Ubuntu Touch and Firefox OS on your Nexus 4 or 7 (2012 & 2013 editions). After installation, you are able to choose your desired ROM upon boot. In what follows, we’ll be guiding you through the process of setting up MultiROM and using it to install another Android ROM, Ubuntu Touch or Firefox OS on your Nexus 4 or 7.
A great thing about MultiROM is the way it doesn’t require a lot of tweaking on the user’s part to get things to work – there are no custom bootloaders to flash, no configuration files to manually tweak or move around; it all just works. Even better – it also supports USB flash drives on devices such as the Nexus 7 that support USB OTG out of the box, and even on Nexus 4 with hardware hacks that enable it.
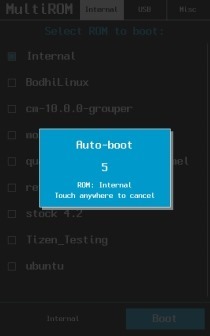
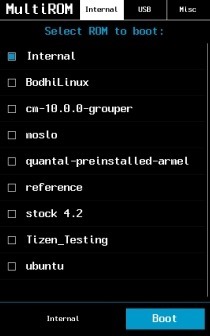
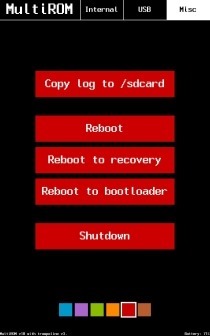
Disclaimer: Please follow this guide at your own risk. AddictiveTips will not be liable if your device gets damaged or bricked during the process.
Installing MultiROM
The process of getting MultiROM itself up and running on your device is dead-simple, thanks to the MultiROM Manager app provided by the developers.
Requirements
- Rooted Nexus 4, Nexus 7 (Original 2012) or Nexus 7 (2013)
- MultiROM Manager app
Procedure
- Launch the MultiROM Manager app on your device.
- On the Install/Update card, tick the MultiROM, Recovery and Kernel check boxes.
- Tap the Install button on the Install/Update card.
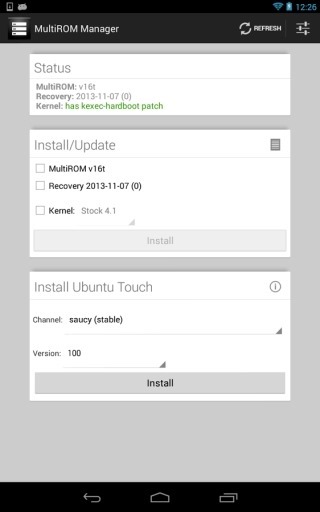
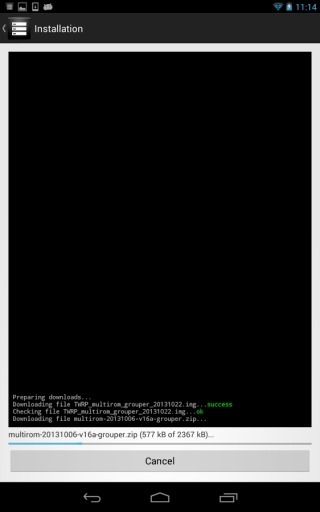
The MultiROM Manager app will automatically take care of downloading and installing the required components for your device.
That was easy, no? So now that you have MultiROM installed, how do you go about dual-booting another OS on it? Let’s find out.
Installing Another Android ROM
Dual-booting is a great way to test out another Android ROM without having to let go of your current one. In order to dual-boot another ROM with MultiBoot:
- Download the zip file for your ROM and transfer it to your device’s storage.
- Reboot your device into recovery.
- Go to Advanced > MultiROM > Add ROM.
- Choose the ROM’s ZIP file, followed by confirming the installation.
You can use the same method for installing multiple Android ROMs – just keep in mind the space requirements for each, and make sure you have ample space free on your device. To give you an idea, stock Android 4.2 should take around 676MB after a fresh, clean install.
Installing Ubuntu Touch
In case you’re happy with having one Android ROM on your device and would prefer to put its newfound dual-booting capability to use for trying out an entirely different OS altogether, why not give the excellent Ubuntu Touch a shot? Here’s how to do it:
- Launch the MultiROM Manager app.
- From the ‘Install Ubuntu Touch’ card, select a channel. (saucy is the 13.10 stable build; others are nightly builds of the upcoming 14.04 version and are more likely to have support issues based on their frequent updates).
- Next, select a version (you can simply go with the defaults to keep things simple).
- Hit Install and let the app do the rest.
Installing Firefox OS
Mozilla has been working on its mobile OS for a while now, and we have already started to see its (very alpha) builds appear for some devices, primarily a couple of Nexus models. With MultiROM, you can install Firefox OS as the second operating system on your Nexus 4 or 2013 edition Nexus 7. The method differs slightly on the two devices, but it’s not going to be too difficult for either.
On Nexus 4
- Download Nexus 4’s Firefox OS system & UI files and place both of them on your device’s storage.
- Reboot your device into recovery.
- Go to Advanced > MultiROM > Add ROM.
- For the ROM type, select ‘Android’.
- Select ‘Don’t share kernel’ and hit Next.
- Choose the system ZIP file for installation.
- Go to Advanced > MultiROM > List ROMs.
- Select your Firefox ROM, followed by Flash ZIP.
- Choose the UI ZIP file.
On Nexus 7 (2013)
- Download Firefox OS for Nexus 7 and place the zip file on your device’s storage.
- Install it using exactly the same recovery method used for dual-booting Android.
Updating The Primary ROM
The primary ROM can be updated the same conventional way, with just an added step. Here’s how it goes:
- Just flash the zip file of the update from recovery like you normally would, and feel free to wipe data if you have to; it will not delete any of your secondary ROMs or their data.
- Go to Advanced > MultiROM and run the Inject curr. boot sector option.
Updating Or Deleting A Secondary Android ROM
You can easily update or delete any of your secondary Android ROMs that you have installed by following these steps:
- Reboot your device into recovery.
- Go to Advanced > MultiROM > List ROMs and select the desired ROM.
- Now select the desired option. For instance, select ‘Flash ZIP’ for updating the ROM or flashing any mod for it, followed by selecting the zip file of the updated version or mod.
Uninstalling MultiROM
The developers have provided an easy way to get rid of MultiROM and get things back to the way they were before. All you have to do is flash the appropriate MultiROM uninstaller file for your device from recovery, and MultiROM will be removed from your device. Do note that this will also remove all secondary ROMs that you may have installed.
MultiROM Uninstaller for Nexus 4
(https://www.mediafire.com/download/ycrwdcva8gdnghn/multirom_uninstaller-2.zip) MultiROM Uninstaller for Nexus 7 (2012)
(https://www.mediafire.com/download/xfg9ic1x54taqam/multirom_uninstaller-flo-2.zip) MultiROM Uninstaller for Nexus 7 (2013)
The MultiROM-modified TWRP recovery will still remain on your device, but that shouldn’t be an issue; you can simply ignore the Advanced > MultiROM submenu, and use the rest of the recovery as the regular TWRP. Though if you want to remove that as well, you can easily flash a recovery of your choice.
While multibooting different operating systems on a mobile device might not be for everyone, it still is something many enthusiasts love to do, and considering the usual hacks required for the purpose that involve quite a lot of complex configurations and risks involving bootloader modifications, MultiROM is a breath of fresh air. That said, we would like to stress again that you should still try it entirely at your own risk, after being sure of what you are doing. Enjoy multibooting on your Nexus!
[via XDA-Developers]

Had some wifi issues after rooting the device. Wifi would not turn on. Got it figured out. Rooted my Nexus 7 about ten or more times and Flash
Stock unrooting it. It seems the problem is the following:
Multirom: When installing the first time around make sure when you
update to choose kernel 4.4.1 and 4.4.2 option. Installing kernel 4.3 is
what’s causing the Wifi problem.Had it updated to 4.4.1 4.4.2 option
and wifi is stable.
I’ve successfuly stock loaded my Nexus using this thread:
http://forum.xda-dev…d.php?t=2381582
Download the proper .zip file needed for your device and follow
instructions. I used to boot into fastboot mode (power button and volume
down) and just clicked the nexus_dead.bat file. Restored the Nexus in a
flash.
Rerooted the device and did what I have said up there ^^^^^^ about multirom. Wifi is now stable and no issues thus far.
Hope that helps.
Well, after running MultiROM my phone doesn’t boot anymore. Thats definitly a great advice!
Reflashing the device to stock android using adb solved the problem, though, but I sure won’t touch MultiROM again.
Can you help with how you reflashed the device to stock android? I need to start over. There was an issue with my installation of ubuntu touch where it removed Android somehow.
WiFi works for me on a nexus 4 with FFOS. However, apparently the kernel I flashed to get kexec doesn’t play well with my main ROM because I get a messed up screen when I boot that now. Naturally, FFOS is unable to download any file that isn’t audio or video, so I’m stuck until I figure out a way to get a good kernel downloaded somehow.
Delete FFOS and reinstall but marking the option Don’t share kernel
Tryed Miui, FFOS, Ubuntu Touch and stock 4.2…
WiFi does not work on any secondary ROM.
I have tried both Ubuntu Touch & FF Os in Nexus 4. Neither of them could find th WiFi MAC address so in result I could not connect to WiFi. Could you please tell me what could be the issue ?
I tried both without any wifi problem
An interesting article.But anybody knows how to do the same for Galaxy Nexus (maguro)?
Nice to know how to install. Next question, how do we remove the installed ROM?
Thanks for bringing that up; the post has been updated with information on deleting or updating secondary Android ROMs, as well as uninstalling MultiROM itself.