How to Force An App To Use The Dedicated GPU On Windows
An average PC comes with two graphics cards. The first, the default one, is called the ‘On-board’ graphics card and it’s usually an Intel chip. The second one is the ‘Dedicated’ graphics card and Nvidia and AMD are the best ones available.
A dedicated graphics card is normally found on gaming PCs but it’s not uncommon to find a lower-end GPU on a non-gaming rig.

Do I use my dedicated graphics card?
When an application’s requirements exceed the capabilities of the on-board graphics card, your system switches to the dedicated GPU. This happens mostly when you play games. You can however force an app to use the dedicated GPU. Here’s how.
As mentioned earlier, there are two major GPU manufacturers that dominate the market; Nvidia, and AMD. We’re going to show you how you can force an app to use the dedicated GPU from both manufacturers.
Windows 10 Settings
You must be running Windows 10 1809 or later for this to work. It doesn’t matter which GPU you have because this will work for both.
- Open the Settings app and go to the System group of settings.
- Select the Display tab and scroll down.
- Click the ‘Graphic Settings‘ option.
- On the Graphics Settings screen, open the ‘Choose an app to set preference‘ dropdown.
- Select the type of app you want to set the GPU use for; Classic app for desktop apps, and Universal app for UWP or Store apps.
Once selected, click the Browse button and select the app. Click the ‘Options‘ button under the app once it has been added.

In the window that opens, select ‘High Performance‘ and click ‘Save‘.

Force App To Use NVIDIA Graphics Card
It’s worth mentioning that NVIDIA uses Optimus Technology. Whenever it detects that an app needs additional, more powerful resources, the dedicated GPU kicks in. That said, you can still force an app to use the dedicated GPU.
With NVIDIA, it’s really easy
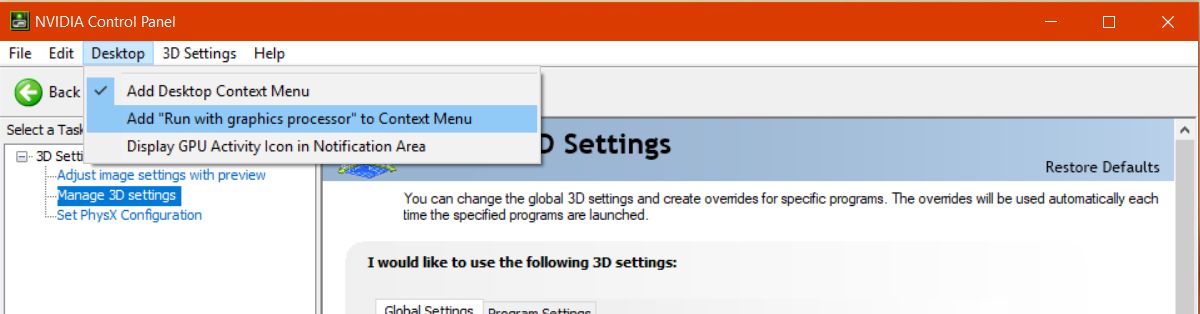
Open the NVIDIA control panel. Right-click on an empty area on your desktop and select the ‘NVIDIA Control Panel‘ option from the context menu.
Go to the Desktop menu and enable the ‘Add “Run with graphics processor” to Context Menu‘ option.
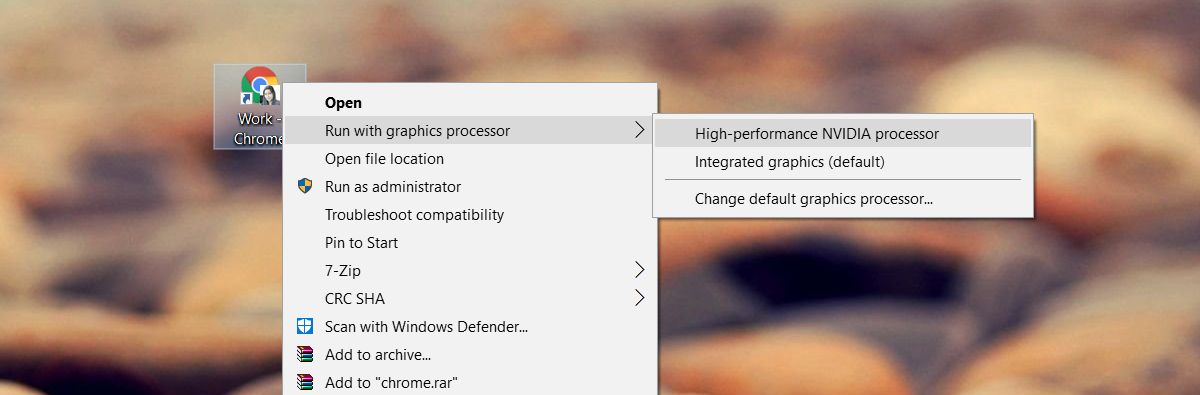
Return to your desktop. Right-click the app you want to force to use the dedicated GPU. The right-click context menu will have a ‘Run with graphics processor’ option. Select ‘High-performance NVIDIA processor’ from the sub-options and the app will run using your dedicated GPU.
Force App To Use AMD Graphics Card
You can force an app to use your AMD graphics card but it isn’t as easy, or as accessible as the NVIDIA option.
With AMD, you can select which apps will use the dedicated graphics card. You don’t have an option in the context menu. Instead, you add apps to the AMD Catalyst Control Center.
Open the AMD Catalyst Control Center app by right-clicking on an empty area on your desktop.
- Select ‘Catalyst Control Center‘ from the context menu.
- From the list of panels on the left, select ‘Power‘.
- Under ‘Power’, select ‘Switchable application graphics settings‘.
Here you will see a list of apps that AMD already recognizes as needing better GPU support. On this panel is an ‘Add Application’ button.
Click it and select the EXE of the app you want to force to use the AMD graphics card.
After you add the application, open the dropdown next to it for setting graphics options. Select ‘High performance’ and you’re done. The app will always use AMD graphics card.
We should mention that some options may differ depending on your driver version and the GPU model you have. These solutions will still work but the options may be found under a different menu.
Windows UWP Apps – NVIDA GPU
Unfortunately, this doesn’t work for Windows UWP apps. That doesn’t mean you can’t force them to use the dedicated GPU, just that the process is different for an NVIDIA GPU.
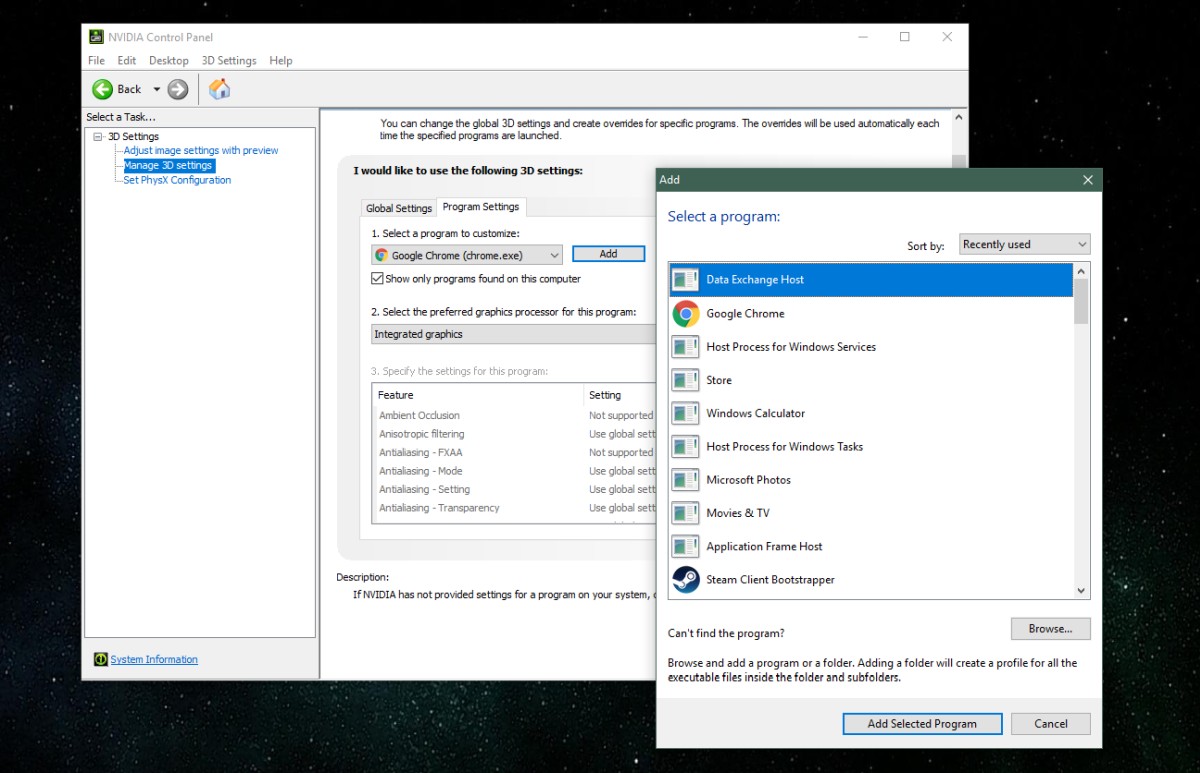
Open the NVIDIA control panel and go to 3D Settings>Manage 3D Settings.
Select the Program Settings tab and click the ‘Add’ button. Browse for the Windows UWP app you want to run with the dedicated GPU, and add it.
From the ‘Select the preferred graphics processor for this program’ dropdown, select your GPU.
Parting words
For those of you who’d like to see everything that’s been said above, but in a video, check out our tutorial below.

Personally for me when I use the Nvidia option to change between the On-Board and Dedicated GPU sometimes it doesn’t take priority for me. But whenever I use the Windows option it works 100% of the time, I have no idea why using that option works for me but it does.
My NIVIDIA Doesnt have that option plz help
It works perfectly. I don’t have to turning on and off my GTX every time I use some CAD programs. They don’t need extra GPU performance but using GTX cause battery drainage and make my PC very loud. Thanks.
how do i do this in windows 8.1
I tried the process through windows display etc. doesn’t work…
When I try to play a 1440p or higher video on the internet CPU goes berserk and GPU remains on a flimsy 14%.
Great to find this article. I’m hoping these solutions will work for me. I ran into a brand new problem I hadn’t seen before the other day after swapping in a new monitor, two I guess, going from dual to triple head arrangement.
I ran into an immediate problem where the tv connected to my ded-gpu for my games, started producing super low fps on my games after the swap out. I had not changed the cable going to the tv, so it didn’t make any sense.
I had always assumed that if you had the cable coming out of the card, then whatever you have running on that screen will be processed on that gpu, and vice versa, but I am learning that this is not always the case.
I discovered via GPUz that my game was now being run on my IGP, and Intel 4600. At the current settings it would only do about 10-12 fps while normally I get around 40 or so.
I discovered a quick workaround by making the gaming tv my primary desktop monitor, restarting the game, then reverting the desktop, and it switched it to the ded-gpu.
For some reason, even though the game obviously needs maximum power, my new monitor arrangement is causing it to use the IGP by default. I upgraded my Intel driver but that did not fix it. I haven’t reinstalled my ATI driver yet, hopefully that will fix it but I have a new Nvidia 1030 coming in a week anyway (old card is a 6790)
Now I also just discovered that playing a simple youtube video on the ded-gpu tv causes BOTH gpus to be used! I tested to make sure by pausing the video and both gpus drop to zero.
But that’s not all! When the video is on the ATI tv, the average gpu usage is 10% for the ATI and 15% for the Intel. But when I moved the video to the Intel tv, the ATI gpu drops to zero and the Intel gpu stays at 15%
I can only guess that the processing is being done by the IGP, as this article indicates, and the 10% of the ATI is just being used to pump out the stream.
Anyway, I hope I can get all of this sorted out. Seems like all my pc issues always come in waves, and right now I’ve got about 3-5, with another one being that as soon as I plug my two new monitors, the screen position is off on both them! Most times I’ve had that issue in the past, it has been resolved by setting a more proper resolution and refresh rate, but that’s not fixing it here. One monitor has built in screen adjustment so I should be able to use that, but the tv does not, which means I’ll have to use the Intel custom resolution option and there’s a warning that says it can cause actual damage when doing that! /sigh seems like it never ends.
For the amd catalyst control pannel, I do not see an option for switching apps to the graphics card
i don’t have that ‘Run with graphics processor’ option in the desktop tab,i have gtx 1060 6gb,can u help me out,thought i’d never see a day where a girl knows about computers a lot better than me hhhhhh
I have done this an still the game has not run through the GPU
the Nvidia control panel on my desktop does not have that option
what about the intel options
Thanks for the help Fatima Wahab it helped a lot.
Does Intel integrated grapic cards can also perform this kind of task?
Normally, all apps run using the integrated graphics card. The exception is apps that need a particularly powerful graphics card to run e.g. games. You can force apps to use the dedicated GPU but if you’re trying to force an app to use the integrated graphics card, you can’t. The option won’t be there and it’s not a good idea to do this because the app that uses the dedicated GPU needs its extra capabilities in order to run.
Thank you Fatima. In my case, GPU was being used by default but only now I was able to confirm it.
My system has an NVS 4200M GPU, but that option does not exist in the menu.
how do i do this but with windows apps from the windows store?
The post has been updated with instructions for Windows Store apps if you have an NVIDIA GPU. The process should be the same for an AMD GPU.
Typically the one I want (netflix) has the option to change gpu disabled.
Thanks though, without this article I’d still believe it easy/possible.
This NVIDIA menu option appears only with systems using NVIDIA’s power-saving GPU technology. This option is not exists e.g. with GTX 960
CCC doesnt have that option for me.
What options do you see in the ‘Power’ section?
Only AMD Start Now Tecnology and Usage Pattern.
Is there anything on the interface that says ‘Preferences’ ?
Nope.
share a screenshot?
Hi, I have the same issue. I did detect Preferences button. Can you please share your thoughts on next steps?
Thank you
I am using two displays. One driven by my laptot and the other one driven by a USB to VGA cable. AMD CCC doesn’t detect the external graphics card.
In CCC Go to Gaming > 3D Application > Add your web browser and video players there and don’t touch the other settings. I was able to get my PC to play 4k 60fps on youtube on an old quadcore with the help of an AMD Radeon HD 6870. I saw activity o nthe GPU and less activity on the CPU