How to Fix DNS_PROBE_FINISHED_NO_INTERNET Error on Windows 10
“`html
DNS_PROBE_FINISHED_NO_INTERNET is an error message displayed by Google Chrome when trying to access any websites. It indicates a problem with your DNS servers, which prevents you from navigating the Internet and viewing your favorite content.
There are multiple ways to handle this error without resorting to professional help. However, it’s necessary to determine whether there’s something wrong with your web browser, computer settings, or Internet connection.
How to fix the DNS_PROBE_FINISHED_NO_INTERNET error on any platform
Check out the following solutions and make sure to go through them one step at a time. We have taken into account the Windows 10 and macOS platforms.
1. Try a different browser
The simplest way to find out if DNS PROBE FINISHED NO INTERNET points out to an issue with your web browser is by trying to use another application to access the Internet.
If you can successfully surf the web with another browser like Firefox, Edge, or Safari, it makes things easier since you just need to troubleshoot Chrome. Otherwise, it indicates a bigger problem that affects not only Chrome but your entire computer and possibly your Internet connection.
2. Restart Chrome
It may sound too simple to work, but restarting Google Chrome usually fixes the DNS_PROBE_FINISHED_NO_INTERNET error. However, you have to make sure to properly close all its processes before restart.
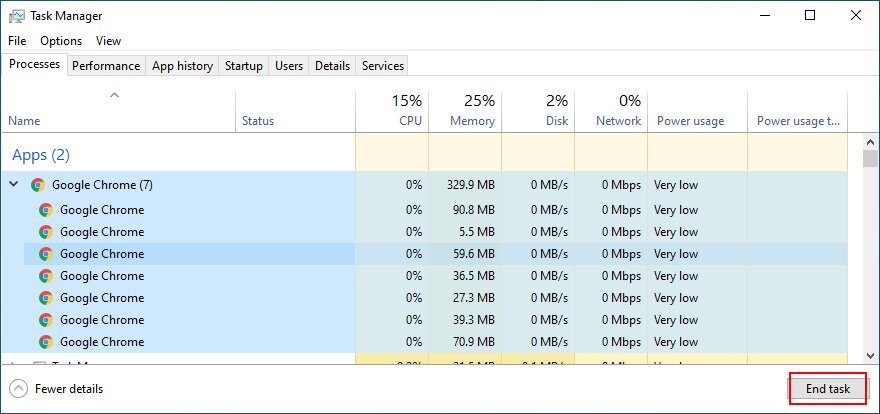
How to correctly restart Chrome on Windows 10:
- Right-click the taskbar and go to Task Manager

- In the Processes tab, find and select Google Chrome and its entire process tree
- Click End task

- Launch Chrome and check for DNS errors

How to correctly restart Chrome on Mac:
- Select the Chrome window
- Click the Apple button and select Force Quit from the menu
- Relaunch Chrome and inspect results
3. Clear browser cache
DNS connection problems can be caused by the browser cache, like saved cookies. So it’s a good idea to clear the Chrome cache before trying to access any webpage. Here’s what you need to do.
How to clear Chrome cache (Windows and Mac):
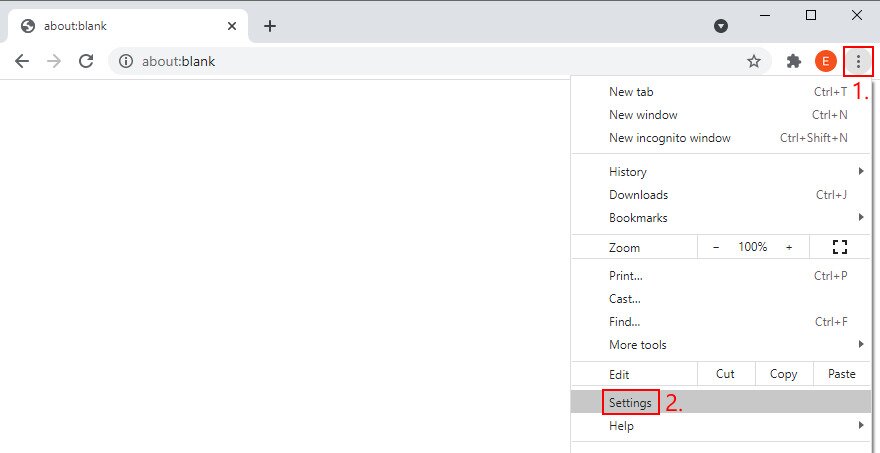
- Fire up Chrome and click the More button on the top-right corner
- Select Settings from the menu

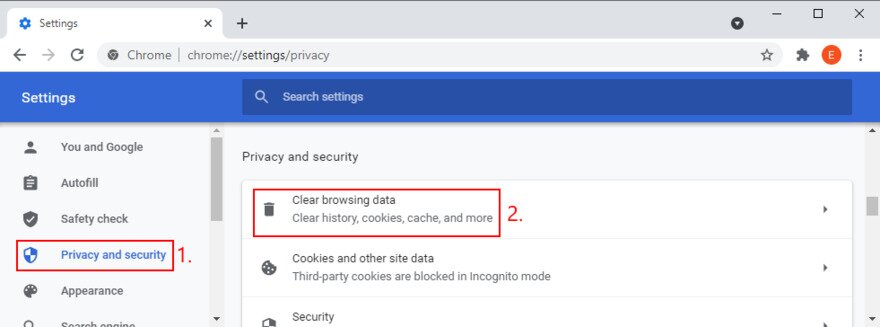
- Jump to the Privacy and security section (or, visit the
chrome://settings/privacyaddress as a shortcut) - Click Clear browsing data

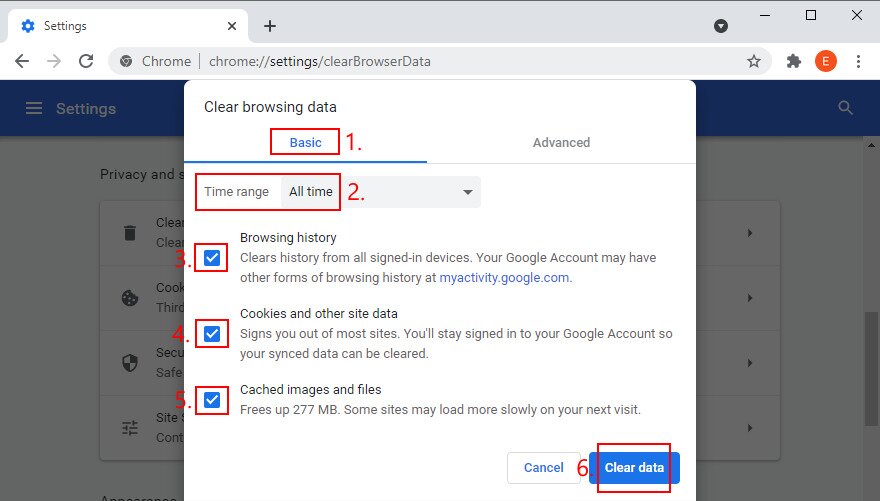
- Remain in the Basic area
- Set Time range to All time
- Make sure to enable the following options:
- Browsing history
- Cookies and other site data
- Cached images and files
- Click Clear data when you’re ready

- Restart Chrome and check for DNS errors
4. Update Chrome
On the latest edition of Windows and macOS, it’s essential to keep Chrome updated to the latest version. This way, you will get immediate access to not only brand new features but also any improvements and fixes to known DNS errors.
How to update Chrome on Windows and Mac:
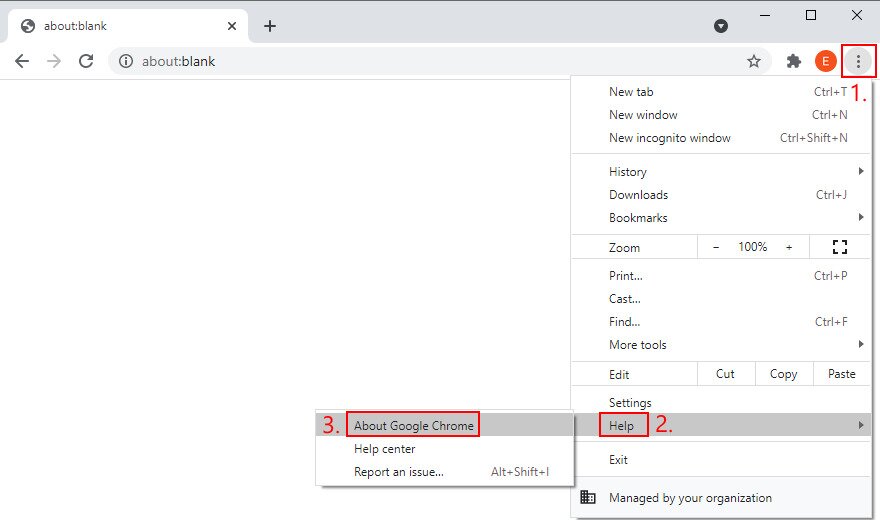
- Open Chrome and click the More button
- Go to the Help section
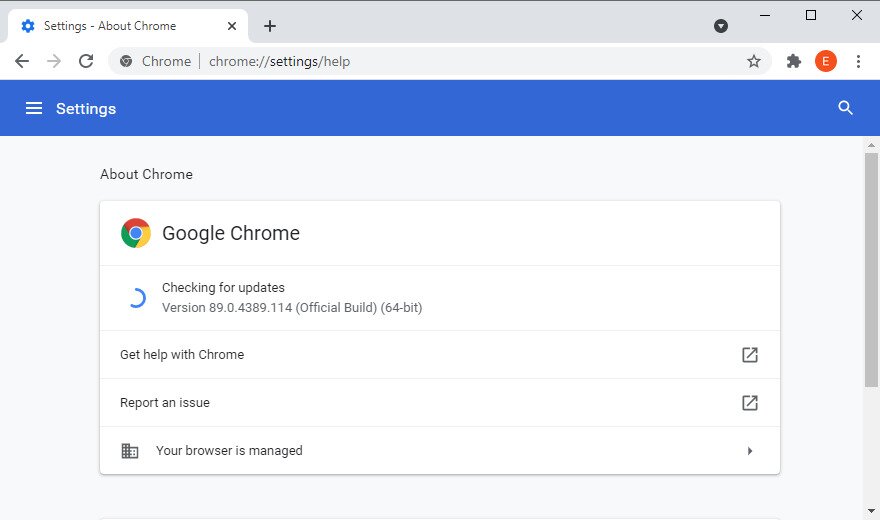
- Click About Google Chrome. Else, you can visit the
chrome://settings/helpaddress
- Wait until Chrome finds and performs updates

- Restart the browser when it finishes and check for DNS issues
5. Reset Chrome to default settings
If you or a browser extension has configured too many settings in Chrome, perhaps the DNS configuration was messed up, too. It’s difficult to find and fix the broken options. A simpler and more elegant solution is to reset Chrome to default.
How to restore Chrome to factory settings on Windows and Mac:
- Open the More menu and select Settings (or visit the
chrome://settings/address) - Go down to the bottom of the page and click Advanced
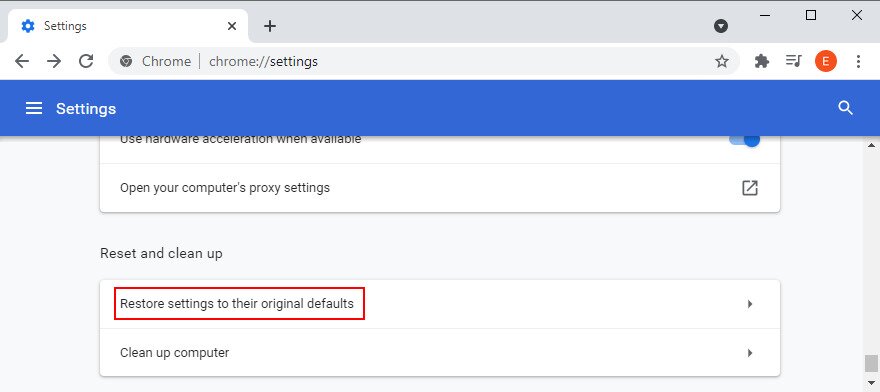
- At the Reset and clean up section, click Restore settings to their original defaults

- When asked to confirm, click Reset settings
- Restart Chrome and check for DNS issues
6. Disable Chrome extensions
Certain browser extensions have permission to change the IP and DNS configuration of Chrome, such as VPN services and proxy tools. If it’s not done correctly, this could cut off Internet access to your entire browser.
To fix this issue, you should uninstall any suspicious or unknown Chrome extensions. Here’s what you need to do (Windows and Mac):
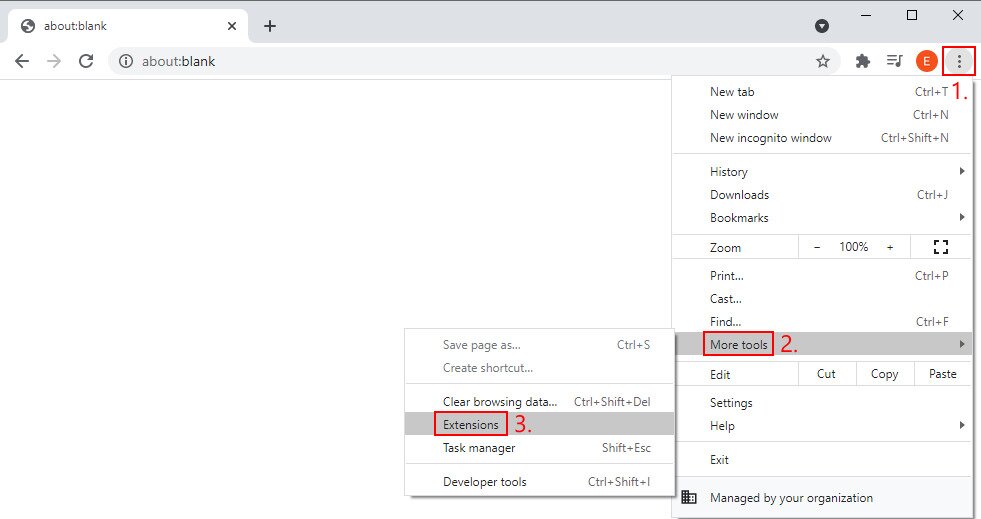
- From the More menu, go to More tools
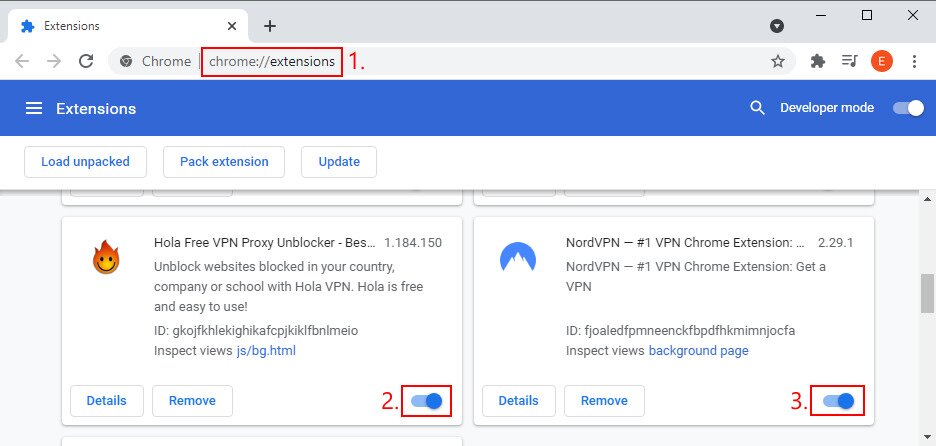
- Select Extensions. Otherwise, visit the
chrome://extensionsaddress
- Turn off any extensions with access to your IP and DNS configuration, including VPN and proxy tools

- Relaunch Chrome and inspect results
7. Reinstall Chrome
If Chrome still throws you the DNS_PROBE_FINISHED_NO_INTERNET error after trying the solutions above, it’s a good idea to remove it from your computer and then reinstall it.
How to correctly reinstall Chrome on Windows 10:
- Right-click the taskbar and select Task Manager
- Select Google Chrome and click End task
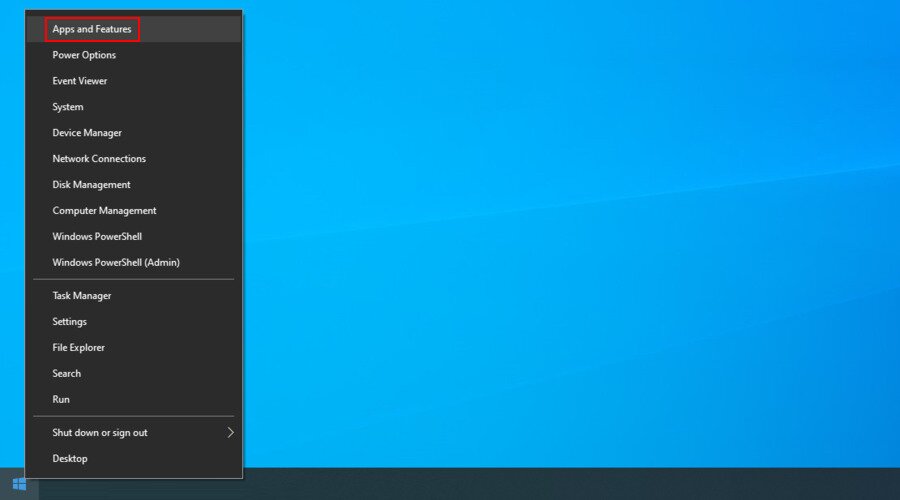
- Right-click the Start button and head over to Apps and Features

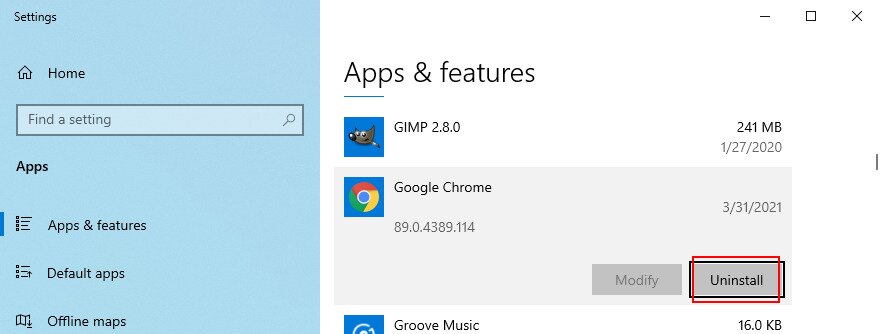
- Locate and select Google Chrome

- Click Uninstall and then again to confirm
- Proceed with the removal operation
- Download Chrome from the official website
- Fire up Chrome and check for DNS errors
How to correctly reinstall Chrome on Mac:
- Launch Chrome and open the Apple menu
- Click Force Quit
- Use the Finder app to track down Chrome
- Drag and drop Chrome to the Trash
- If asked, enter your admin username and password to confirm app removal
- Select Empty Trash in the Finder
- Download Chrome from the official website
- Open Chrome and try to visit a website
8. Use the Chrome stable channel
Chrome has multiple release channels available for download: Stable, Beta, Developer, and Canary. The last three versions give you access to new features and improvements that must be tested before they reach the Stable channel. Some of them never do.
Although it’s exciting to get in the front row and discover cool new features of Chrome, it’s incredibly unstable and should be avoided if you don’t want to experience Internet connectivity issues like the DNS_PROBE_FINISHED_NO_INTERNET error.
Just stick to the Chrome stable version and you’ll be find. It’s the one available for download on the official website.
You can separately download the Beta, Developer, or Canary versions since they won’t override the Stable version. But don’t use them when you need a reliable Internet connection.
9. Downgrade Chrome (Windows)
If you have an older Windows version, it might not fully support the latest edition of Google Chrome. This can lead to all sorts of issues as Chrome evolves and your operating system gets left behind.
The safest solution here is to migrate to Windows 10 since you can take advantage of security patches released by Microsoft and protect your computer from malware.
However, if it’s not possible, then you should downgrade Chrome to an older version, one that’s still compatible with your obsolete operating system. Keep in mind that all your user profiles and cache data will be removed.
How to disable Chrome auto-updates:
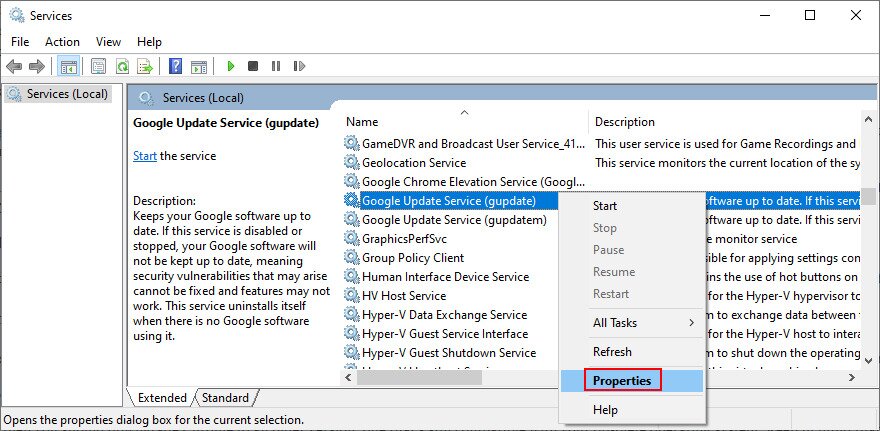
- Click the Start button, search for Services, and open this app
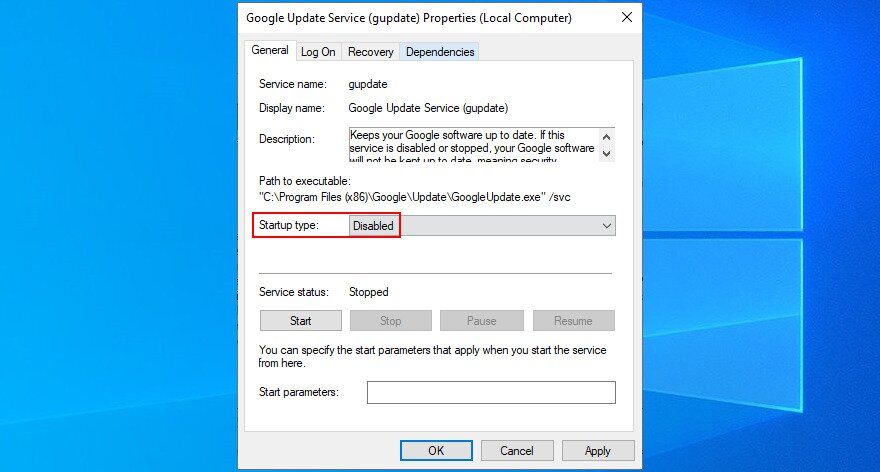
- Locate Google Update Service (gupdate), right-click it, and go to Properties

- Set Startup type to Disabled

- Click Apply and exit
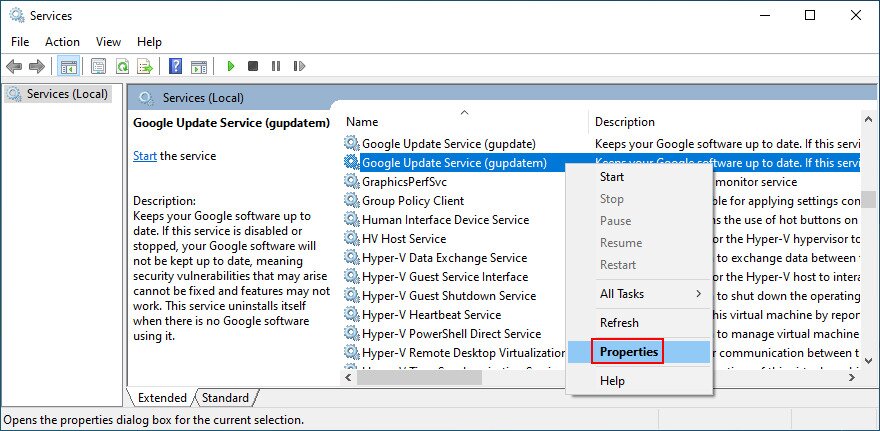
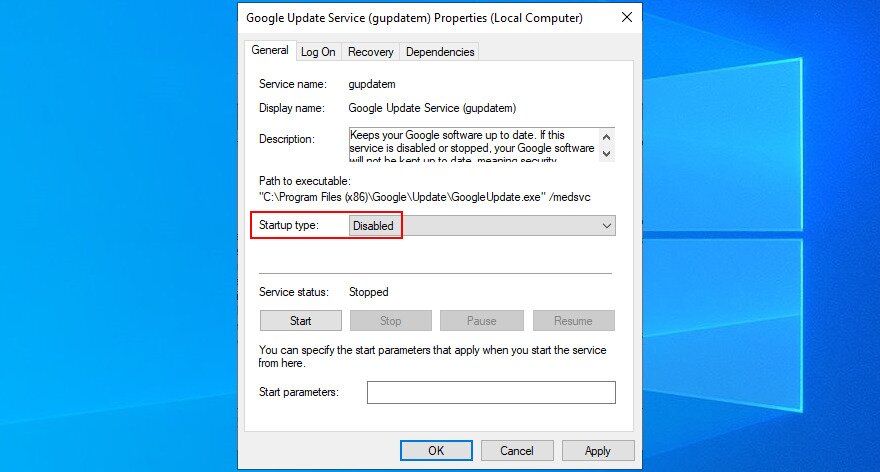
- Double-click Google Update Service (gupdatem) to view its properties

- Set Startup type to Disabled

- Click Apply and exit Services
How to uninstall Chrome:
- Right-click the Start button and select Apps and Features
- Select Google Chrome and click Uninstall
- Proceed with the removal steps
How to install old Chrome:
Unfortunately, Google doesn’t allow users to download older Chrome versions for security reasons. However, you can still find older Chrome versions on third-party websites such as SlimJet.
Just keep in mind that you will download and install those files at your own risk. Caution is advised.
10. Restart the DNS Client service (Windows)
The Windows DNS servers are operated by the DNS Client service, which must run automatically at every system startup and remain running while you’re working on your computer.
However, if there’s something wrong with the service, it’s no wonder that you get the DNS PROBE FINISHED NO INTERNET error in Chrome. It also means that your Internet connection is disabled on any application you try to use, not just Chrome.
How to restart the DNS Client service:
- Press Win key + R, type services.msc, and hit Enter

- Find and right-click DNS Client
- Go to Properties

- Set Startup type to Automatic
- If the Service status says Stopped, click the Start button
- Click Apply and exit

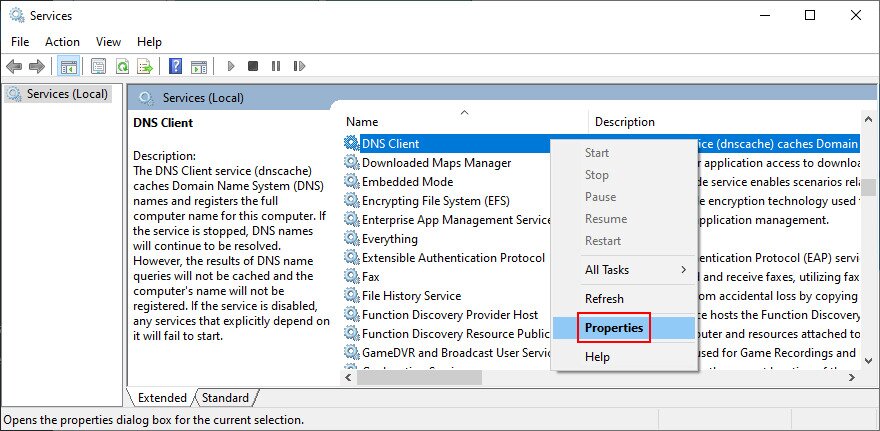
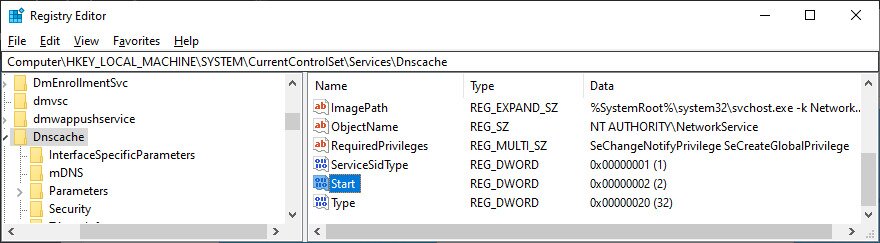
If the DNS Client service buttons are greyed out, here’s what to do:
- Press Win key + R, type regedit, and press Enter

- Click Yes if prompted by UAC (User Account Control)
- Copy and paste the following address:
Computer\HKEY_LOCAL_MACHINE\SYSTEM\CurrentControlSet\Services\Dnscache
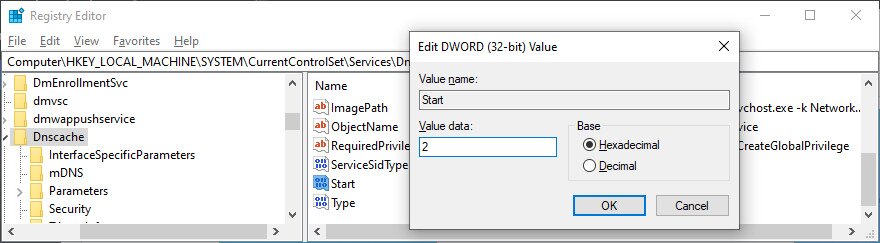
- Locate and double-click the Start entry

- Set Value data to 2
- Set Base to Hexadecimal

- Click OK and exit Services
- Restart your PC
- Launch Chrome and check for DNS errors

11. Use Google DNS servers
By default, your computer uses the DNS servers assigned by your ISP. If they are too slow for Chrome, then your web browser might show the DNS_PROBE_FINISHED_NO_INTERNET error as a warning. You can fix this issue by changing your DNS servers to something else.
We suggest using Google Public DNS because it provides free, public, and secure DNS servers optimized for Chrome. However, you can also try others like OpenDNS or Cloudflare.
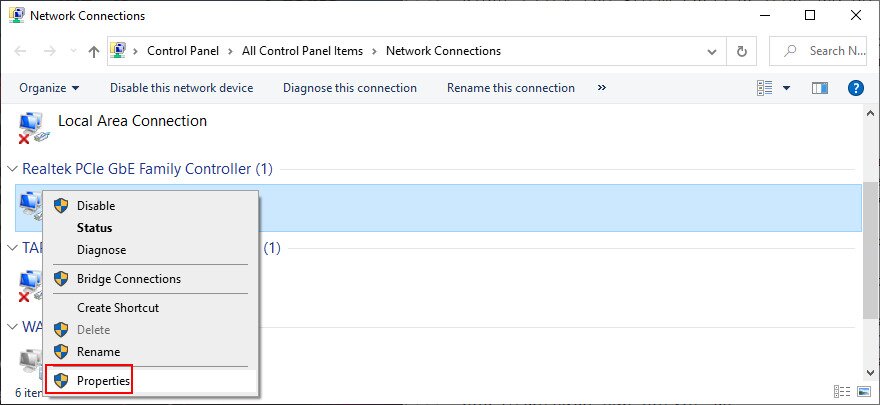
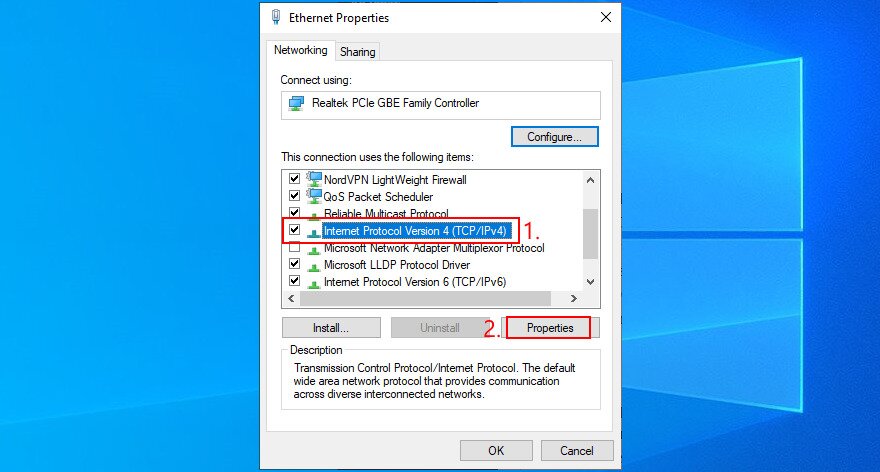
How to set Google Public DNS servers on Windows 10:
- Make sure to log in to Windows 10 with an admin account
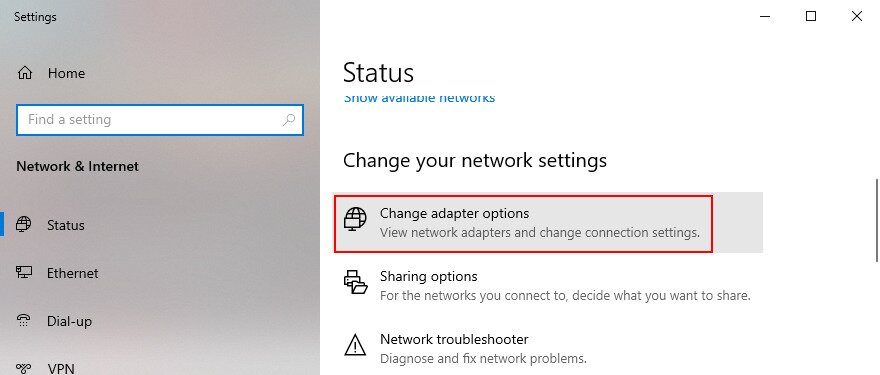
- Click the connections icon in the systray and then Network & Internet settings
- Press Change adapter options

- Choose your Internet connection from the list, right-click it, and go to Properties

- Select the Internet Protocol Version 4 (TCP/IPv4) entry and click Properties

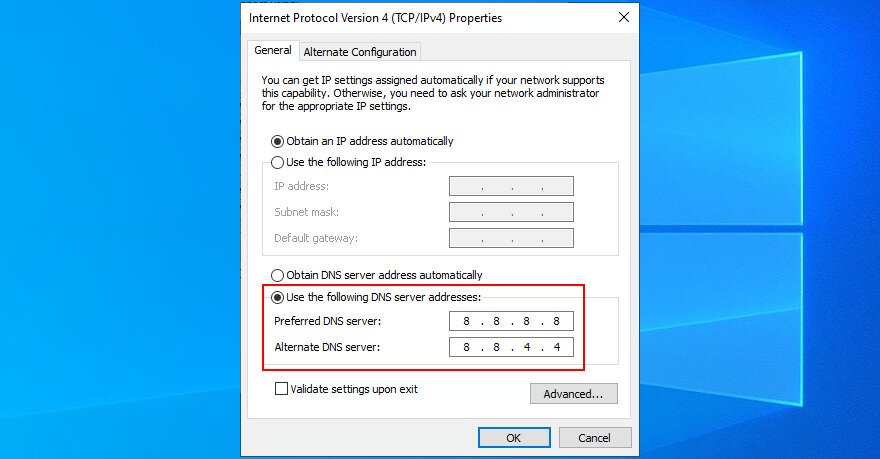
- Remain in the General section
- Select Use the following DNS server addresses
- Set Preferred DNS server to 8.8.8.8
- Set Alternate DNS server to 8.8.4.4

- Check the Validate settings upon exit option
- Click OK and exit
- Try to use Chrome now
How to set Google Public DNS servers on Mac:
- Open the Apple menu on the upper-right part of the screen
- Select System Preferences
- Go to Network > Advanced
- Choose the DNS section
- Click the + symbol and write 8.8.8.8
- Press it again to also add 8.8.4.4
- Click OK and exit
- Launch Chrome and check for DNS errors
12. Clear the DNS cache
Just like your web browser, the system’s DNS cache might get full and cause connectivity errors instead of loading the pages you’re attempting to access. But you can fix this problem by entering a couple of lines of code in Command Prompt on Windows and Terminal on Mac, in order to clear the DNS cache.
How to clear the DNS cache on Windows 10:
- Press the Win key, search for Command Prompt, and open this app
- Paste the following lines of code (press Enter after each one):
-
ipconfig /flushdns
-
ipconfig /registerdns
-
ipconfig /release
-
ipconfig /renew
-
netsh winsock reset
-
- Exit Command Prompt and restart your PC
- Fire up Chrome and check for DNS errors
How to clear the DNS cache on macOS:
