Terrarium TV Parental Controls: How to Set Them Up
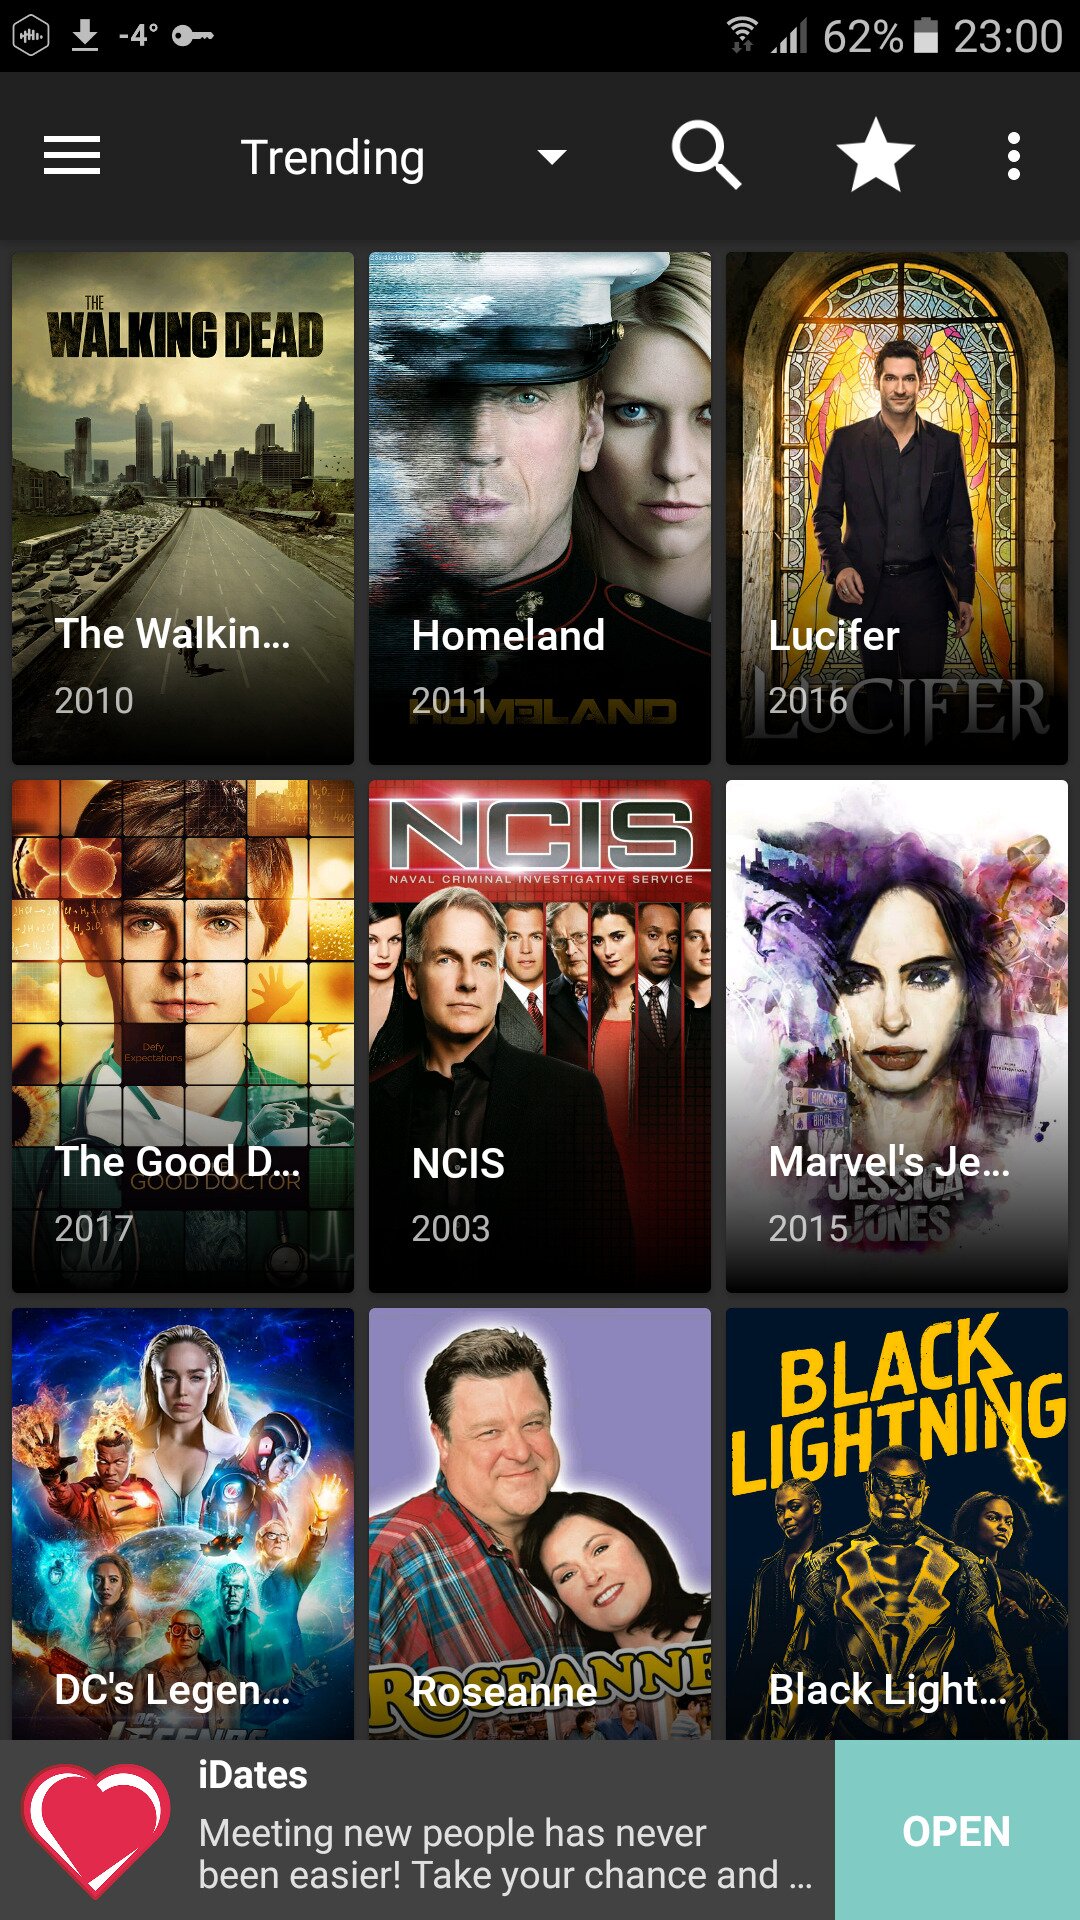
Terrarium TV is a newer piece of media centre software that has proven very popular thanks to its big range of TV content. The software is easy to install and gives you access to streams of the latest and most popular TV shows like The Walking Dead, Black Lightning, NCIS, and lots more. One big advantage of the software is that it can be installed on a variety of platforms, including Android, FireStick, and Android boxes. While there is the occasional problem with excessive buffering, overall the software is perfect for media-addicts looking for a free all-in-one TV streaming solution.
However, there is one feature that some users want in Terrarium TV, and that is parental controls. If you’re a parent and you want to let your kids use your media centre, you know how stressful it can be when you try to make sure that they don’t access any inappropriate content. After all, you can’t realistically monitor every minute of their TV time yourself! Terrarium TV doesn’t offer much in the way of settings you can toggle to enable parental controls, but there are definitely workarounds, as you’ll discover below.
Parental Controls In Terrarium TV
Despite the plethora of content available in Terrarium TV, configuration options are quite sparse. This is because of the way the app is designed: it aggregates streams from multiple difference sources, but does not analyse the content within those streams. The end result is that the available range of filtering options is rudimentary at best.
In other words: there are currently no parents controls available in Terrarium TV. The developer of the app, Nitro, has said that he does plan to implement this feature in the future, but as of yet there is no indication of when the feature might arrive.
If You Need Parental Controls, Try Kodi
If you are a harangued parent who is looking for media centre software that you can install parental controls on, then we recommend that you try Kodi. Kodi is open source media centre software which can be used to stream TV shows, like Terrarium TV, but it has been around for a lot longer so there are a lot more options available for it. You can install add-ons for Kodi to let you watch TV shows and movies, plus listen to music, play games, and more.
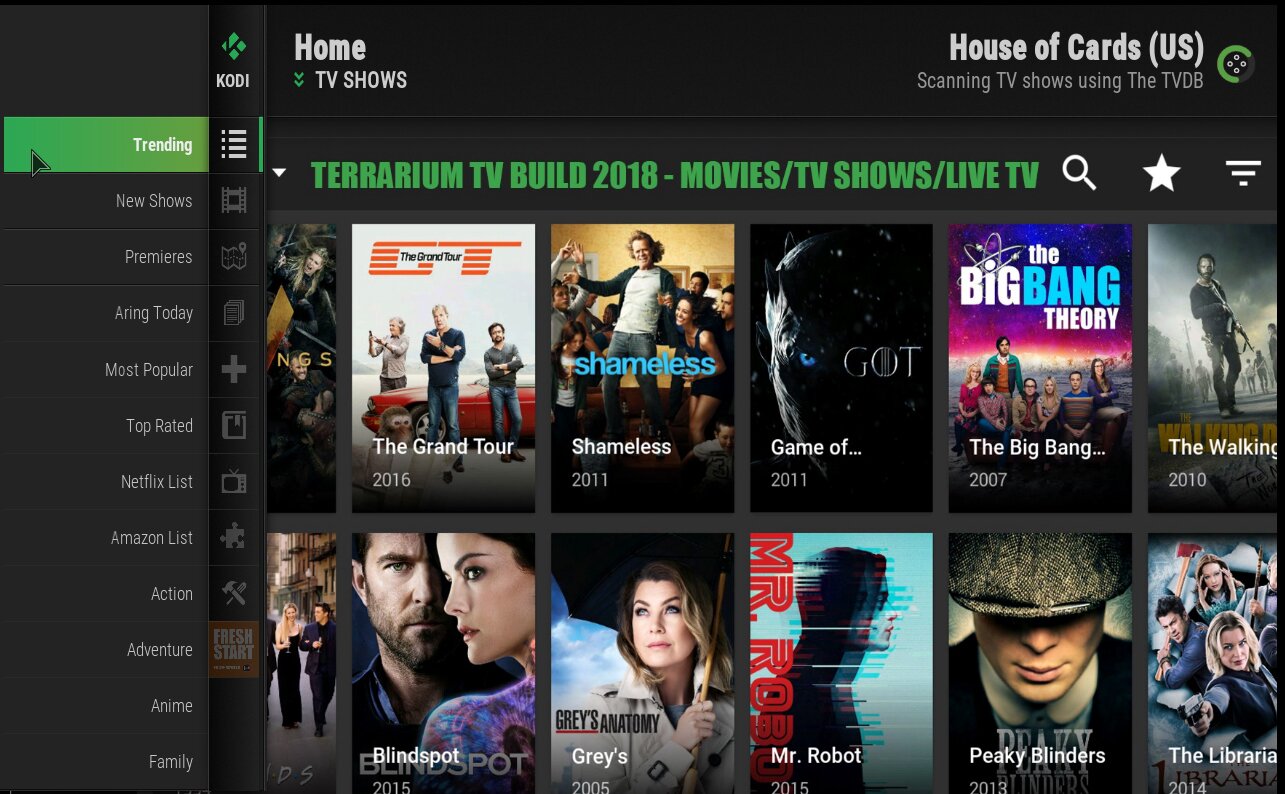
If you are dead set on the Terrarium TV experience then you can install the Terrarium TV build for Kodi. A build is a version of Kodi that comes pre-configured with add-ons installed and a new skin to give it a distinctive look. The Terrarium TV build for Kodi has a similar look to the Terrarium TV app, with the popular and latest TV shows as thumbnails on the main page, and it can also be used to stream these shows plus many more. The primary difference is that the Kodi add-on offers far more options than the native Terrarium TV application, namely a parental lock feature.
Security Issues When Using Kodi Builds
Although the Kodi software itself is fully legal to use, many of the add-ons and builds associated with Kodi are not. Software like the Terrarium TV build may breach copyright law in allowing users to stream copyrighted content for free. If your ISP catches you using such a build to stream copyrighted content, then you could be kicked off their network or even face a fine or prosecution.
To avoid these legal issues when using Kodi builds, you need a VPN. A virtual private network is a piece of software which encrypts all of your data before sending it over the internet, so that no one can track your internet activity (not even your ISP). In choosing a provider, look for 256-bit encryption, no-logging policies, fast connection speeds and an extensive server network. Additionally, it’s a great advantage to be able to install your VPN on whatever device you use to stream.
IPVanish – The Best VPN For Kodi

We recommend IPVanish for Kodi users. This service offers fast connection speeds which are perfect for streaming video, industry-standard encryption protocols that would take millions of years for even the most sophisticated supercomputer to crack, and a strict no-logging policy to safeguard your privacy online. Their proxy servers number over 950, and are located throughout the world in 60 countries. IPVanish offers slick, lightweight software available natively for a wide variety of devices, including Android, iOS, Mac, Windows, Amazon Fire TV, and so many more.
IPVanish offers a 7-day money back guarantee which means you have a week to test it risk-free. Please note that Addictive Tips readers can save a massive 60% here on the IPVanish annual plan, taking the monthly price down to only $4.87/mo.
Understanding Kodi Profiles
The good thing about Kodi is that it comes with a whole lot of features installed and ready to use, including a Profiles feature that lets you control exactly what your children can and cannot access. Check out our full guide on Kodi profiles, or just continue reading for some basics of how to set up a profile for your kids.
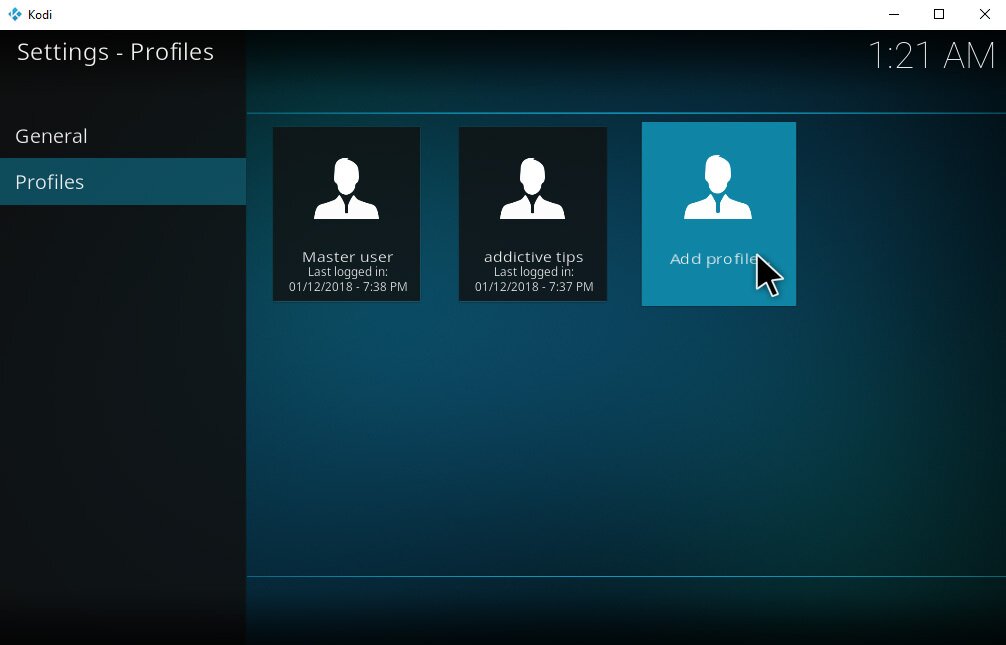
The default profile in Kodi is called Master user, and this is the profile that has access to everything that you have installed on Kodi so far. By creating a separate profile for your kids, you can hand select which add-ons get installed on their profile, effectively restricting access to anything else. You can also select which folders of content on your hard drive that the profile has access to, so if you have your R rated movies in one folder and your G rated movies in another, you can grant your kids access to the latter but not the former.
When your kids are done with Kodi and you want to use it yourself, you can switch profiles by simply logging into your master user profile with a password. This restores full access to all of your add-ons and files for your own use.
How To Set Up A New Profile For Your Kids
Here are instructions on how to set up a new profile in Kodi:
- Begin on your Kodi home screen
- Go to Settings by clicking the icon that looks like a cog
- Click on Profile settings
- Select Profiles from the menu on the left
- This brings up a list of all of the profiles you have already created. If this is your first time working with profiles, there will be just one profile here called Master user. To create a new profile, click on Add profile… on the right

- This brings up a Profile name text input box. Give your profile a name, like kids
- Click on OK
- Now you’ll see an input box that says Browse for folder. Leave it blank and click on OK
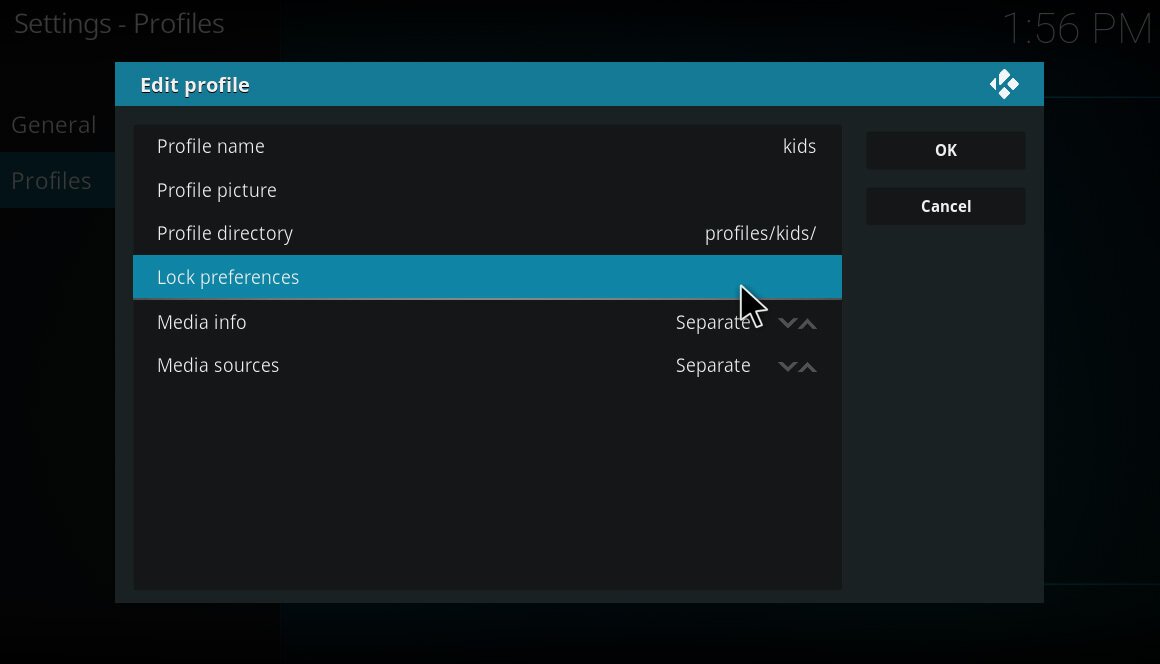
- Now you will see the Edit profile window. Here you can set the options for your new profile:
- Profile name – change the name of your profile
- Profile picture – add an icon or picture to each profile to make it easy to find. This is good for very young children
- Profile directory – choose the folder in which the profile’s individual settings are stored

- Lock preferences – stop your children from fiddling with your Kodi settings by enabling the lock for each item you want to restrict. Alternatively, you can use the parental lock feature below if you want to mange these settings more precisely. When you lock an item, you will need a password to access it. You can know the password for yourself but not give it to your kids to stop them from accessing content or settings that they shouldn’t
- Media info – choose how you want to share media between the multiple profiles. If you have R rated content in your media folders that you want to be able to watch but you don’t want your kids seeing, choose Separate to manage the media libraries separately for each profile
- Media sources – choose where the profile can pull media from, such as when using add-ons. For your kids’ profile, select Separate to manage which add-ons and sources your children have access to
- Click OK when you are done to save the new profile
- Now go back to the Profile settings screen and check the box to enable Login screen. This means that when Kodi starts up you will be prompted to log in
How To Use The Kodi Parental Lock
Now that you have a profile of appropriate content for your children, you’ll also want to stop them from changing your Kodi settings either accidentally or deliberately to get around your profile settings. To do this, you can use a feature of Kodi called the master lock. We wrote a comprehensive guide on Kodi parental locks, but we’ll walk you through the basics of enabling the lock below:
- Start up Kodi and see your home page
- Click the icon that looks like a cog to go the settings menu
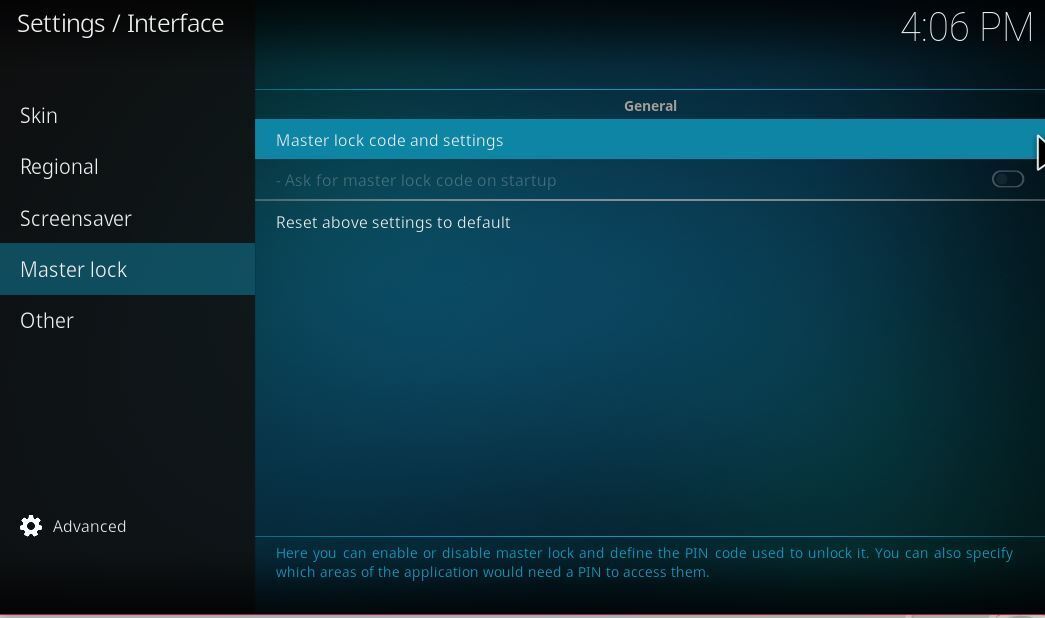
- Choose interface settings
- Now look at the bottom of the menu on the left where it says Standard next to a cog icon. Click on this to open the advanced user settings
- Now select Master lock from the menu on the left

- Choose the option Master lock code and settings from the options on the right
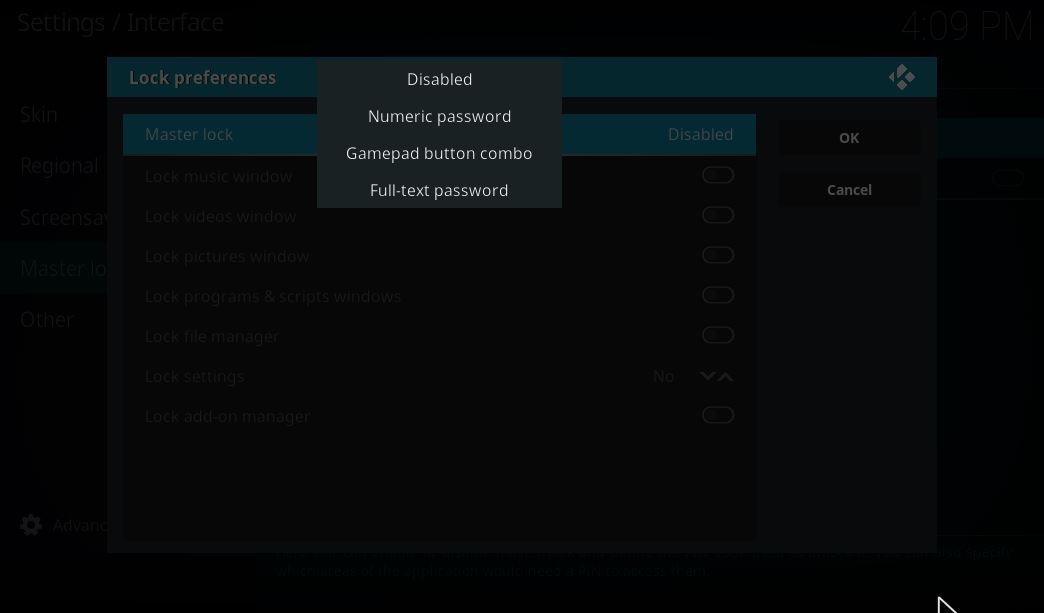
- This brings up a Lock preferences box. Look at the option for Master lock at the top, and click where it says Disabled

- This brings up four options: Disabled, Numeric password, Gamepad button combo and Full-text password. We’ll select Numeric password as that is the quickest and easiest to type, though you could use a button combo or a text password if you prefer
- Now a box will appear where you can input your code. You can use as many digits as you like but 4 is usually a good number. Type in your code and press Done
- Enter your password again to confirm
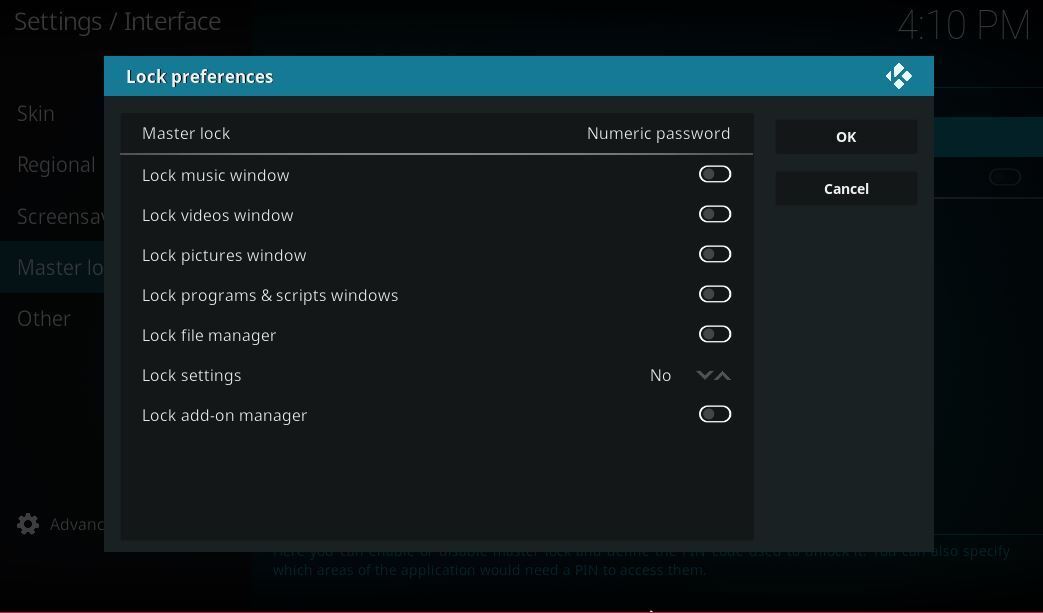
- Now you’ll see a list of options have appeared in the Lock preferences window. You can toggle and option that you want to lock:

- Lock music window – Prevent access to music content
- Lock videos window – Prevent access to video content, including both movies and TV shows
- Lock pictures window – Prevent access to picture content
- Lock programs & scripts windows – Prevent the users from running scripts or programs. Do turn this on when setting up a lock for your kids
- Lock file manager – Prevent access to the file manager. You should also enable this lock for your kids
- Lock settings – Prevent access to the settings panel in general, or to specific settings. You will probably want to lock at least some of the settings away from your kids
- Lock add-on manager – Prevent access to your add-ons, including all of your streaming content
- Once you have toggled the features that you want locked, click OK
- Now you’ll be taken back to the lock settings screen. Find the Ask for master lock code on startup option and toggle it to on
- Now your kids won’t be able to change your Kodi settings without the password
Conclusion
Terrarium TV is a streaming app that is growing in popularity thanks to its huge selection of TV shows that can be watched for free. However, there are some limitations to the service, such as its lack of parental controls. The developer of Terrarium TV has said that he does intend to implement a parental lock feature into the app in future, but for now it is not available.
If you want the Terrarium TV experience but you also want a parental lock, give the Terrarium TV build for Kodi a shot. This add-on provides a similar user experience to Terrarium TV, but with the added benefit of Kodi’s many access control options to keep your kids from watching restricted content. You can use a combination of profiles for your kids and the master lock feature to set up Kodi according to your needs so that both you and your kids can use the software happily and safely.
If you are a parent and a media centre user, what steps do you take to control access to appropriate content? Have you tried out the parental control features of Kodi? Let us know about your experiences in the comments below.
Don't miss this great deal
