Install a VPN on Synology NAS in 2025: Expert Fixes
Need help setting up a VPN on your Synology NAS device? In today’s guide, we’ll walk you through the process of choosing the best VPN provider with out of the box NAS support from a crowded marketplace. If you’d rather configure your VPN connection manually, we’ll show you how to do so via OpenVPN and PPTP.

Network Attached Storage devices, or simply NAS devices, are incredibly powerful pieces of hardware that bring centralized data storage to your home or office. NAS technology includes everything from standalone hard drives to routers with built-in NAS capabilities. All you have to do is give the device access to the internet and all of the computers, smartphones, and tablets on your local network can wirelessly access files stored on the NAS.
These VPN providers all easily install onto your Synology NAS:
- NordVPN – Best NAS VPN – Compatible with Synology NAS via OpenVPN and PPTP, NordVPN offers endless configuration options to optimize your VPN connection for security and performance.
- Surfshark – Uses the OpenVPN UDP/TCP protocols, has some nice extras like automatic obfuscation and ad-blocking.
- ExpressVPN – Connects through both PPTP and OpenVPN, prioritizes connection speeds and network stability.
- IPVanish – OpenVPN/PPTP. Great for torrents, streaming–especially on Kodi.
- VyprVPN – NAS-compatible through OpenVPN, Chameleon protocol beats DPI censorship.
Synology is one of the better-known NAS manufacturers and offers a wide range of devices for home, office, and even corporate use. They can hold hundreds of terabytes of files and come with plug-and-play bays that make them easy to expand. They’re so flexible you can even install a virtual private network (VPN) and use it to encrypt all of your network traffic without having to rely on expensive off-site servers.
Comparison of the Best VPNs to Install a VPN on Synology NAS
- 24/7 Live Chat
- 24/7 Live Chat
- 24/7 Live Chat
- 24/7 Live Chat
- 24/7 Live Chat
- Netflix,
- Disney+,
- Amazon Prime,
- iPlayer,
- YouTube,
- Hulu
- Netflix,
- Disney+,
- Amazon Prime,
- iPlayer,
- YouTube,
- Hulu
- Netflix,
- Disney+,
- Amazon Prime,
- iPlayer
- Netflix,
- Disney+,
- Amazon Prime,
- iPlayer,
- YouTube,
- Hulu
- Netflix,
- Disney+,
- Amazon Prime,
- iPlayer,
- YouTube,
- Hulu
Option 1: Supported VPN Services (Beginner)
Adding a virtual private network to your Synology NAS is a fairly straightforward process. There are a couple of things you’ll need to prepare beforehand, however, the most important of which is VPN support. Make sure your existing VPN provider offers at least one of two protocol options: OpenVPN and PPTP. OpenVPN is generally the far superior choice and is fortunately supported by the vast majority of VPNs on the market, so chances are you don’t have anything to worry about.
Not sure which VPN to use? There are hundreds of providers out there who claim everything from the fastest speeds to the toughest encryption and lowest prices. Picking through their feature sets can be a confusing mess, especially if you want a VPN for a specific purpose. We’ve narrowed things down to the most important criteria, listed below. We use these to select our recommended VPNs to ensure you get the fastest, the most secure, and the best overall VPN around.
- Zero-logging policy – Sensitive data that travels to and from your network can be logged by ISPs and VPN services alike. If those logs fall into the wrong hands, your data is no longer private. The top VPNs have strict zero-logging policies to ensure that never happens.
- Speed – Encryption often slows VPNs down by as much as 20%, largely due to encryption overhead. Our recommended VPN services have developed workarounds to deliver the fastest speeds without sacrificing privacy.
- Protocols and software support – Some VPN services only offer the basic security protocols and custom apps for a few common operating systems. If you’re a power user and want to experiment with alternative encryption methods, or if you need to use your VPN from non-standard devices, make sure your VPN is set up to handle it.
- Bandwidth and traffic – Some VPNs throttle download speeds, put caps on maximum bandwidth usage, and block protocols like torrents and P2P networks. Top services offer completely unmonitored, unlimited traffic so you can surf and download anything you like.
Below are our best VPNs you should use to install on a NAS:
1. NordVPN
- Highly affordable plans
- Different IP addresses aervers
- Connect up to 6 devices at once
- Based in Panama
- Customer Service (24/7 Chat)
- Some servers can have average d/l speeds
- Sometimes slow in procesing refunds (but always do)
NordVPN has a stellar reputation in the VPN community, and it’s well-deserved, too. The service has been in operation for years, providing incredible speeds and strong privacy policies for users around the globe. NordVPN’s biggest standout feature is the size of its network: over 5,000 servers in 60 different countries. This incredible number of nodes gives you the ability to find lightning-fast, no-lag connections to any country, all with unlimited bandwidth, no traffic monitoring, and no blocked P2P networks or torrents.
NordVPN offers both OpenVPN and PPTP connections through a Synology NAS device. Our instructions below will help you get things set up in a matter of minutes. You can also follow NordVPN’s step-by-step guide for both protocols.
More of NordVPN’s best features:
- A completely private connection that delivers reliable access even in censorship heavy areas like China, Turkey, Russia, and the Middle East.
- Unique, specialized servers that deliver double encryption, onion routing, and anti-DDoS features.
- Zero-logging policy covers traffic, time stamps, bandwidth, and IP address logs.
- One of the few VPNs that maintains reliable access to Netflix.
Read our full NordVPN review.
2. Surfshark
- Bypass government censorship with NoBorders mode
- Unblock Netflix on any server, no more picking and choosing
- No questions asked money back guarantee
- VPN home jurisdiction in British Virgin Islands is ideal for privacy
- Get help any time of day via email, phone, or live chat
- Server network is not nearly as expansive as major competitors
- Relatively young VPN still has to prove itself trustworthy over the long haul
Surfshark is the newcomer on our list, but it stands tall as one of the best VPN providers overall. They offer a respectable network of 800+ servers across 50 countries, giving you global access to virtual IPs and optimal connection speeds. The unbreakable 256-AES-GCM cipher is used to secure your link with their network, and the app automatically kicks obfuscation in when it detects advanced surveillance measures like deep packet inspection.
No logs are kept by Surfshark according to their independently audited logging policy; and anyway their RAM-only servers continually wipe all user metadata, making retention impossible.
Surfshark is compatible with your Synology NAS device via OpenVPN. Our instructions below should be all you need to get started, but Surfshark also has a helpful how-to guide on their website.
Surfshark features the following features:
- RAM-only server network which continually wipes all VPN user metadata
- Unlimited simultaneous connections
- An entire server network that “just works” to unblock Netflix thanks to blanket obfuscation
3. ExpressVPN
- SPECIAL OFFER: 3 months free (49% off – link below)
- 94 countries, 3,000+ servers
- Very simple and easy to use
- Strict no-logs policy
- Great support (24/7 chat)
- Max 3 simultaneous connections
- Slightly more expensive than some other options
ExpressVPN is fast, easy to use, and extremely reliable. The service offers custom software for a wide variety of devices, including Windows, Mac, Linux, iOS, and Android operating systems, all backed by a large network of over 3000 servers in 94 different countries. Speed test scores are consistently high throughout this network, regardless of your physical location. This allows you to connect at top speeds to any country at any time of day without having to worry about slowdown or lag. ExpressVPN backs this up with excellent security practices, including 256-bit AES encryption and a no-exceptions zero-traffic logging policy to keep your activity private and safe.
ExpressVPN offers both OpenVPN and PPTP protocols for all users. When installing the software to your Synology NAS device, however, ExpressVPN recommends using PPTP. Follow our instructions below to add the VPN to your NAS, or use ExpressVPN’s step-by-step installation guide.
More ExpressVPN features:
- An automatic kill switch and DNS leak protection on several versions of their custom apps.
- Built-in speed tests to ensure you always get the fastest connection possible.
- Reliable access to Netflix through the website as well as Netflix apps.
- Unlimited bandwidth and no restrictions on P2P or torrent traffic.
Read our full ExpressVPN review.
4. IPVanish
IPVanish is the best VPN for staying hidden online. Speed, privacy, and security are its focal points, offering unbeatable 256-bit AES encryption on all transfers and absolutely no traffic logs to keep that activity safe. DNS leak protection and an automatic kill switch will keep your identity a secret even if something goes wrong. All of this is routed through IPVanish’s massive network of over 1300 servers in 60 different countries, all of which are lightning-fast and incredibly reliable.
IPVanish offers both OpenVPN and PPTP encryption for VPN customers, but when using the service with a Synology NAS it’s recommended you stick with PPTP. Once you’ve signed up with IPVanish, use our guide below to complete the NAS installation.
IPVanish includes the following features:
- Easy to use custom software and apps for all major operating systems, smartphones, and mobile devices.
- Download torrents with full privacy and anonymity, keeping you safe from ISP warning messages.
- Fast and secure servers allow for incredible video streams through Kodi.
Read our full IPVanish review.
5. VyprVPN
VyprVPN goes to great lengths to provide the best privacy features on the market. One of the biggest contributing factors is the fact that VyprVPN owns its entire server network, allowing the company to perform all hardware and software upgrades without third-party intervention. In other words, your data has never been safer! There’s also VyprVPN’s unique Chameleon protocol that helps defeat deep packet inspection. If your ISP or a local government uses DPI to investigate VPN traffic for censorship or throttling purposes, Chameleon can cut through the firewall to keep your internet connection fast, safe, and secure.
VyprVPN supports NAS set-ups through OpenVPN, which is generally considered more secure and reliable than its PPTP counterpart. Follow our instructions below to install the VPN, or use VyprVPN’s detailed custom guide.
VyprVPN includes the following features:
- Support for a wide variety of operating systems, including desktops, Android, and iOS smartphones.
- Unlimited bandwidth and no restriction on P2P traffic or torrent downloads.
- Strict zero-logging policy that covers both traffic and DNS request logs.
- A large network of 700 servers in 70 different countries.
Read our full VyprVPN review.
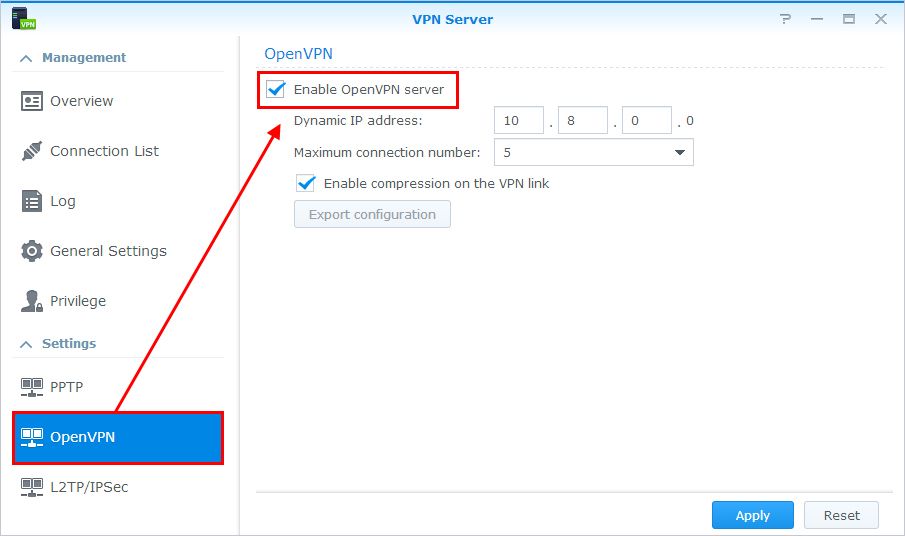
Option 2: OpenVPN Guide (Expert)

Adding a virtual private network to your Synology NAS device is easy, straightforward, and should only take a minute or two of your time, all thanks to Synology’s built-in support for virtual private networks. You’ll need access to your VPN credentials before you begin, however, and you’ll also need to be able to log into the NAS device. Once that’s secured, simply follow the steps below.
Step 1: Gather your VPN credentials
Most VPN services allow you to generate custom .ovpn files to use for manual set-ups, which is exactly what you’ll be doing here. If you can’t find the option in your provider’s membership area, visit their support pages and look for articles titled “OpenVPN configuration files”. These files include server information that allows the VPN to connect through the NAS. Save this file somewhere convenient, as you’ll need it just a few seconds.
If you can’t get the .ovpn file for any reason, make sure you have access to the following:
- Login name for your VPN provider
- Password for your VPN provider
- Server address for the VPN server you want to connect to
- Port and protocol information (usually 1194 UDP, though not always)
Step 2a: Configuring the NAS with an .ovpn file
With access to your Synology device and a generated .ovpn file you can upload and configure the VPN in just a few seconds.
- Log into your Synology NAS.
- Open the “Network” icon.
- Click on “Create” then choose “Create VPN profile”
- Select OpenVPN.
- Fill in the boxes with your VPN login and account information.
- Upload your .ovpn file on this same screen.
- Click “Next”
- Choose the profile you just created and click “Connect”
Step 2b: Configuring the NAS manually
If you can’t create or simply can’t use an .ovpn file for the installation process, don’t worry, you can always do it manually. Instead of uploading the file just enter the details listed below into the appropriate boxes.
- Profile name: Choose an easy to recognize name.
- Server Address: Enter a server hostname from your VPN provider.
- Username: Your VPN service’s username.
- Password: Your VPN service’s password.
- Port: 1194 (this can vary between VPNs)
- Protocol: UDP (this can vary between VPNs
RELATED READING: How to Change to an American IP Address
Option 3: PPTP Guide (Medium)

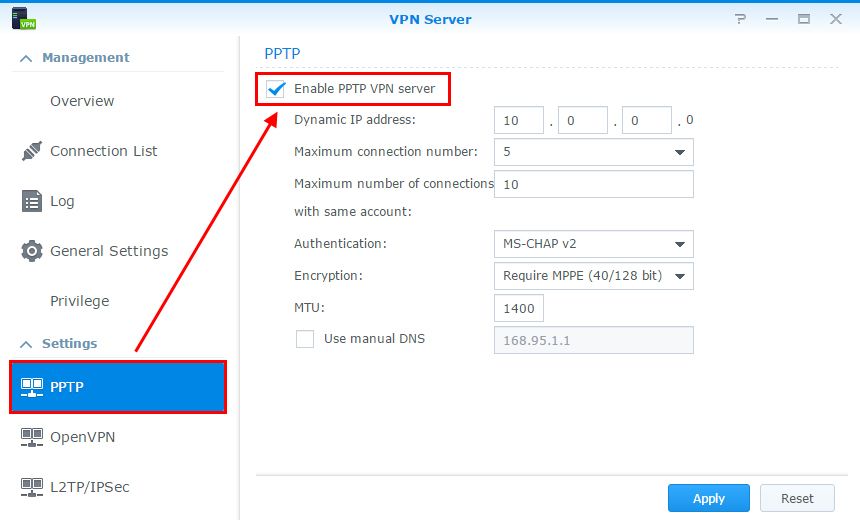
The PPTP method requires a lot of the same information as an OpenVPN setup. There’s no .ovpn file to generate and upload, which means you’ll need to configure your Synology NAS manually. The information presented below will work for the vast majority of VPNs on the market. Double check your service provider’s details just to make sure nothing needs to be different.
- Log into your Synology NAS.
- Open the “Network” icon.
- Click on “Create” then choose “Create VPN profile”
- Select PPTP and click “Next”
- Fill in the boxes with your VPN service credentials.
- Locate server information on your VPN provider’s support pages and enter that in the boxes, as well.
- When everything is filled out, click “Next”
- Fill in the advanced settings with the appropriate information. The info below is most commonly used. Double check your VPN service provider’s specifications if you’re unsure.
Authentication: MS CHAP v2
Encryption: Maximum MPPE (128 bit)
CHECK the box next to “use default gateway on remote network”
UNCHECK the box next to “allow other network devices to connect…”
CHECK the box next to “reconnect when the VPN connection is lost”
- Apply these changes.
- Choose the profile you just created and click “Connect”
INTERESTING READ: Looking for an Iranian web proxy? Better try these VPNs.
What’s the Difference Between OpenVPN and PPTP?
VPN services use a variety of protocols to encrypt and manage traffic that passes through their servers. You’ll see lots of abbreviations like L2TP/IPSec, SSL/TLS, SSTP, and so on. On the whole these “extra” features are designed for specific purposes, such as breaking through censorship firewalls or defeating ISP throttling. For the vast majority of users these won’t have any effect on daily VPN usage, even though it’s nice knowing they’re there, just in case!
OpenVPN has largely taken over as the dominant protocol in the virtual private network industry. In essence, OpenVPN pulls together a variety of protocols to create a single unified networking experience, complete with encryption and authentication, both of which are absolutely necessary for a secure online connection. Most other protocols rely on separate technologies to provide some of these features, which is what makes OpenVPN so attractive to VPN providers.
PPTP, or Point-to-Point Tunneling Protocol, is another commonly used style of VPN that helps deliver privacy and anonymity online. It doesn’t use encryption or authentication on its own, relying instead on a stack of technologies to add these features before it carries out its direct connection. PPTP is largely considered an obsolete method of online privacy, however, as there are many known security issues. It’s still used in a variety of VPN applications when a fast, low overhead method of data protection is needed, however.
If you need a VPN for a short while when traveling for example, you can get our top ranked VPN free of charge. NordVPN includes a 30-day money-back guarantee. You will need to pay for the subscription, that’s a fact, but it allows full access for 30 days and then you cancel for a full refund. Their no-questions-asked cancellation policy lives up to its name.

