How to Fix Windows Stop Code 0xc000021a (Full Expert Guide)
0xc000021a is a Blue Screen of Death error that can occur on Windows 10, 8.1, 8, 7, Vista, and XP. It’s also known as STOP 0xC000021A, STATUS_SYSTEM_PROCESS_TERMINATED, HALT: c000021a {Fatal System Error}, and STOP c000021a. On Windows 10, it’s accompanied by the Your PC ran into a problem and needs to restart message.
Many users report getting this stop code after upgrading Windows 10 to a newer edition. It usually shows up on the screen when trying to boot to Windows, making it challenging to fix this BSOD error by just relying on the tools available in BIOS and Advanced Startup mode. In some cases, this error might occur alongside other issues like the PFN list corrupt Windows 10 stop code, which also points to deeper system-level corruption. Similar to the system thread error fix, resolving 0xc000021a requires systematic troubleshooting to identify the underlying cause.
Because of this, you might be tempted to turn to a professional for help. But it’s not necessary for fixing a problem similar to the Inaccessible Boot Device error, as long as you follow the simple instructions below.
How to fix 0xc000021a BSOD error on Windows 10
Windows stop code 0xc000021a can be caused by Winlogon.exe (Windows Logon Subsystem) or Csrss.exe (Client/Server Runtime Subsystem) if any of these core components stop working properly. In this case, you have to fix the malfunctioning processes.
1. Start Windows 10 in Safe Mode with Networking
If you can’t boot your operating system due to the 0xc000021a error, try to start Windows 10 in Safe Mode with networking features. It’s a secure booting environment that disables all optional drivers, services, and processes that might be causing this problem. Here’s what you need to do:
- Interrupt the boot sequence three times in a row to launch Windows troubleshooting
- Select Troubleshoot > Advanced options > Startup Settings

- Click Restart and wait a few seconds
- Press F5 to enable Safe Mode with Networking


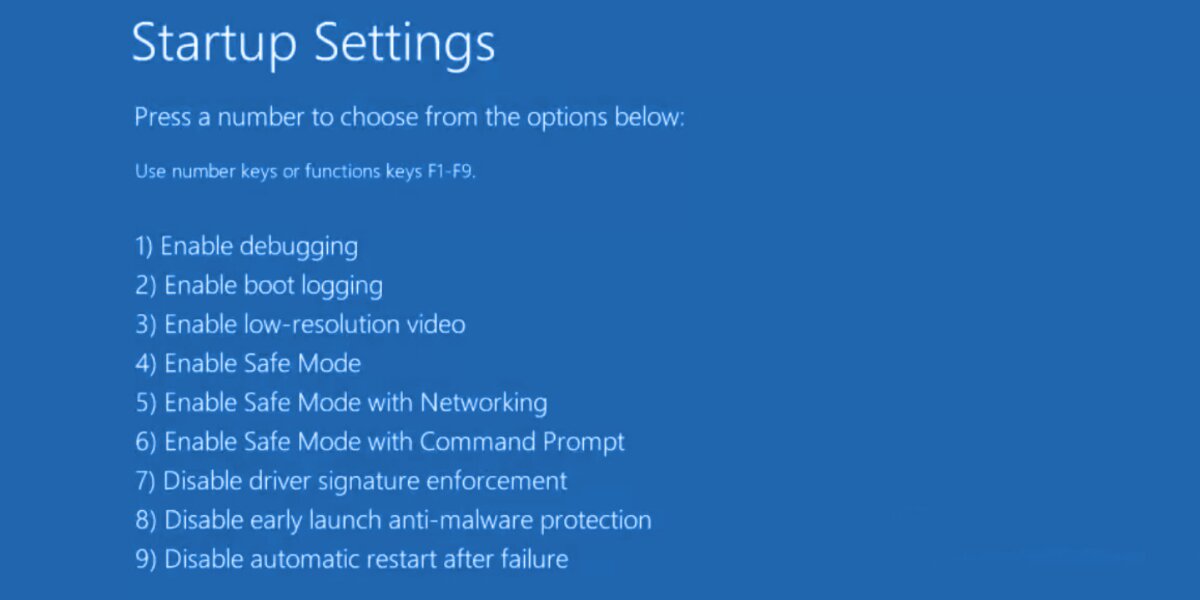
Windows 10 should start now. If it doesn’t, return to Startup Settings and press F4 to enable Safe Mode without networking features.
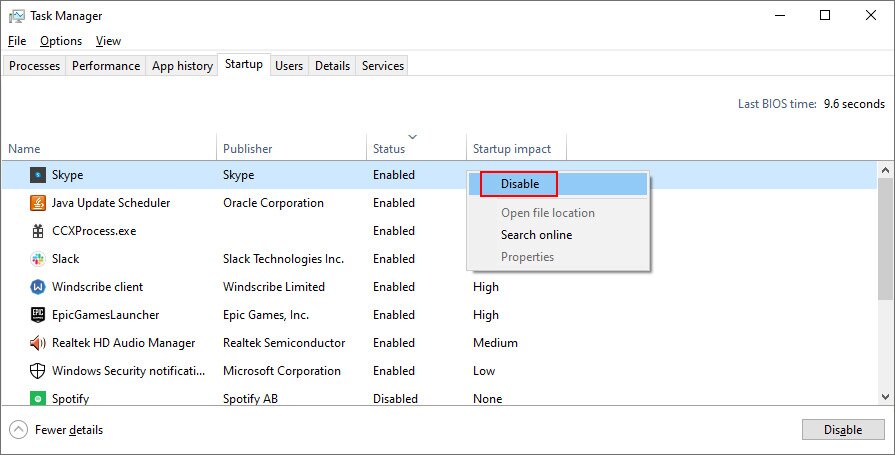
2. Clean boot Windows 10
If Safe Mode was successful, you can run a clean Windows 10 boot to make the changes permanent, at least until you get the chance to thoroughly troubleshoot the 0xc000021a error.
- Start Windows 10 in Safe Mode
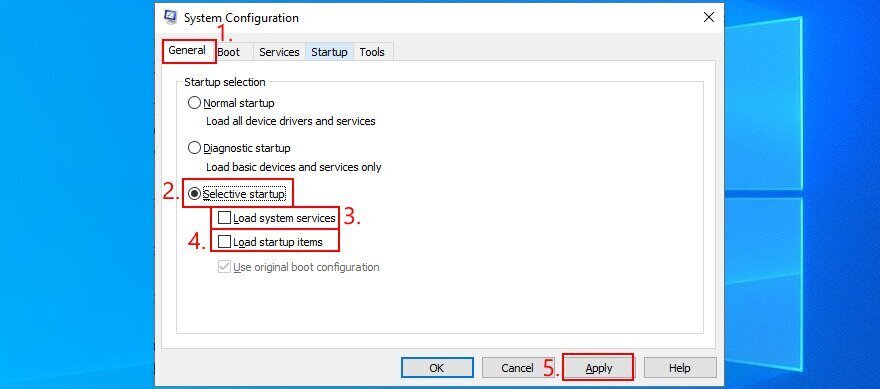
- Press Win key + R, type msconfig, and press Enter to open the System Configuration app
- Select the General tab
- Pick Selective Startup
- Uncheck the Load system services and Load startup items boxes
- Click Apply

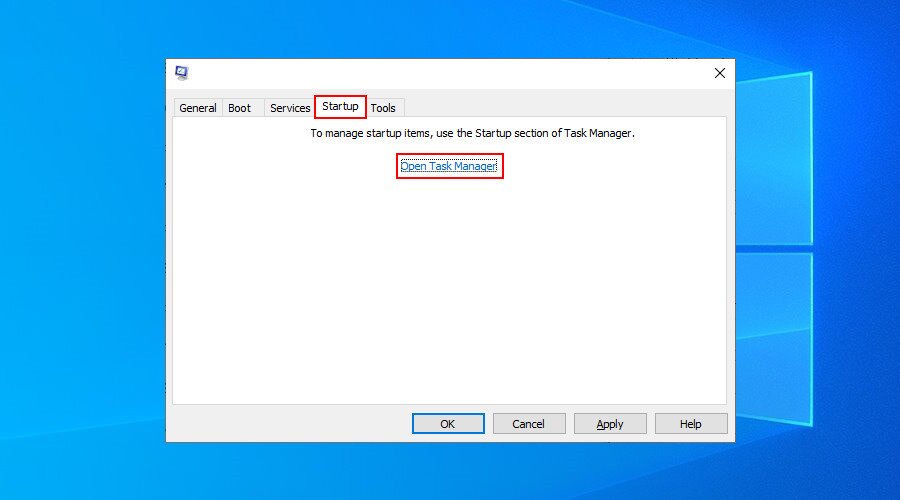
- Switch to the Startup tab
- Click Open Task Manager

- Select an app with the Enabled status and click Disable. Do this for all enabled apps

- Restart your computer
3. Run Startup Repair
You can troubleshoot the errors that prevent your operating system from booting by running the Startup Repair tool in the troubleshoot menu before boot. However, you need to use your Windows 10 installation disc. If you don’t have it, you can use another computer to create one.
How to create Windows 10 installation media (on a working PC):
- Connect a USB flash drive and make sure to copy any files you might need later since the drive will be formatted
- Download Media Creation Tool from the official website
- Launch the application and follow the instructions
How to run Startup Repair (on the malfunctioning PC):
- Plug the USB flash drive into the PC
- Turn your PC on and off three times to reach the Advanced Startup menu
- Select Troubleshoot > Advanced options > Startup Repair
- Choose your PC account and enter your password to continue
- Follow the step-by-step instructions
4. Disable Driver Signature Enforcement
By default, Windows doesn’t allow unsigned drivers to run on your PC. So, if you have recently installed drivers from third-party sources, your operating system won’t boot due to Driver Signature Enforcement. In turn, this leads to the 0xc000021a error.
But you can fix this by disabling Driver Signature Enforcement:
- Force Windows to load the troubleshooting screen (interrupt the boot sequence three times)
- Go to Troubleshoot > Advanced options > Startup Settings
- Click Restart
- Press F7 to disable Driver Signature Enforcement
- Try to start Windows 10 now
If it doesn’t work, you can use Command Prompt:
- Select Troubleshoot > Advanced options > Command Prompt
- Choose your account and enter your password to continue
- Run
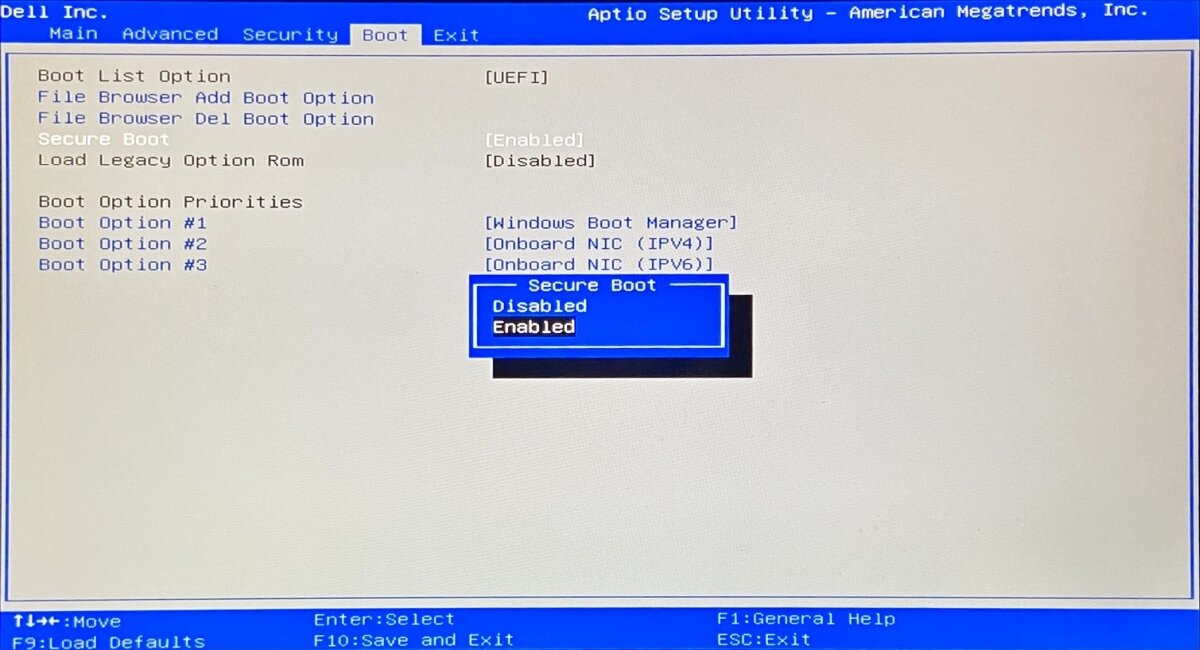
bcdedit /set testsigning on. If it displays the The operation completed successfully message, try to boot Windows 10. But if it says Protected by Secure Boot policy, you must turn off Secure Boot from the UEFI firmware
How to disable Secure Boot from the UEFI firmware settings:
- In the troubleshooting menu, go to Troubleshoot > UEFI Firmware Settings
- Click Restart
- After accessing BIOS, select the Authentication section
- Set Secure Boot to Disabled

- Save the BIOS settings and exit. You can now run the
bcdedit /set testsigning oncommand in Command Prompt
If you need to re-enable Driver Signature Enforcement, run Command Prompt again and use the bcdedit /set testsigning off command.
5. Fix hard drive corruption
Hard disk failure could cause problems with the Winlogon.exe and Csrss.exe processes, resulting in error 0xc000021a. But you can fix HDD errors using CHKDSK (Check Disk) from the console environment.
- Boot your computer to the troubleshooting menu
- Go to Troubleshoot > Advanced options > Command Prompt
- Select your account and enter your password to continue
- If Windows is installed on the C: drive, run
chkdsk c: /f /r. Otherwise, make sure to replacec:with the correct partition letter- If you’re not sure where Windows is, select a drive letter (e.g.
run c:) and list its directories (e.g.run dir). Do this for multiple drive letters until you spot the Windows folder
- If you’re not sure where Windows is, select a drive letter (e.g.
6. Repair corrupt system files
To repair corrupt operating files such as Winlogon.exe and Csrss.exe, you can turn to SFC (System File Checker):
- In the troubleshoot menu, visit Troubleshoot > Advanced options > Command Prompt
- Pick your PC account and input your password to continue
- Run
sfc /scannowand wait - It might be necessary to insert a Windows 10 installation media to restore system files
If SFC is unsuccessful, you can use DISM (Deployment Image Servicing and Management) to verify the component store of the Windows image:
- Make sure your PC is connected to the Internet
- In Command Prompt,
run DISM /online /cleanup-image /scanhealth - If DISM finds any errors, fix them by running
DISM /online /cleanup-image /restorehealth - Run SFC (
sfc /scannow) again
7. Update old drivers
If you have never updated your drivers or haven’t done so for a long time, it could be the reason why you keep getting the 0xc000021a error before Windows boot. But you should be able to solve this problem by using a driver update tool in Safe Mode. Or, you can update drivers without having to install any third-party applications:
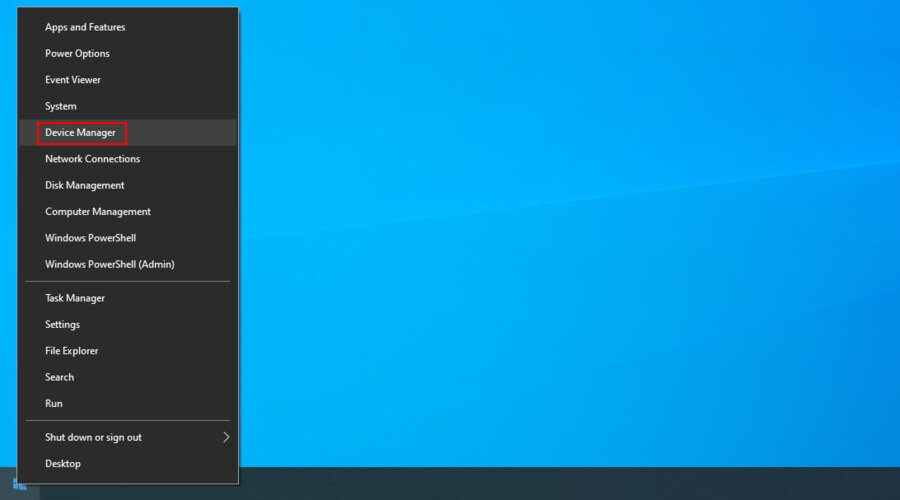
- Start Windows 10 in Safe Mode with Networking
- After the system boots, right-click the Start button and select Device Manager

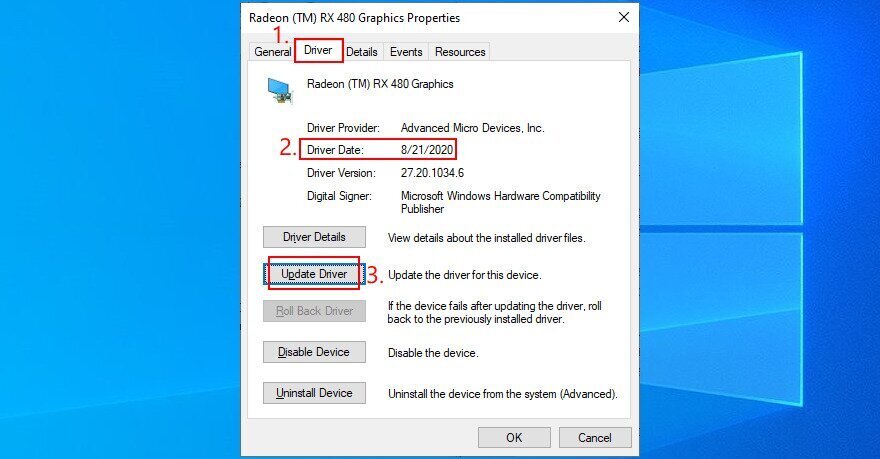
- Double-click a device to access its properties
- Switch to the Driver tab and inspect the Driver Date. If it’s older than one year, check for updates by clicking the Update Driver button

- Click Search automatically for drivers. Do this for all outdated drivers

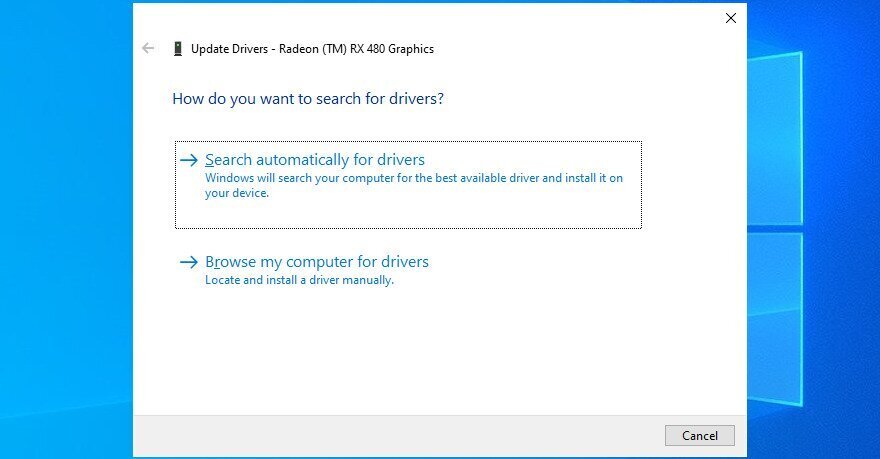
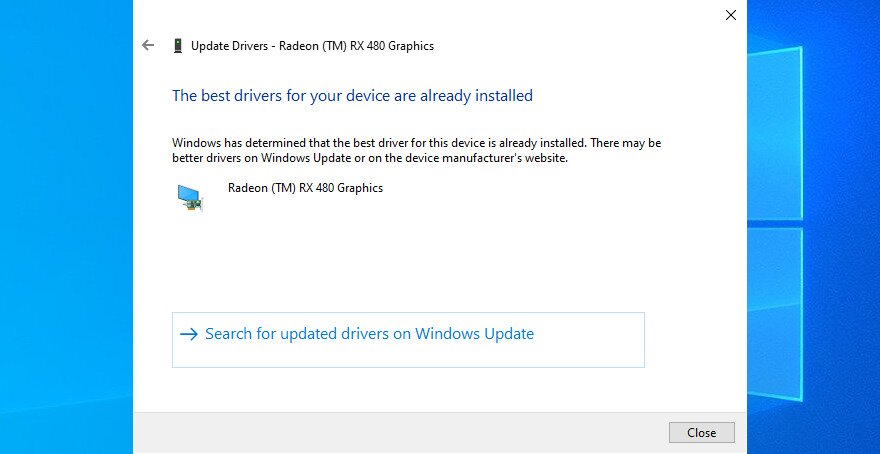
If you get the The best drivers for your device are already installed message for any driver, click Search for updated drivers on Windows Update. You just have to do this once since Windows Update should download and install all available drivers.
On the other hand, if Windows can’t find a newer driver, you can visit the website of your device manufacturer to download the newest driver. Make sure to get drivers that are compatible with your devices and operating system. Then, retrace the steps above but choose Browse my computer for drivers to perform a manual installation.
8. Roll back incompatible drivers
Unsupported drivers can cause serious problems on your computer, including blue screen errors like 0xc000021a. After disabling Driver Signature Enforcement (see Solution 4), you should roll back these malfunctioning drivers to be able to update them correctly.
- Start Windows 10 in Safe Mode with Networking
- Press Win key + R, type devmgmt.msc, and press Enter to open Device Manager
- Extend all categories and look for any devices with a yellow exclamation mark
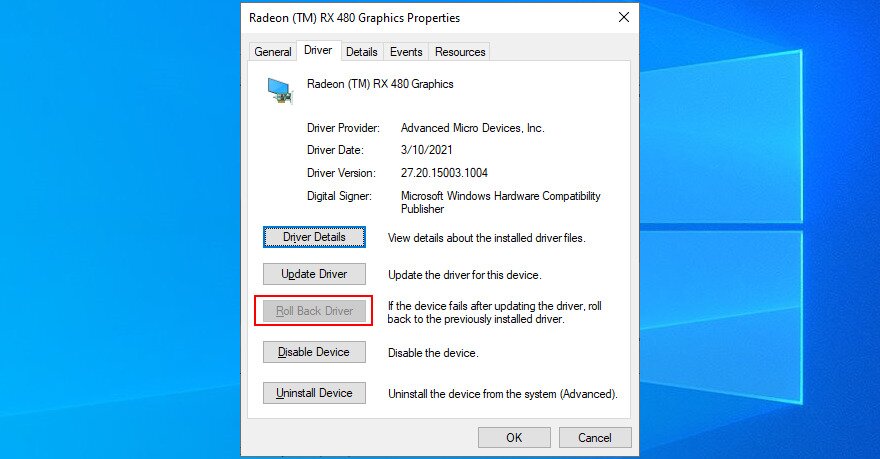
- Double-click the device and select the Driver tab
- Click Roll Back Driver and follow the instructions. If the Roll Back Driver is greyed out, you can’t perform the rollback because no previous driver is saved on your computer.

9. Repair the system registry
The Windows registry could have corrupt entries that are essential for system boot. However, you can restore the registry to its default configuration from the command-line environment before boot.
- Interrupt the boot sequence three times to trigger the Advanced Startup menu
- Select Troubleshoot > Advanced options > Command Prompt
- Choose your account and enter your password to continue
- Type the following commands (press Enter after each line of text):
-
cd %SystemRoot%System32\config
-
ren %SystemRoot%System32\config\DEFAULT DEFAULT.old
-
ren %SystemRoot%System32\config\SAM SAM.old
-
ren %SystemRoot%System32\config\SECURITY SECURITY.old
-
ren %SystemRoot%System32\config\SOFTWARE SOFTWARE.old
-
ren %SystemRoot%System32\config\SYSTEM SYSTEM.old
-
copy %SystemRoot%System32\config\RegBack\DEFAULT %SystemRoot%System32\config\
-
copy %SystemRoot%System32\config\RegBack\DEFAULT %SystemRoot%System32\config\
-
copy %SystemRoot%System32\config\RegBack\SAM %SystemRoot%System32\config\
-
copy %SystemRoot%System32\config\RegBack\SECURITY %SystemRoot%System32\config\
-
copy %SystemRoot%System32\config\RegBack\SYSTEM %SystemRoot%System32\config\
-
copy %SystemRoot%System32\config\RegBack\SOFTWARE %SystemRoot%System32\config\
-
- Try to boot Windows now
10. Fix BCD
The BCD (Boot Configuration Data) is responsible for the Windows 10 startup operation. It it’s damaged in any way, it’s no wonder that your computer screen turns blue and shows the 0xc000021a error. But you can fix the BCD from Command Prompt:
- In the troubleshooting menu, go to Troubleshoot > Advanced options > Command Prompt
- Select your account and use your password to continue
- Write the next commands (press Enter after each one):
-
bootrec /repairbcd
-
bootrec /osscan
-
bootrec /repairmbr
-
- Exit Command Prompt and try to boot Windows 10
11. Uninstall third-party apps
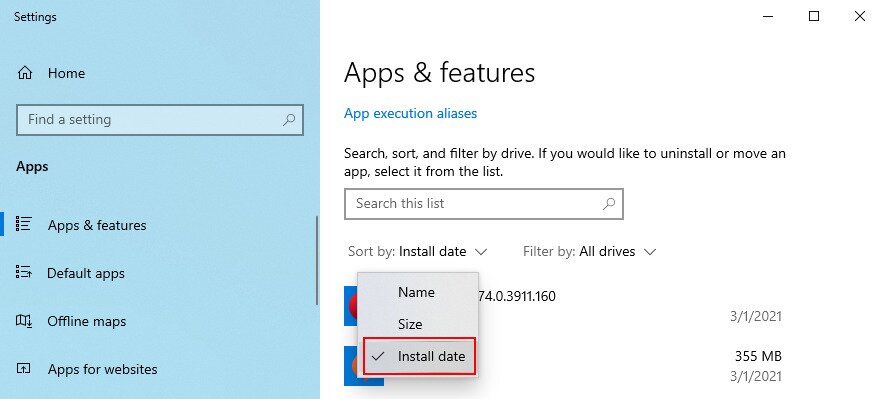
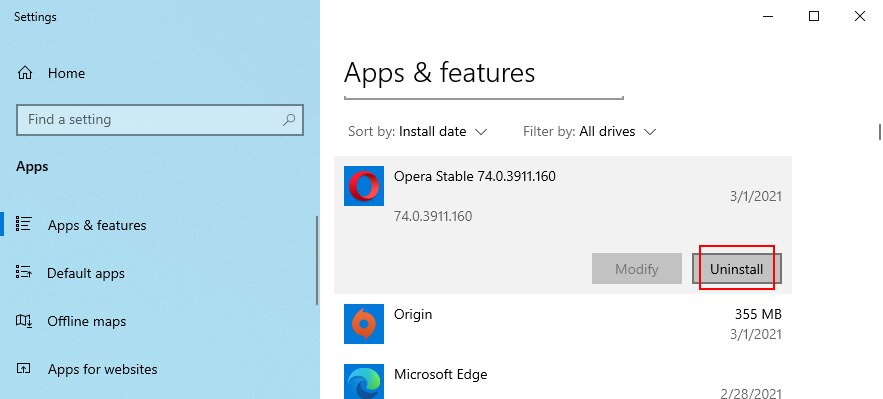
You might have installed third-party software applications that don’t support your operating system or which conflict with each other. For instance, two antivirus solutions with distinct real-time engines are likely to clash and cause blue screen errors. To solve this problem, you just have to uninstall any programs added to your PC lately:
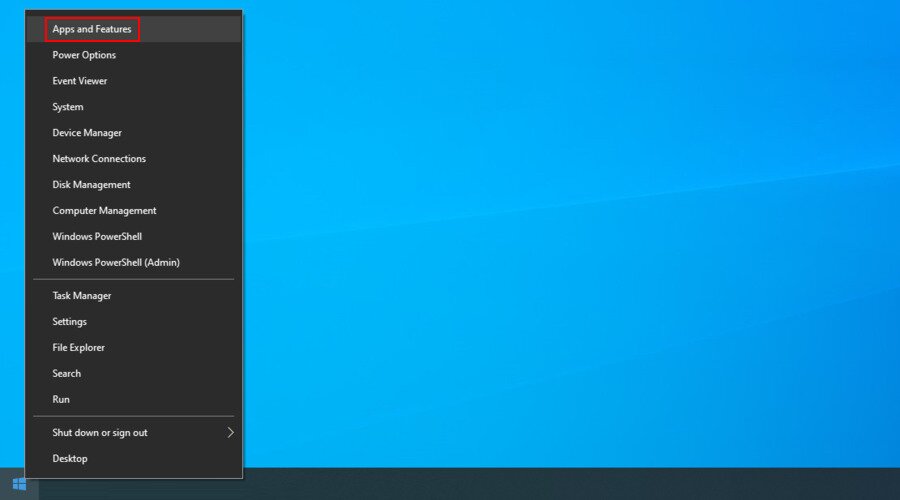
- Start Windows 10 in Safe Mode
- Right-click the Start button and go to Apps and Features

- Set Sort by to Install date to view the latest programs first

- Select the first app in the list, click Uninstall, and again to confirm

- Do this for all programs recently installed
- Try to boot your OS normally now
12. Uninstall system updates
Not only software applications but also malfunctioning system updates can be dangerous for your computer. You can remove them before boot:
- Interrupt the boot sequence three times by turning your PC off and on
- When it shows the Advanced Startup screen, visit Troubleshoot > Advanced options > Uninstall Updates
- Select and uninstall the most recent Windows update
- Try to boot your operating system now
13. Unplug external devices
If you have recently attached new devices to your computer, such as a Wi-Fi adapter, a webcam, a printer, or a USB pen drive, there could be compatibility issues that result in BSOD errors like 0xc000021a. It can even happen with plug-and-play devices.
But you should be able to fix this by removing the USB cables from your PC. It’s also a good idea to change the USB ports in case some of them are not working correctly.
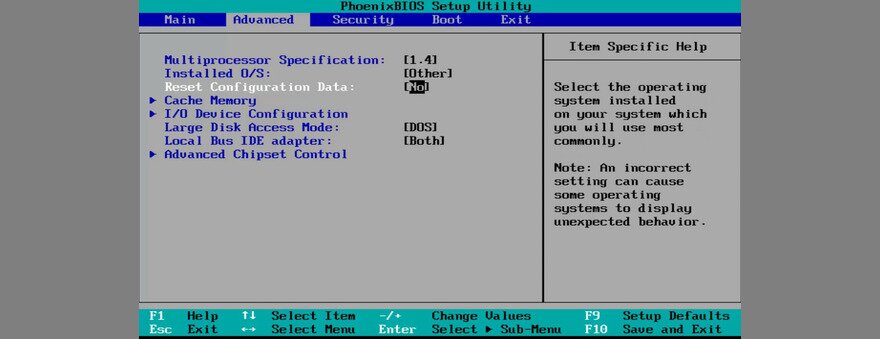
14. Reset BIOS
An incorrect BIOS configuration could be fatal for your computer. If you or someone else with access to your PC has accessed BIOS mode in order to enable overclocking, shadowing, caching, or something else, you should restore the BIOS configuration to default to remain on the safe side.
- In the troubleshooting menu, select Troubleshoot > Advanced Options > UEFI Firmware Settings
- Click Restart to enter BIOS mode
- Locate the option that resets your BIOS configuration data to default and turn it on

- Save the new BIOS settings and exit
- Try to boot Windows 10
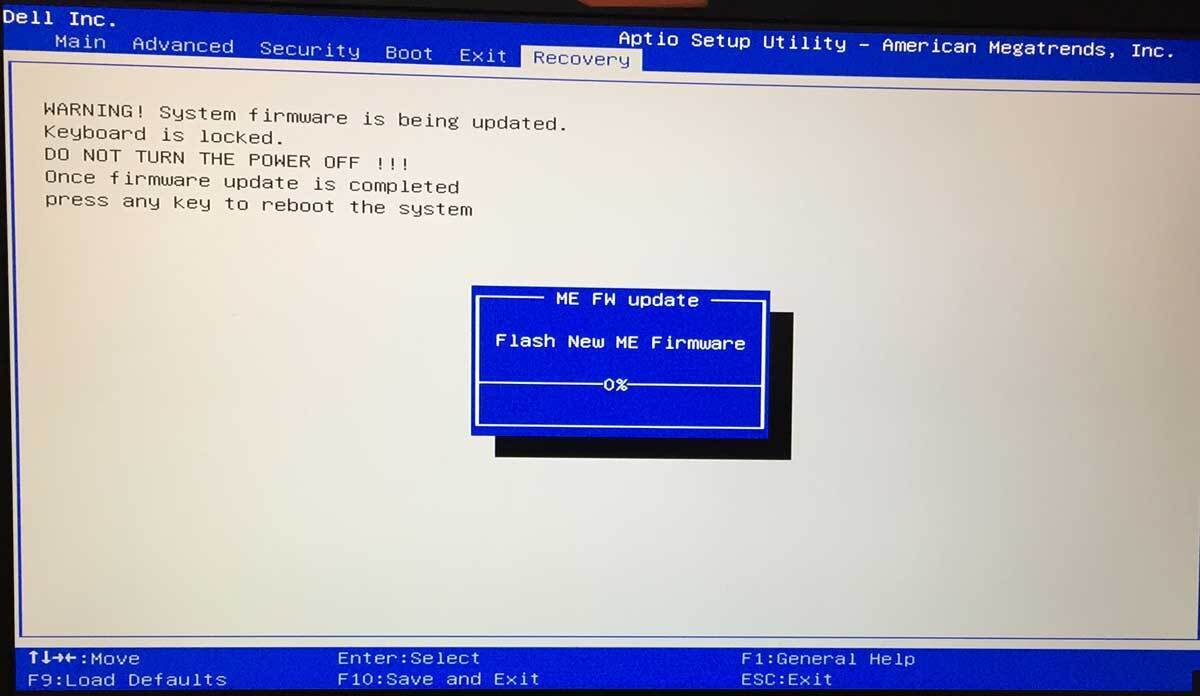
15. Update BIOS
BIOS needs to be regularly updated, just like software applications or your operating system. If you have never done this, you should get on it right away. But you need to use a pen drive and a working computer to download the BIOS installation files. Here are the complete steps:
- On your malfunctioning PC, reach the Advanced Startup menu (turn the PC off and on three times)
- Go to Troubleshoot > Advanced Options > UEFI Firmware Settings
- Click Restart to reach the BIOS setup mode
- In the main section, write down the BIOS manufacturer, current version, and install date
- Shift your attention to the working PC. Connect a USB flash drive
- Visit the manufacturer’s website and find a newer BIOS version by comparing it to the BIOS current version and install date
- Download the BIOS setup file and unzip the archive to the pen drive
- Disconnect the USB flash drive and plug it into the malfunctioning PC
- Follow the steps above to access the BIOS menu
- Create a backup of the current BIOS version
- Start the BIOS update and follow the steps

- Try to boot Windows after the update is complete
16. Disable Fast Boot
Fast Boot preloads the Windows drivers in order to boot your PC faster. But it’s known to sometimes cause Blue Screen of Death errors, so it’s a good idea to deactivate Fast Boot
