How to Fix PAGE FAULT IN NONPAGED AREA in Windows 10
All Windows users eventually deal with computer problems, depending on how they use their PC and how careful they are when browsing the Internet. Blue screen issues cripple your machine and prevent you from using it. However, no matter how severe the issue is, BSOD errors can be fixed.
What is PAGE FAULT IN NONPAGED AREA?
PAGE FAULT IN NONPAGED AREA is a BSOD error. It’s usually accompanied by the 0x00000050 code and can occur on any Windows iteration, including Windows 10, 8, 7, Vista, and XP.
The stop code indicates that your OS system can’t identify an essential system file in the memory, whether we’re talking about the main, processor or video card memory. As a result, Windows shuts itself down and displays a blue screen to prevent data loss and file corruption.
How to fix PAGE FAULT IN NONPAGED AREA on Windows 10
Troubleshooting the PAGE FAULT IN NONPAGED AREA stop code may take a long time. However, it’s important to arm yourself with patience. It’s also a good idea to have another device with Internet access on standby, in order to look up more information on the web as new problems may arise.
Furthermore, unless PAGE FAULT IN NONPAGED AREA causes a boot loop on Windows 10, you should create a system restore point and even a complete backup of your personal files and applications as a security measure. After doing so, check out the following solutions.
1. Hard-reboot your PC
Get started with a simple workaround that might get rid of the PAGE FAULT IN NONPAGED AREA stop code if it’s a one-time problem: hard-rebooting your PC. It means removing all temporary cache stored by your computer in order to perform a clean restart.
How to hard-reboot your computer:
- Power off Windows (press Alt + F4 and select Shut down)
- Disconnect the power cord from the desktop. If you have a laptop, take out its battery
- Press and hold the power button for 20-30 seconds. On tablets, press and hold the power button and volume down simultaneously for this amount of time
- Replug the power cord into your desktop or reattach the battery to the laptop
Turn on your computer and boot Windows
2. Run Windows Update
If you have never updated Windows 10 or too long has passed since the last update, don’t postpone this event any longer. Check for any signs that your computer is ready to perform an update, like a small red dot on the notifications or power button, which signals a pending update.
However, if you have disabled Windows 10 automatic updates, you can manually perform the checkup and allow your operating system to get the newest features, improvements, hotfixes, and security patches.
How to manually check for system updates:
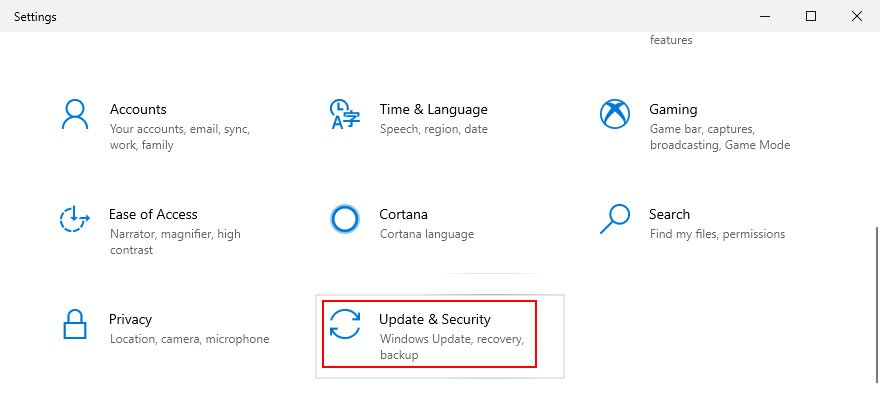
- Right-click the Start button and select Settings
- Go to Update & Security

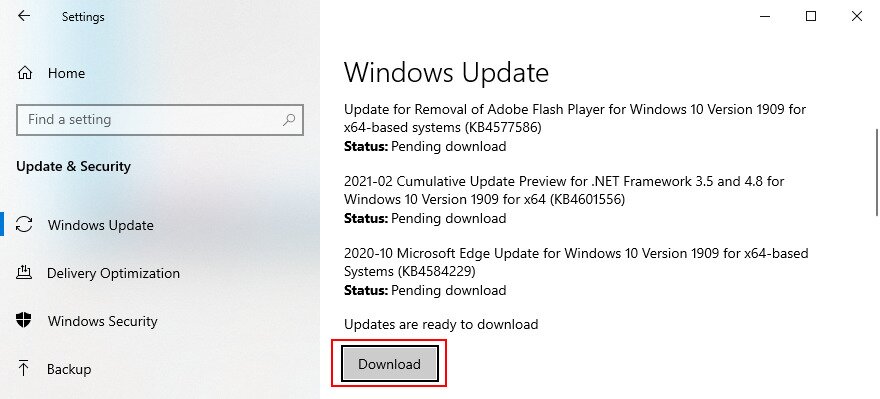
- Jump to Windows Update on the left side
- If there are any pending updates, click Install now or Restart now. Otherwise, click Check for updates and then Download

- Patiently wait while your operating system gets updated. It might restart your PC several times
3. Fix hard disk errors
Hard disk corruption and bad sectors can cause blue screen errors such as PAGE FAULT IN NONPAGED AREA. It can happen when a partition formatting operation is suddenly interrupted by power outage, for instance.
When this happens, you can turn to an internal command-line utility called CHKDSK (Check Disk) to scan your HDD and fix any errors.
How to use CHKDSK:
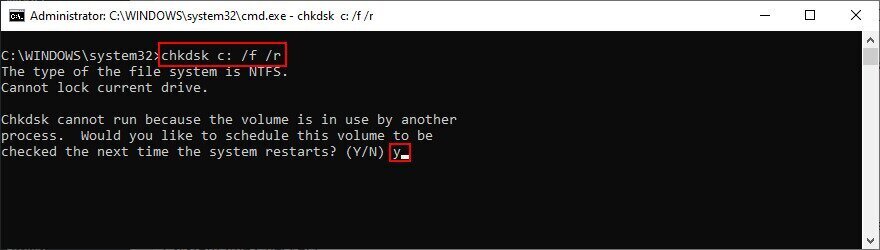
- Click the Start button, search for Command Prompt, and click Run as administrator. If prompted by UAC (User Account Control), click Yes
- Type
chkdsk c: /f /rif your operating system is installed on the default C: drive. Else, replacec:with the correct partition letter. Hit the Enter key
- You will be asked to schedule CHKDSK for the next system restart. Type y and press Enter to confirm
- Exit Command Prompt and restart your PC
- The disk scan and repair will be performed before Windows boots
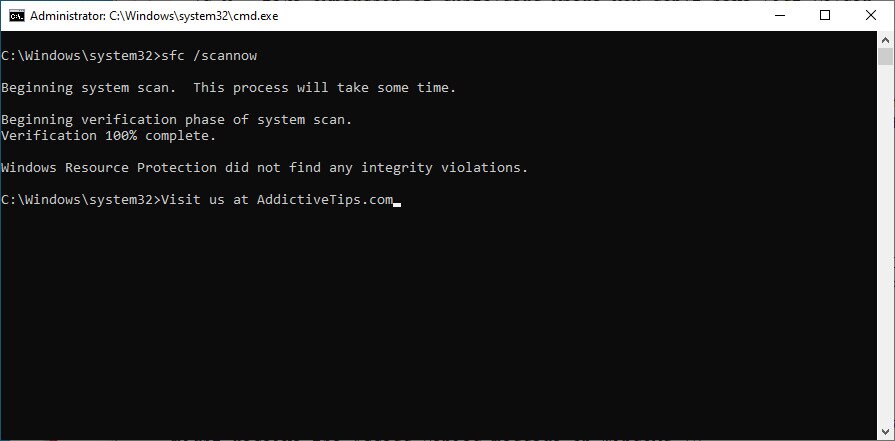
4. Repair corrupt system files
Not only hard disk failure can cause PAGE FAULT IN NONPAGED AREA but also any damaged, modified, or missing system files that Windows needs to run its processes. For that scenario, you can use SFC (System File Checker), another built-in command-line tool.
How to use SFC:
- Press Win key + R, type cmd, and press Ctrl + Shift + Enter to launch Command Prompt with elevation rights
- Run
sfc /scannowand allow Windows to find and fix any integrity violations
- Exit Command Prompt
- Restart your computer
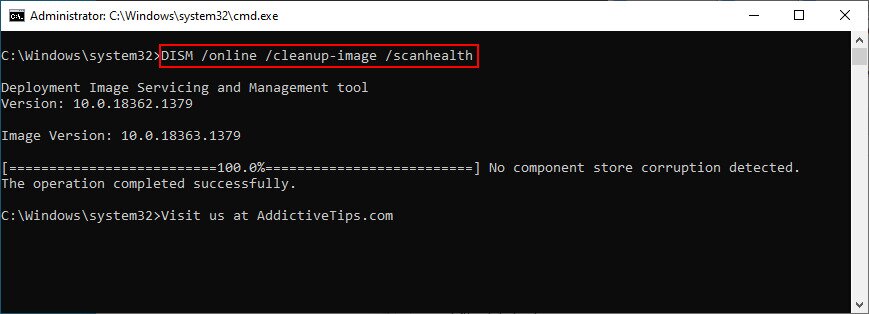
If SFC fails to find any problems or if it’s not enough to repair the PAGE FAULT IN NONPAGED AREA stop code, you can turn to DISM (Deployment Image Servicing and Management) for fixing the component store of the OS image.
How to use DISM:
- Press the Win key, type Command Prompt, select this app, and click Run as administrator
- Run the
DISM /online /cleanup-image /scanhealthcommand
- If DISM doesn’t find anything wrong with your PC, you can exit. Otherwise, run
DISM /online /cleanup-image /restorehealthto fix issues - After DISM completes its task, exit Command Prompt and restart your PC
- Launch CMD with elevation rights again
- Run SFC (
sfc /scannow) to perform a system checkup - Exit Command Prompt and reboot your PC one last time
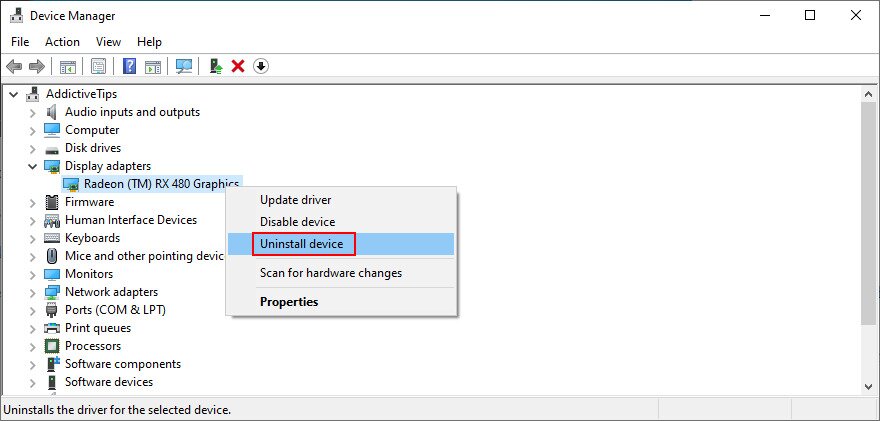
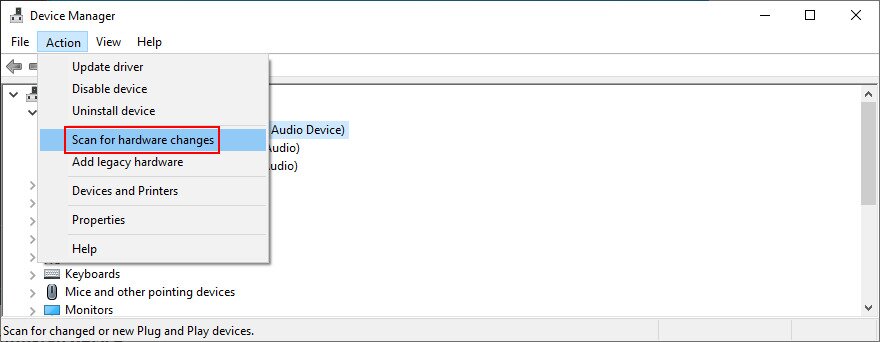
5. Check device drivers
Devices not properly installed on your computer or drivers which are outdated or incompatible with your operating system could be another reason why you keep seeing the PAGE FAULT IN NONPAGED AREA error on a blue screen. For example, many users report problems with AMD display drivers. Here’s what you need to do.
Reinstall your devices:
- Click the Start button, search for Device Manager, and open this app
- Extend all device menus
- Look for any device with a yellow exclamation mark
- Right-click it and select Uninstall device

- Click Uninstall to confirm
- Open the Action menu and select Scan for hardware changes

- If the device doesn’t get reinstalled automatically, restart your PC
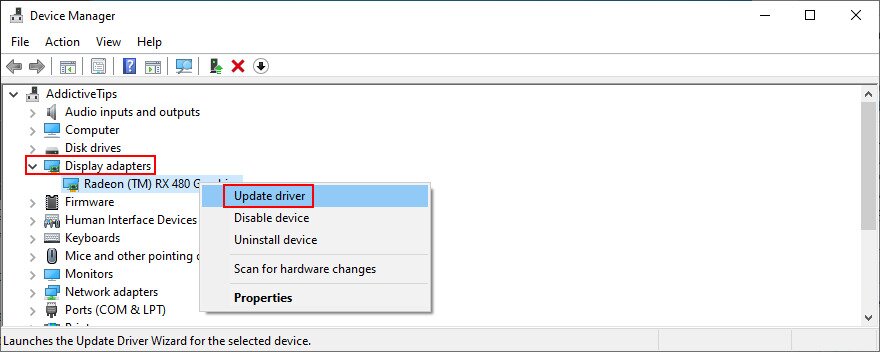
Update old drivers:
- Right-click the Start button and visit Device Manager
- Select a device, right-click it, and choose Update driver. If you’re unsure about which devices to select, we suggest starting with your display adapter

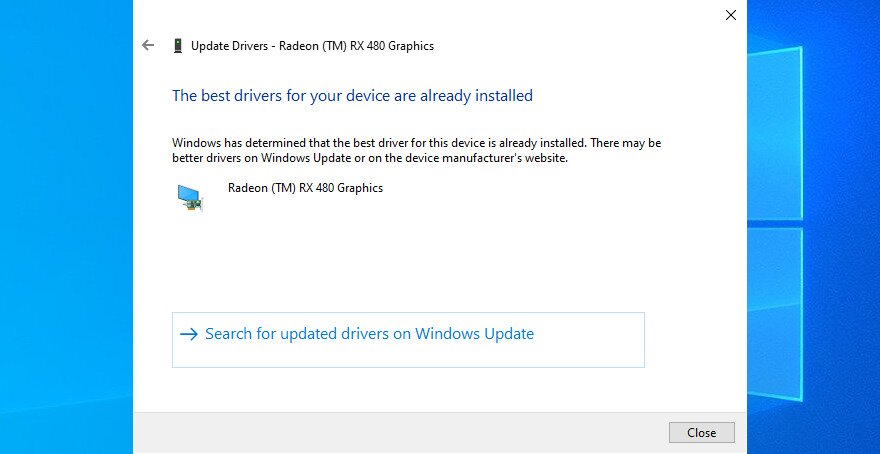
- When asked what to do, click Search automatically for drivers
- If you get the The best drivers for your device are already installed message, click Search for updated drivers on Windows Update. But if you already checked for system updates, skip this step

- Follow the on-screen instructions to finalize the driver update
- Restart your computer
It can be hard to figure out which drivers must be updated on your PC. If you don’t want to spend a lot of time trying to solve this problem, just use a driver update application. It autodetects all obsolete drivers on your PC and offers to install all of them. Plus, you won’t risk getting a driver unsupported by your operating system.
If you accidentally installed an incompatible driver for any device, roll it back to the previous, stable version. After that point, you can leave your PC as it is and check if you still get the PAGE FAULT IN NONPAGED AREA stop code, or update your drivers correctly by using the previous steps we described.
Roll back unsupported drivers:
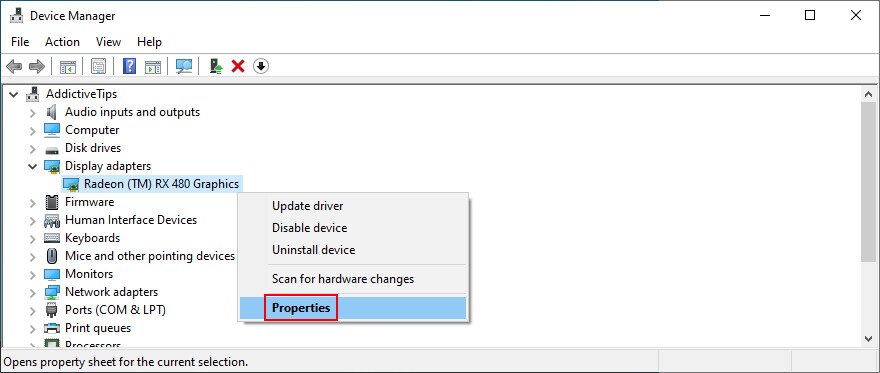
- Press Win key + R, type devmgmt.msc, and press Enter to open Device Manager
- Select the faulty device and open the right-click menu
- Go to Properties

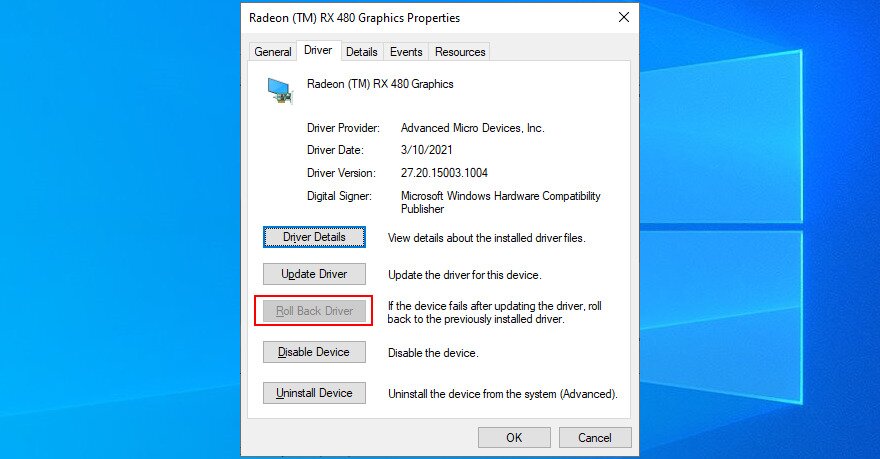
- Switch to the Driver section
- Click Roll Back Driver and follow the given instructions. If you can’t click this button because it’s greyed out, you can’t perform the rollback because there’s no previous driver version on your PC. Just skip this part of the solutions

6. Run a malware scan
A virus infection can be powerful enough to corrupt critical system files that Windows needs to function normally. It usually happens to users who don’t have an antivirus solution installed, keep it turned off all the time, or don’t practice safety tips when going online.
To put this theory to the test, you just have to fire up your anti-malware application and run a scan to see what the results show. If you don’t have a third-party security solution installed, shift your attention to Windows Defender.
How to use Windows Defender:
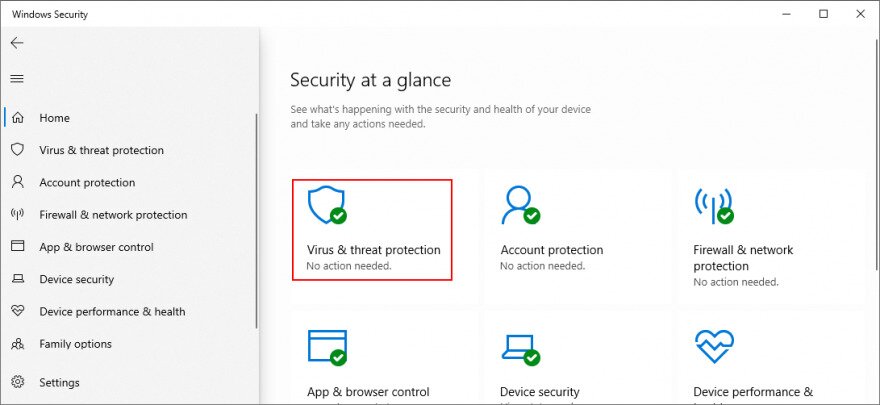
- Click the Start button, search for Windows Security, and open this app
- Go to Virus & threat protection

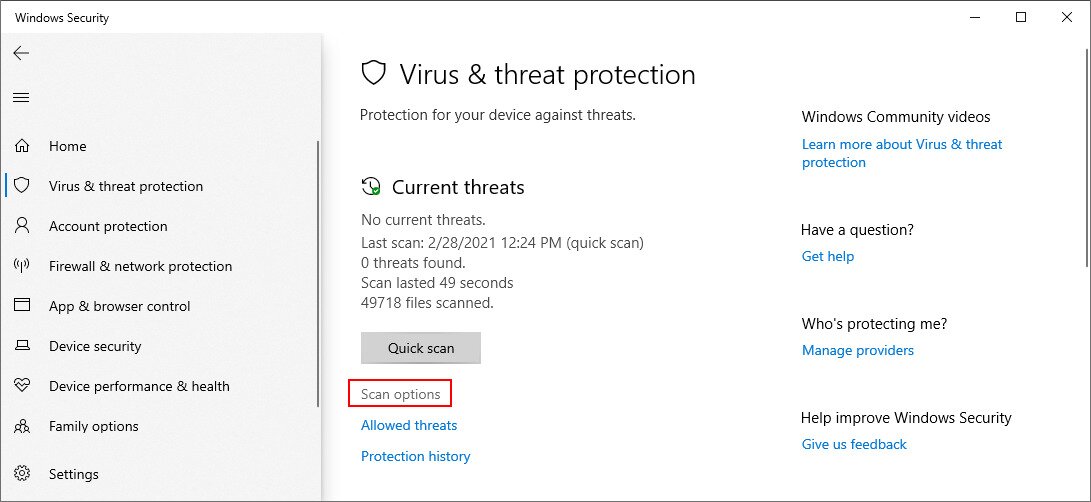
- Click Scan options

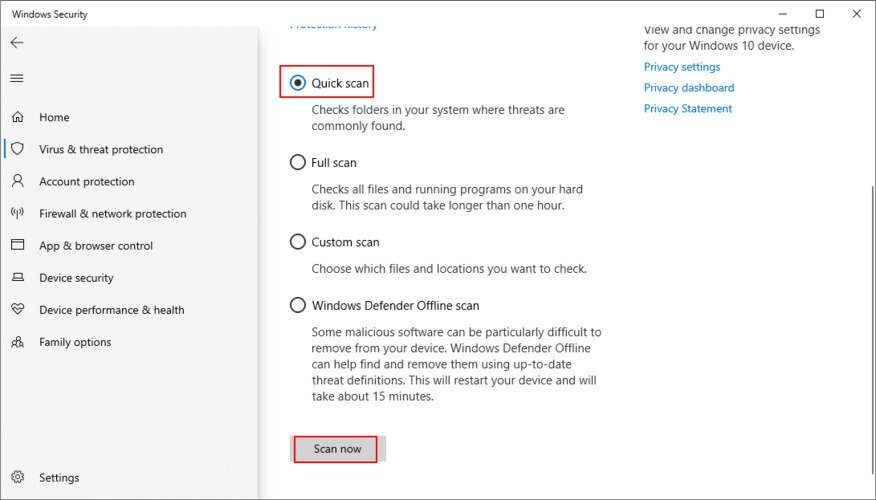
- In the list of scan options, pick Quick scan and click Scan now

- Defender will begin the scan. Don’t turn off or restart your PC during this time
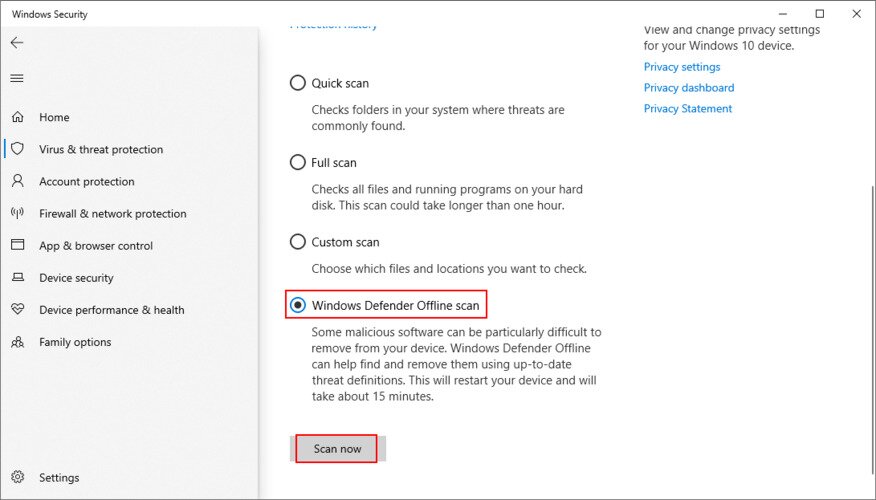
- If the scan results turn up empty-handed, perform another scan using the Windows Defender Offline scan option

- If it finds any malicious threats, allow Defender to remove or quarantine the infected files
- Reboot your PC and see if this fixed your crash issues
7. Run a clean boot
A Windows 10 clean boot means starting your operating system by disabling all programs that automatically run as soon as you turn on your computer. Certain malware agents are sneaky enough to infiltrate into startup programs, so a clean boot will help fix this problem.
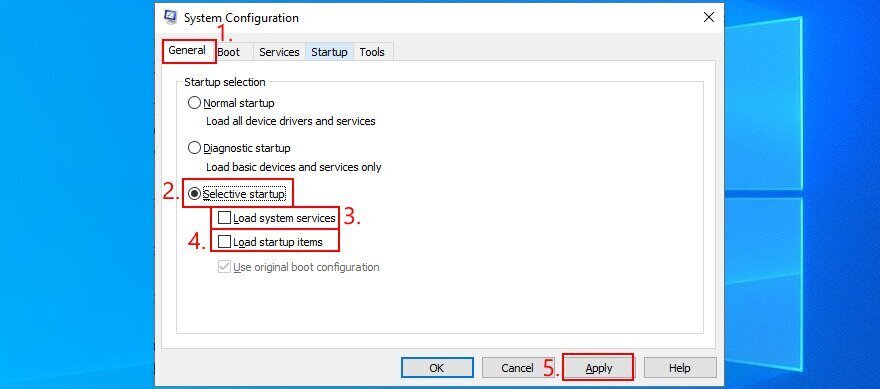
How to clean boot Windows 10:
- Press Win key + R, type msconfig, and press Enter to launch System Configuration
- Remain in the General tab
- At Startup selection

- Select Selective startup
- Deselect Load system services
- Deselect Load startup items
- Click Apply and exit
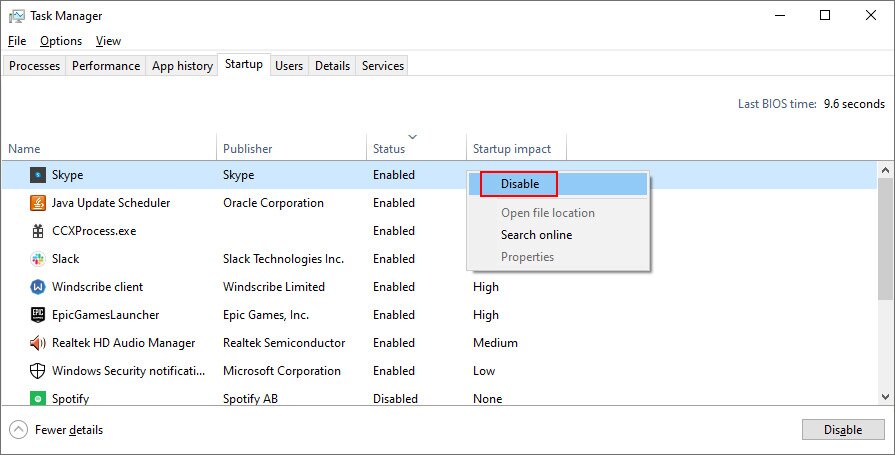
- Press Ctrl + Shift + Esc to open Task Manager
- Switch to the Startup tab
- For every application with the Enabled status, select it and click Disable

- Exit to the desktop and restart your PC
- Check if your system still crashes
8. Start Windows 10 in Safe Mode
To create a secure environment for troubleshooting BSOD errors, it’s recommended to boot Windows 10 in Safe Mode. Your operating system will start only with the necessary drivers, processes, and services. So it’s a simple way to narrow down your search by disabling any software components which might be causing stop code PAGE FAULT IN NONPAGED AREA.
- Click the Start button on the desktop and open the power menu
- Hold down Shift and click Restart to boot Windows in troubleshooting mode
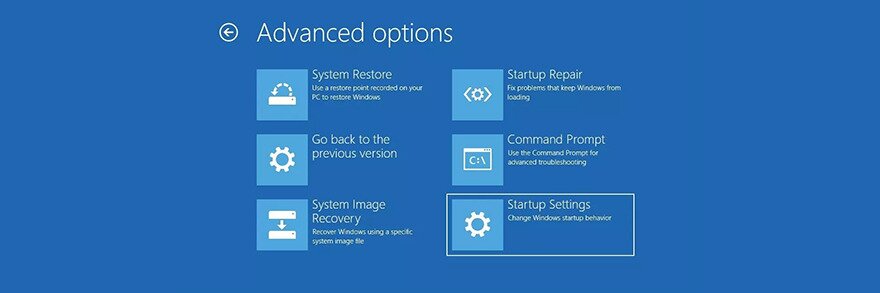
- If you can’t access your desktop because the blue screen error sends your PC into a boot loop, interrupt the Windows boot sequence three times to enter Advanced Startup mode
- Go to Troubleshoot > Advanced options > Startup Settings

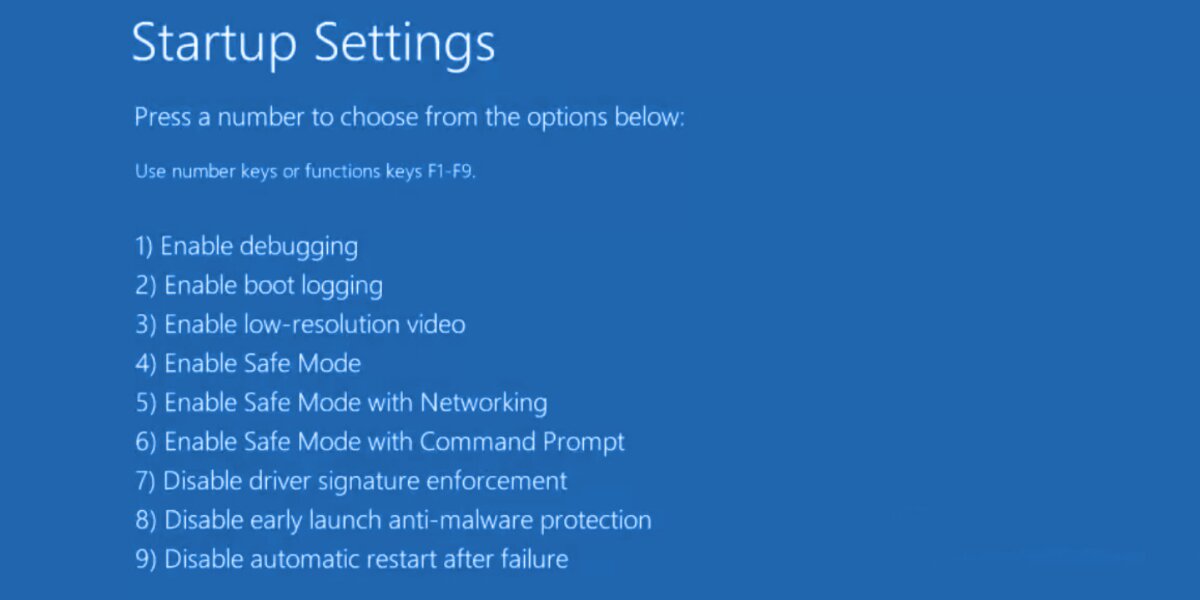
- Click Restart
- Press F4 to boot Windows in Safe Mode

- Check if you still get blue screen errors after Windows starts
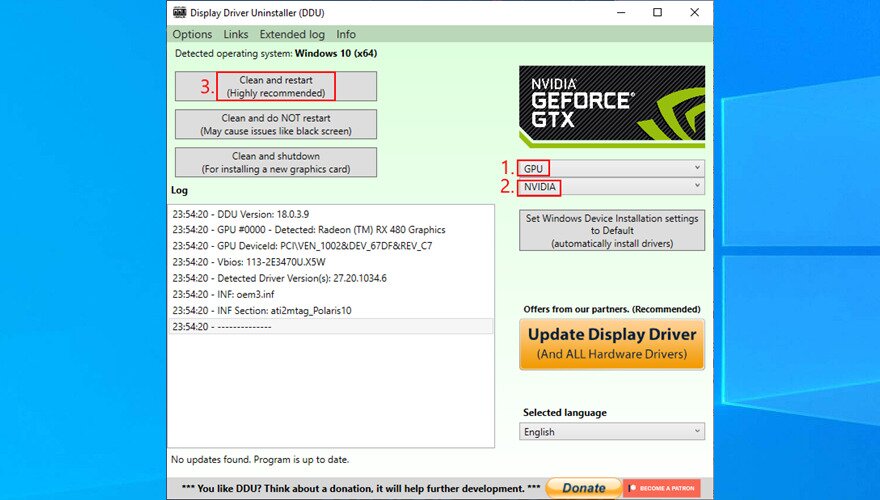
9. Use Display Driver Uninstaller
It’s a good idea to thoroughly check your GPU drivers since any problem in that department can affect your gaming and streaming experience. Worse, it can even cause blue screen errors like PAGE FAULT IN NONPAGED AREA on Windows 10 or older versions.
We suggest using Display Driver Uninstaller (DDU) to reset device software and drivers without too much hassle. It works with NVIDIA, AMD, and Intel. It can even restart Windows in Safe Mode to perform those operations securely.
How to use Display Driver Uninstaller:
- Create a system restore point or a full backup if you haven’t already done this by now
- Download Display Driver Uninstaller from the official website
- Unzip the downloaded file somewhere on your PC
- Open the DDU executable file
- If you get the The app you’re trying to install isn’t a Microsoft-verified app, click Install anyway
- Extract the program files in any folder
- If you have any pending Windows updates, make sure to install them
- Start Windows 10 in Safe Mode by following the instructions from Solution 6 on this list. However, when you reach the Startup Settings screen, make sure to select F5 to enable Safe Mode with Networking
- Launch Display Driver Uninstaller.exe
- Leave the configuration to default and click OK to reach the main DDU window
- Select your device type and device from the two menus on the right side

- Click Clean and restart
10. Repair and reinstall .NET Framework
Microsoft .NET Framework is a required dependency for your operating system and many software applications made by Windows. So, if there’s something wrong with the component package, this could result in software conflicts, system errors, and even blue screen messages like PAGE FAULT IN NONPAGED AREA.
However, you can fix a broken .NET Framework by installing a straightforward and practical tool released by Microsoft for this very purpose.
How to use Microsoft .NET Framework Repair Tool:
- Download Microsoft .NET Framework Repair Tool from the official website
- Launch the setup file
- Agree to the license terms and click Next to check your PC for issues
- If it finds any problems, like reregistering or restarting the Windows Installer service, click Next to apply all fixes
After completing the wizard steps and exiting to the desktop, check if you still get the PAGE FAULT IN NONPAGED AREA stop code on your PC. If you do, it’s a good idea to reinstall .NET Framework. Don’t worry since it’s pretty basic.
How to reinstall Microsoft .NET Framework:
- Right-click the Start menu and go to Apps and Features
- Find and select any entry that includes .NET Framework
- Click Uninstall and then again to confirm removal
- Do this for all .NET Framework entries
- Open a web browser
- Go to the .NET Framework official download page
- In the Supported versions category, click the recommended entry
- Download the runtime version (for non-developers)
- Open the downloaded file and install .NET Framework
11. Run Windows Memory Diagnostic
The PAGE FAULT IN NONPAGED AREA blue screen error could be caused by issues with your system memory. A simple way to test this is by running Windows Memory Diagnostic, a tool that comes integrated with Windows 10.
- Save all ongoing projects and terminate all applications
- Press Win key + R, type mdsched.exe, and press Enter
- Click Restart now and check for problems

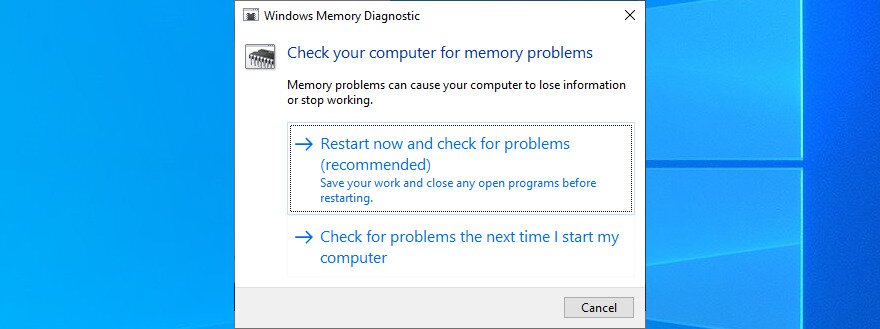
Before Windows boots, it engages in memory testing. There are three tests available: Basic, Standard, and Extended. By default, it runs the Standard test. However, it’s a good idea to switch to the Extended version. Although it takes more time, it’s more thorough.
To to this, press F1 to access Options. Then, select Extended and press F10 to apply. After the memory diagnosis is done, Windows will start as normal and show you the results in the notifications center. It might take a few seconds or minutes, just be patient until you get notified.
If you’re looking for a more advanced solution, we suggest checking out MemTest86.
12. Remove and reseat the memory slots
If Windows Memory Diagnostic doesn’t indicate any errors and you still can’t shake off the PAGE FAULT IN NONPAGED AREA error, you should remove and reseat your memory slots. But you need to be a bit handy with your computer.
It means removing all cables, taking apart your desktop, unpluging the memory sticks from their slots, then attaching them back. You could also try different memory slots if you have multiple options available.
However, you might have to consider replacing your RAM card if it’s damaged beyond repair.
13. Temporarily disable your antivirus
Security alerts could mean that your anti-malware tool is blocking access to critical system files that Windows needs to function at optimal parameters. You can quickly check this by temporarily turning off your antivirus solution.
Some applications don’t allow you to disable them due to security problems, however. In that case, you’re better off removing the program from your computer.
Furthermore, if you have two or more anti-malware programs installed, each with its own real-time engine, it’s absolutely necessary to uninstall all except one. That’s because multiple real-time safeguards can clash with each other, leading to severe computer problems, even blue screen errors like PAGE FAULT IN NONPAGED AREA.
14. Temporarily turn off your firewall
Just like your antivirus application, your antivirus could be blocking Internet access to system files that really need it. For example, Windows Update needs web access or it can’t bring your system up to speed, and Microsoft Store won’t work either.
In some rare cases, incorrect firewall settings can lead to BSOD errors such as PAGE FAULT IN NONPAGED AREA. Here’s what you need to.
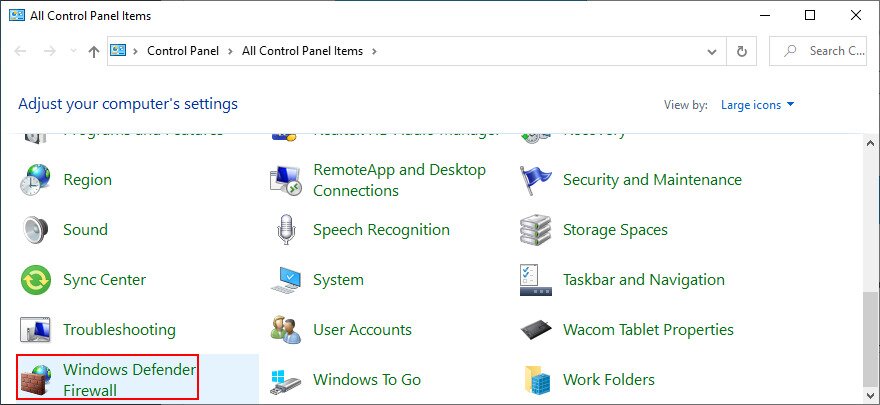
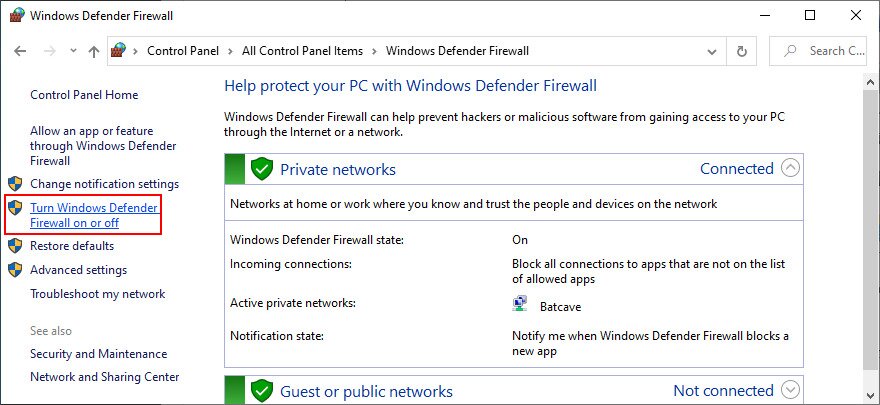
How to disable your firewall:
- Log in to Windows using an administrator account
- Press Windows key + R, type control panel, and hit Enter
- In Control Panel, select Windows Defender Firewall

- Click Turn Windows Defender on or off to open this section

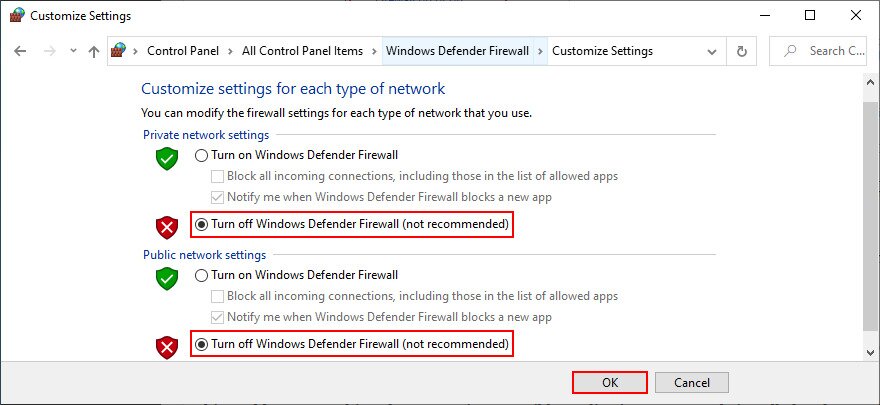
- Set Turn off Windows Defender Firewall at Private network settings and Public network settings

- Click OK to confirm
- Reboot your PC and check if you still get BSOD errors
Even if this solution solved the computer crash, you shouldn’t leave the firewall turned off since it means leaving your system vulnerable to malware attacks. Instead, you should restore firewall settings to their factory values.
How to restore firewall settings to default:
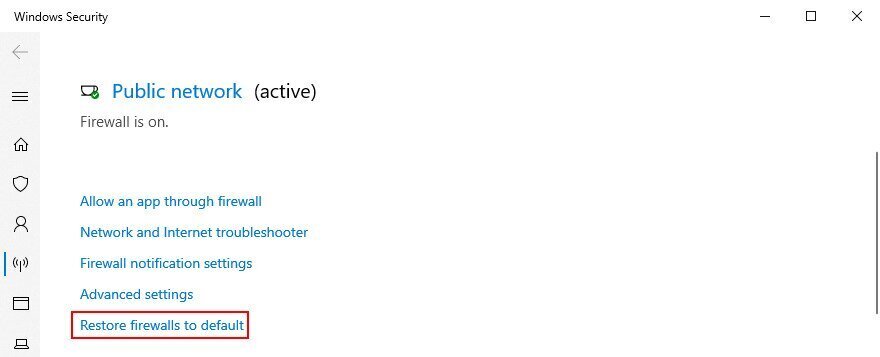
- Click the Start button, type firewall, and open Firewall & network protection
- Click Restore firewalls to default to open a new area

- Then, click Restore defaults and Yes to confirm
- Exit all windows
15. Check the storage space
If you don’t have enough storage space available on your computer, Windows won’t be able to start its processes and download the files it needs to work properly. In turn, this can lead to blue screen errors like PAGE FAULT IN NONPAGED AREA. But you can fix this issue by adding more storage space.
For instance, you can use a partition manager like Disk Management to increase the capacity of your Windows drive.
How to use Disk Management:
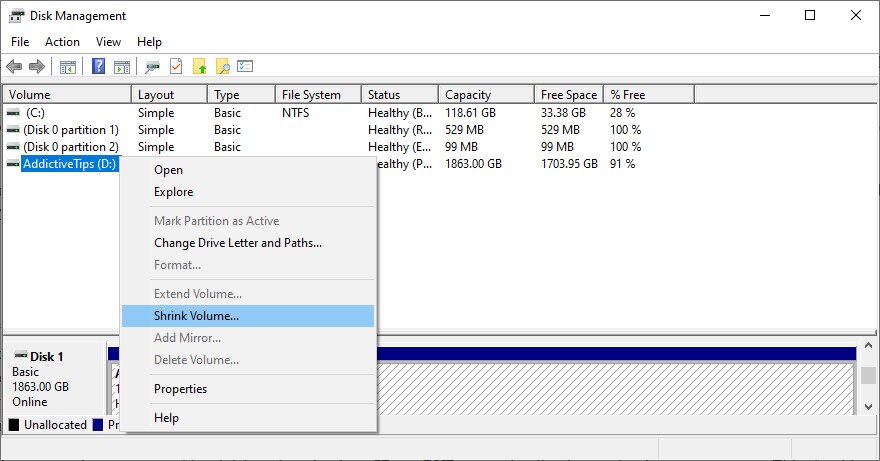
- Click the Start button, search for Disk Management, and open this tool
- By taking into account the values shown in the Capacity, Free Space and % Free columns, choose a partition besides the one that contains Windows
- Right-click the drive and select Shrink Volume

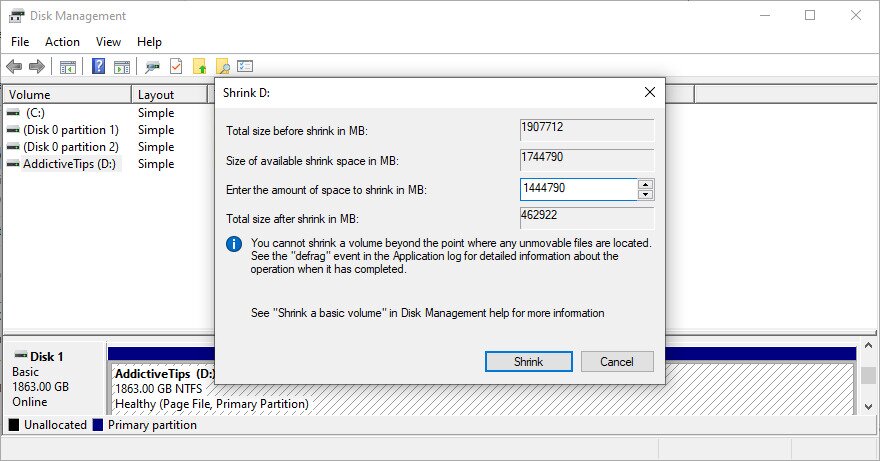
- Specify the new drive size and click Shrink

- Then, shift your attention to the partition with Windows. Right-click it and select Extend Volume
- Set its new size by adding all the available disk space. Click Extend
- Restart your computer and check if you still have blue screen issues
Another way to increase the storage space is by removing files. Make sure to uninstall large games and applications you don’t use anymore, as well as to move large photos, videos, documents, and other personal files somewhere else.
For example, you can back up your data to a removable storage unit, burn it to DVDs, or upload it to a cloud storage account. Remaining junk files on your computer can be eliminated with the help of a specialized cleaning solution such as CCleaner. Or, if you don’t want to install anything, use the Windows Disk Cleanup program.
How to use Disk Cleanup:
- Make sure you’re logged in to Windows 10 with an administrator account
- Open File Explorer by pressing Win key + E
- Go to the Downloads and Recycle Bin locations. Review containing files and copy or restore the ones you’d like to keep since these folders will be cleared by Disk Cleanup
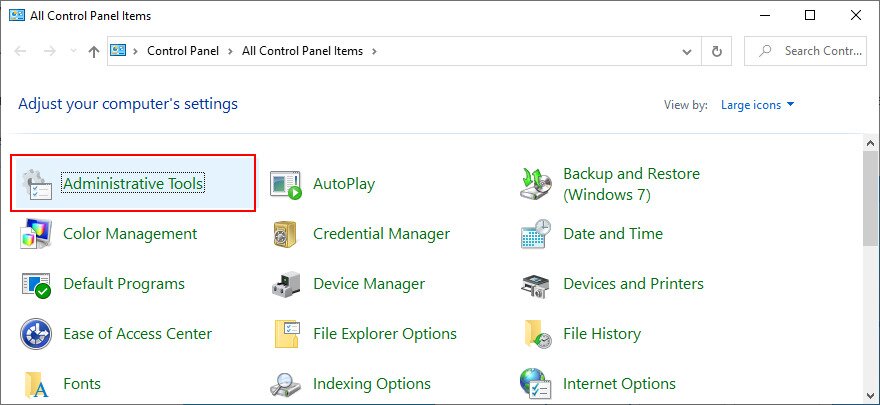
- Press the Windows key, search for Control Panel, and open this app
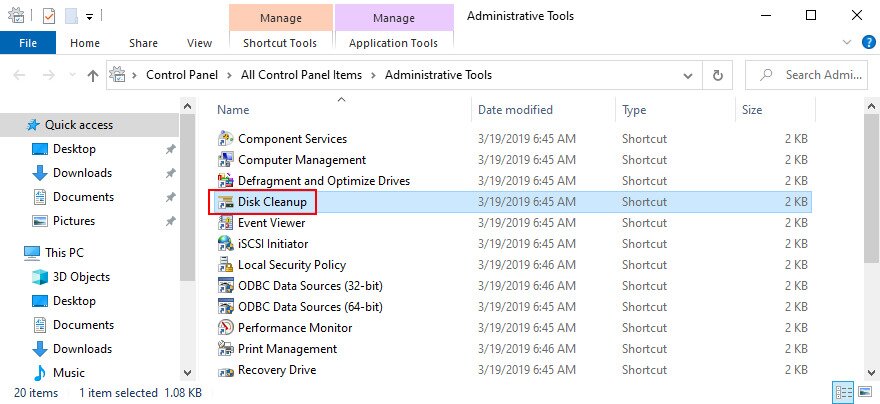
- Select Administrative Tools

- Double-click Disk Cleanup to launch this utility

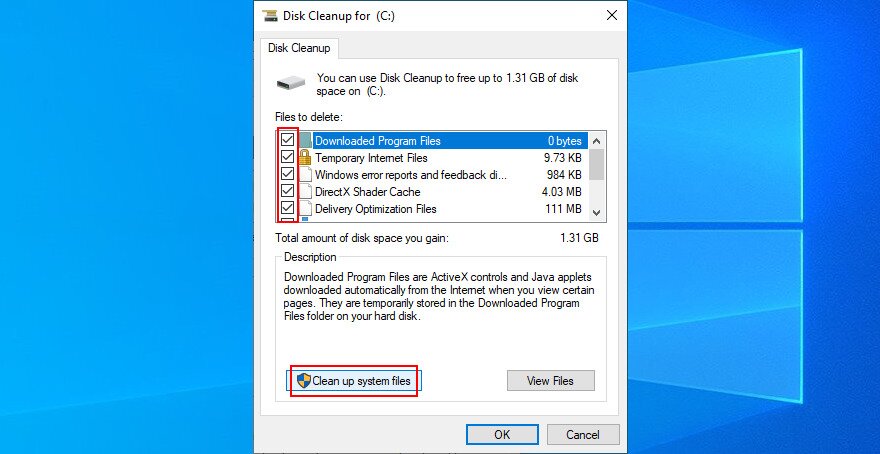
- Select the drive that contains Windows and click OK
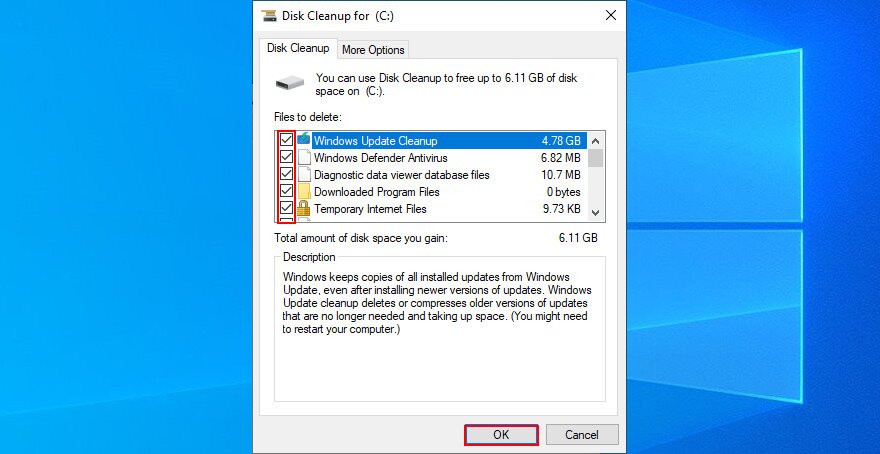
- At Files to delete, select all items. Then, click Clean up system files

- It will begin a file search. Once it’s over, make the same selection and click OK

- The cleanup task might take a while. Don’t turn off or restart your PC during this time
- Once it finishes, restart your computer
- Check if your system still crashes
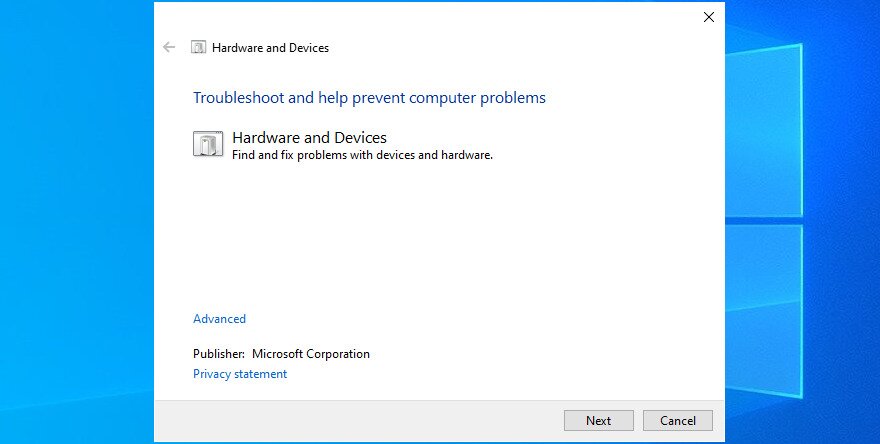
16. Run Hardware and Devices troubleshooter
As we mentioned in the beginning of this article, the PAGE FAULT IN NONPAGED AREA stop code can be caused by a malfunctioning device. An easy way to find and fix device problems is by using the dedicated troubleshooter that’s built into Windows 10.
Normally, you can track down this tool in Settings > Troubleshoot. But if Hardware and Devices troubleshooter is missing, you can run it with a simple command.
How to use Hardware and Devices troubleshooter:
- Click the Start menu, type Run, and open this app
- Type
msdt.exe -id DeviceDiagnosticand press Enter to launch the troubleshooter - Click Next to proceed to the next wizard step

- Windows will start checking for hardware issues right away. If it finds any solutions, click Apply this fix
- Complete the wizard steps and restart your machine
- Check if you still have blue screen problems
17. Disable hardware acceleration
Hardware acceleration is a technique used by certain applications to improve your graphics experience by demanding more power from your hardware. However, if your computer is not powerful enough to handle hardware acceleration properly or if it’s overworked, you shouldn’t be surprised when you get BSOD errors like PAGE FAULT IN NONPAGED AREA.
To fix this problem, make sure to disable hardware acceleration in all your applications, especially when it comes to gaming launchers or emulators. Here’s how to make it happen in your web browser.
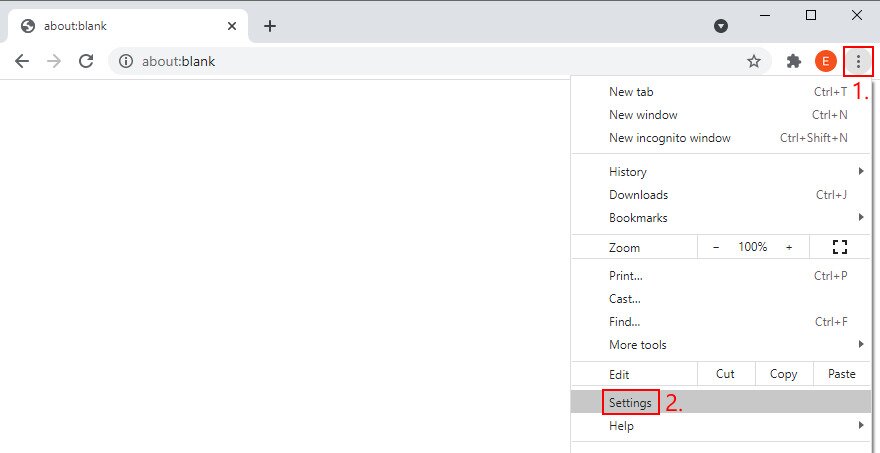
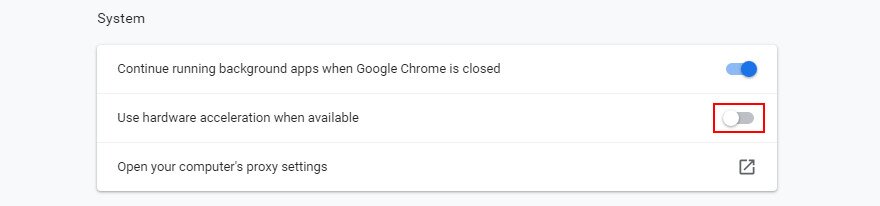
How to turn off hardware acceleration in Google Chrome:
- In Chrome, open the More menu on the top-right corner
- Go to Settings. Alternatively, enter the
chrome://settings/address
- Scroll down to the bottom of the screen and click Advanced to extend this section
- Switch off Use hardware acceleration when available

- Restart Chrome
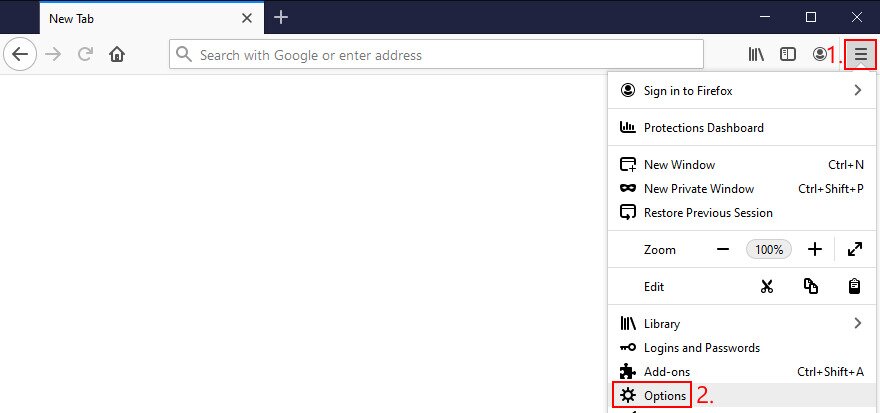
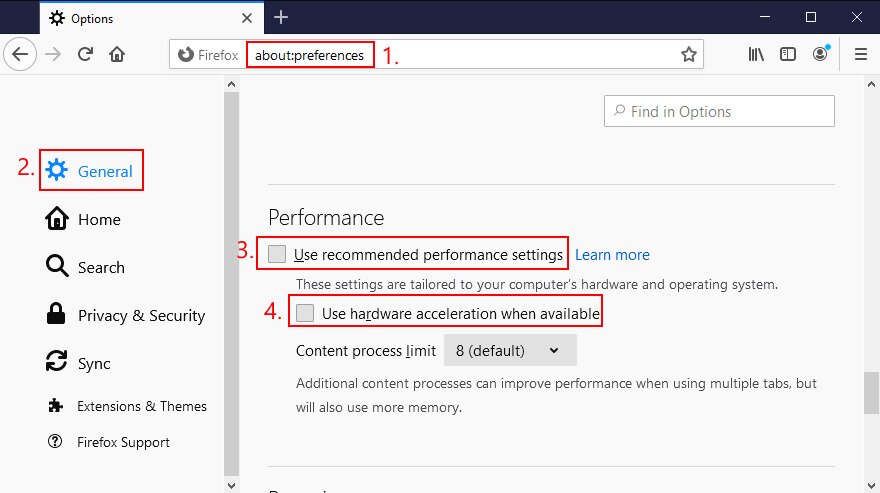
How to deactivate hardware acceleration in Mozilla Firefox:
- In Firefox, open the ≡ menu from the upper-right corner
- Select Options. Or, you can visit the
about:preferencesaddress instead
- In the General area, locate Performance
- Disable Use recommended performance settings and then Use hardware acceleration when available

- Relaunch Firefox
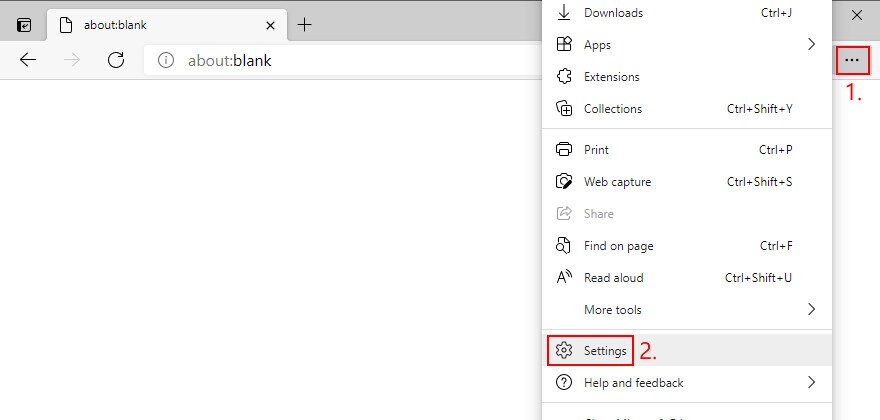
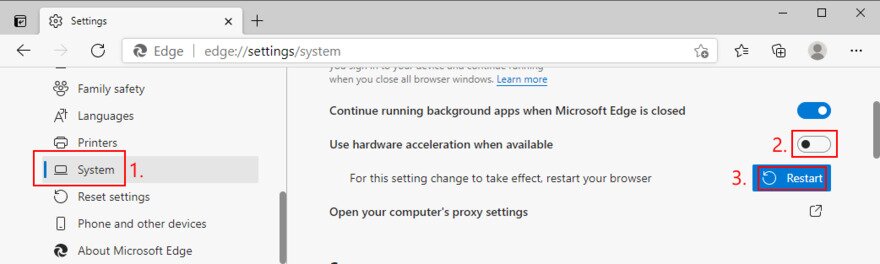
How to disable hardware acceleration in Microsoft Edge:
- In Edge, open the More menu next to the address bar
- Select Settings

- Go to System (or, visit the
edge://settings/systemaddress) - Turn off Use hardware acceleration when available

- Restart Edge
18. Roll back Windows
At this point, it might be a simpler idea to roll back Windows 10 to a restore point. However, this solution works only if System Restore is enabled on your computer and if you, your system or your applications have created a restore point before your PC started experiencing stability issues.
Before proceeding with System Restore, though, keep in mind that you will lose all applications installed beyond the restore point, so you will have to reinstall them afterward.
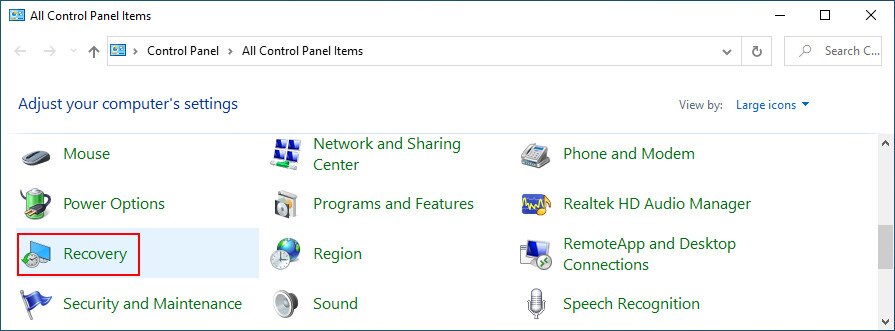
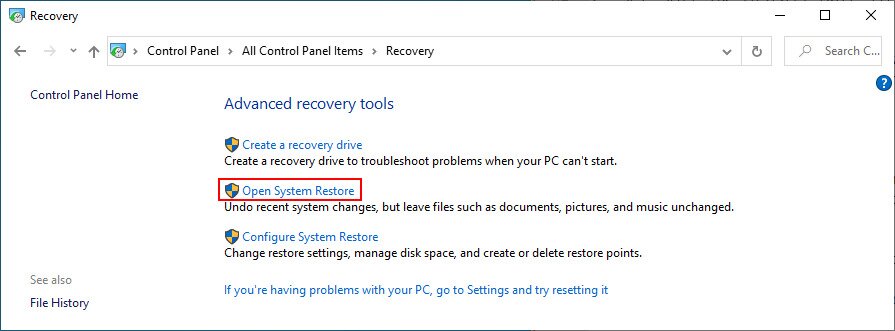
How to use System Restore:
- Sign in to Windows 10 using elevated rights
- Click the Start button, type Control Panel, and launch this tool
- Go to the Recovery section

- Click Open System Restore to open this area

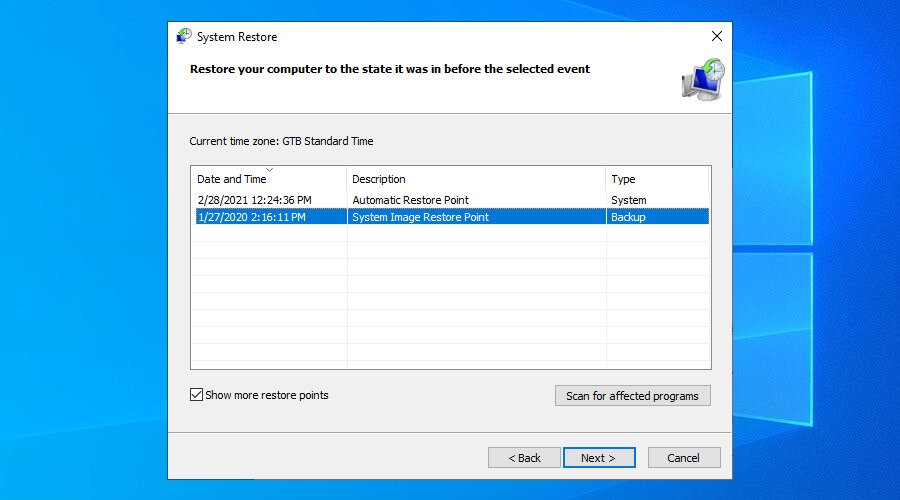
- If necessary, select Show more restore points. You can also click Scan for affected programs to find out which applications you will have to reinstall
- Select a restore point and click Next

- Follow the wizard steps and complete system recovery. Windows will reboot
- Check if your system is still crashing and showing a blue screen
19. Find out more about the BSOD error
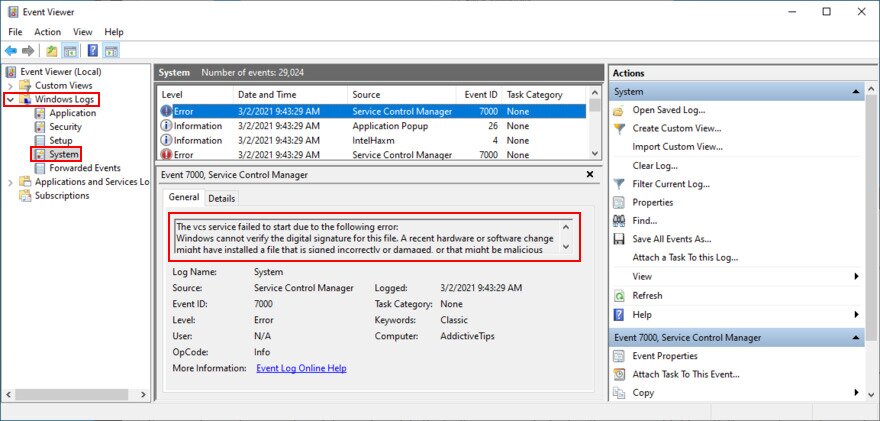
If you prefer getting in touch with tech support and asking for help in troubleshooting PAGE FAULT IN NONPAGED AREA, it’s a good idea to gather and share as many details as possible about the error. A handy tool for this job is Event Viewer, an internal Windows 10 tool.
How to use Event Viewer:
- Press Win key + R, type eventvwr.msc, and press Enter to open Event Viewer
- Go to Windows Logs > System on the left side
- Click the first entry in the list. You can find out more details about the BSOD error in the General and Details tab

- Make sure to copy this text and paste it somewhere safe. You can also use it to look more information on the Internet
Casual users looking for a simpler way to access the event details created by this BSOD error can use BlueScreenView. It’s a third-party tool that you don’t need to install: just download and run. It’s lightweight, easy to use, and offers an intuitive interface for analyzing minidump (.dmp) files created by blue screen events.
20. Remove newly installed software
Some software applications don’t fully support Windows 10 or have settings that clash with the system configuration. So it’s a good idea to uninstall these incompatible programs and restore the stability of your PC.
For example, many users have reported that uninstalling uTorrent or Tencent Gaming Buddy fixed the PAGE FAULT IN NONPAGED AREA error. Pay special attention to any new and suspicious apps you installed, like free driver updaters, VPN services, proxy servers, torrenting clients, or gaming emulators.
How to uninstall recent software:
- Right-click the Start button and head over to Apps and Features
- Set Sort by to Install date (newest first)
- Select the first (newest) suspicious app in the list and click Uninstall
- Click Uninstall again to confirm. Proceed with the removal instructions
- Restart your computer and check if this fixed the system crash
- If not, remove the next suspicious programs in the list of newly installed software
If you prefer a better solution, we recommend checking out dedicated application removers. These are tools specialized in thoroughly uninstalling programs by getting rid of any leftover files and registry entries.
21. Unplug external devices
If you have recently attached an old or new device to your computer unit, like a USB flash drive, an external hard disk, a wireless adapter or a webcam, perhaps it’s causing stability issues with your computer.
Just unplug the device and see what happens when you boot Windows again. If you’re unsure, detach everything, aside from your mouse and keyboard. Then, start your operating system to confirm that you’re not getting blue screen errors anymore.
It’s also a good idea to change USB ports since any one of them could be malfunctioning. Moreover, you should check the cables and replace any damaged ones.
22. Fix the system registry
The Windows registry contains essential information about your operating system and how its software components interact with each other. If it has corrupt, missing or modified data, it’s no wonder that you keep seeing stop code PAGE FAULT IN NONPAGED AREA.
This usually happens after installing and uninstalling software programs from unknown sources, which are too invasive when it comes to the system registry. You can try using a registry cleaner to solve this issue but, if you don’t want to install third-party apps, here’s what you need to do.
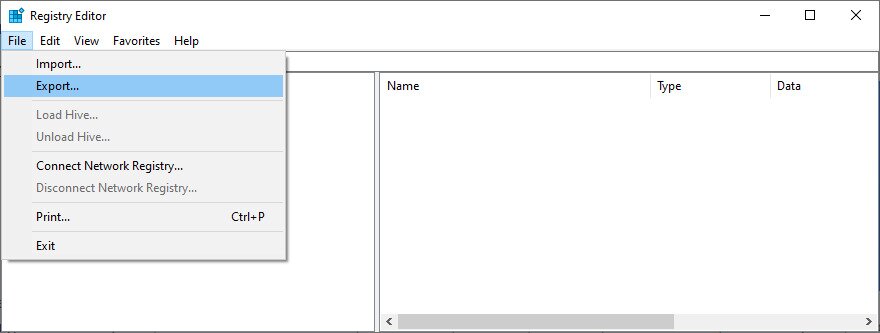
How to repair the registry:
- Press Win key + R, type regedit, and press Enter to open Registry Editor
- Open the File menu and click Export

- Set a name and destination to save the registry backup file. Click Save
- Exit Registry Editor
- Press the Win key and open the power menu
- Hold down Shift and click Restart to reboot Windows in Advanced Startup mode
- Go to Troubleshoot > Advanced options > Command Prompt
- Type the following commands and make sure to press Enter after each one:
-
cd c:\Windows\System32\config
-
ren c:\Windows\System32\config\DEFAULT DEFAULT.old
-
ren c:\Windows\System32\config\SAM SAM.old
-
ren c:\Windows\System32\config\SECURITY SECURITY.old
-
ren c:\Windows\System32\config\SOFTWARE SOFTWARE.old
-
ren c:\Windows\System32\config\SYSTEM SYSTEM.old
-
copy c:\Windows\System32\config\RegBack\DEFAULT c:\Windows\System32\config\
-
copy c:\Windows\System32\config\RegBack\DEFAULT c:\Windows\System32\config\
-
copy c:\Windows\System32\config\RegBack\SAM c:\Windows\System32\config\
-
copy c:\Windows\System32\config\RegBack\SECURITY c:\Windows\System32\config\
-
copy c:\Windows\System32\config\RegBack\SYSTEM c:\Windows\System32\config\
-
copy c:\Windows\System32\config\RegBack\SOFTWARE c:\Windows\System32\config\
-
- Exit Command Prompt and boot to Windows
- Check for BSOD errors
23. Check the Windows page file
The Windows page file (also known as the swap file) is in charge of your system’s virtual memory size. It’s useful when your OS moves data from RAM to the virtual memory size when the memory is full, in order to prevent data loss and corruption.
Normally, the swap file doesn’t pose a problem for modern computers with plenty of RAM. However, even if you have enough memory, the page file shouldn’t be left disabled or to a low value.
Otherwise, your computer might crash when it gets too busy trying to run multiple applications at the same time. As a result, it shows a blue screen and the PAGE FAULT IN NONPAGED AREA stop code due to incorrect page file settings.
In this case, you should change the virtual memory size on Windows 10:
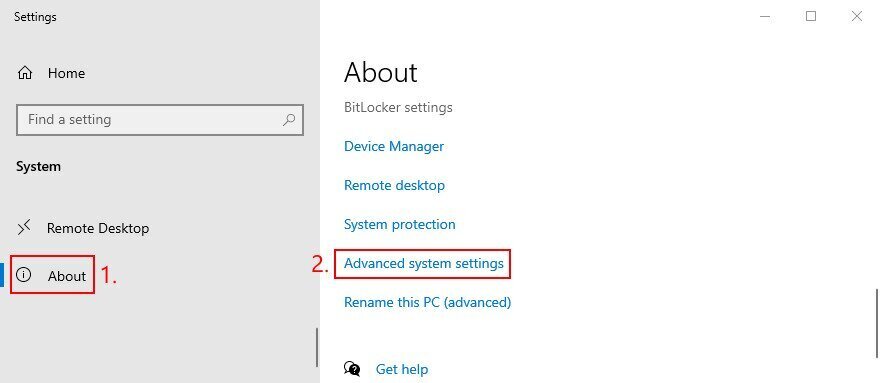
- Right-click the Start button and go to System
- Jump to the About section
- Click Advanced system settings

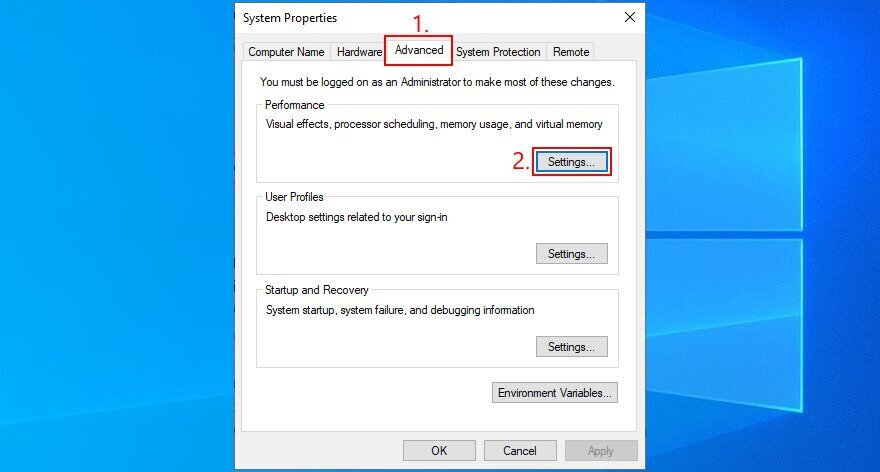
- At Performance, click Settings

- Switch to the Advanced tab
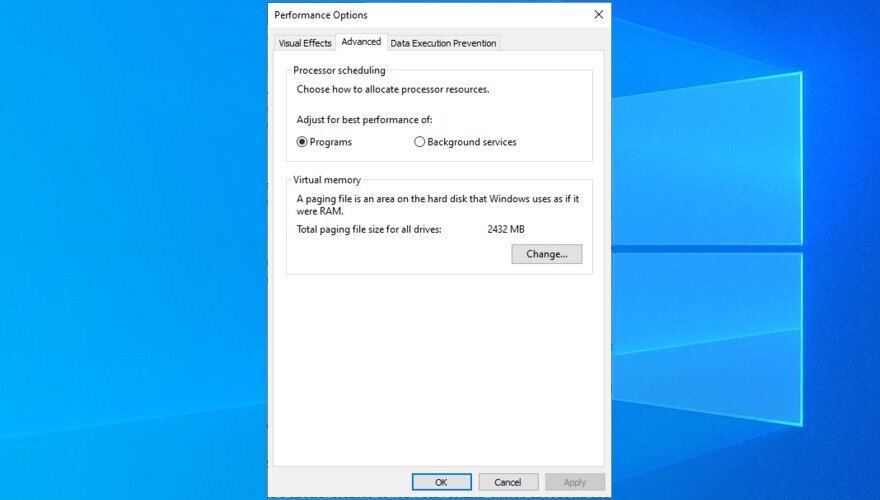
- At Virtual memory, check if Total paging file size for all drives is larger than 0 MB. If it is, you can skip this entire solution. Otherwise, click Change

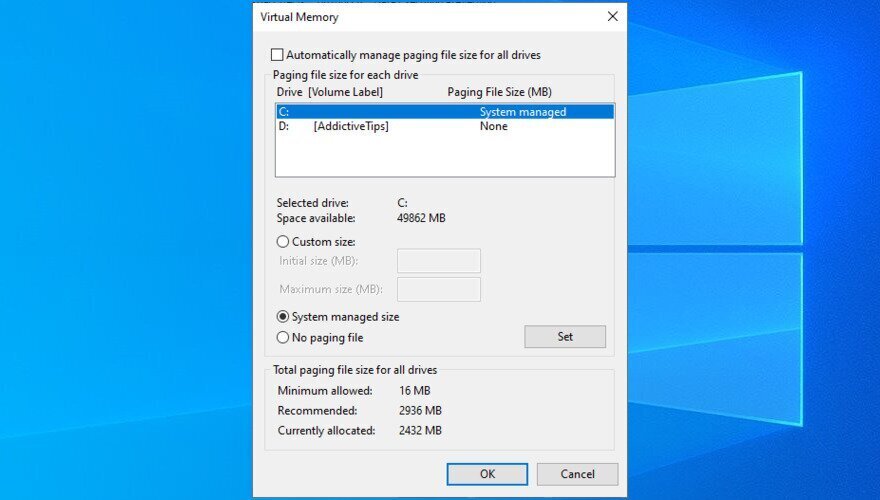
- Disable Automatically manage paging file size for all drives
- Select the partition that contains Windows

- You have two options here
- Select System managed size to allow Windows to dynamically set the page file size by adapting to the system settings (recommended for most users, especially on Windows 10)
- Or, select Custom size in order to fill it out on your own (for experts)
- Click OK and exit
- Restart your computer and check for errors
24. Disable Fast Startup
Windows 10 has a special feature called Fast Startup, which speeds up the boot process by not terminating all processes and services at shutdown. Although it has its obvious benefits, Fast Startup is sometimes guilty for blue screen errors like FAULT IN NONPAGED AREA.
But you can disable Fast Startup on Windows 10:
- Log in to your operating system using an admin account
- Click the Start button, search for Control Panel, and launch this app
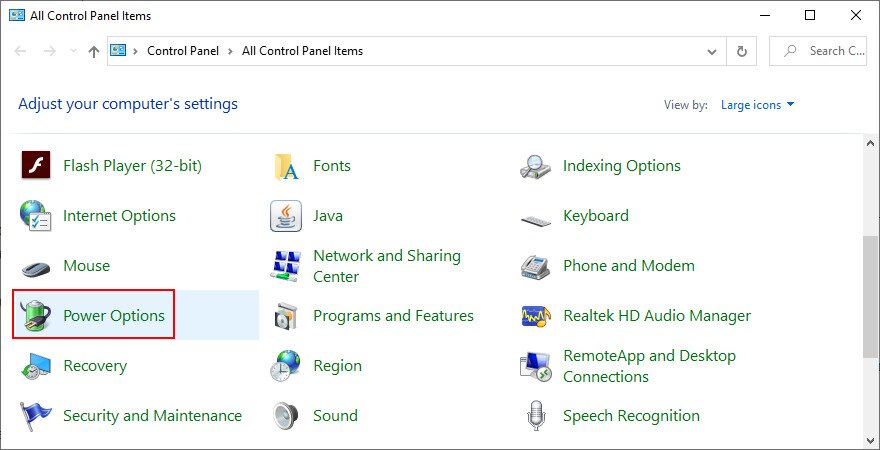
- Go to Power Options

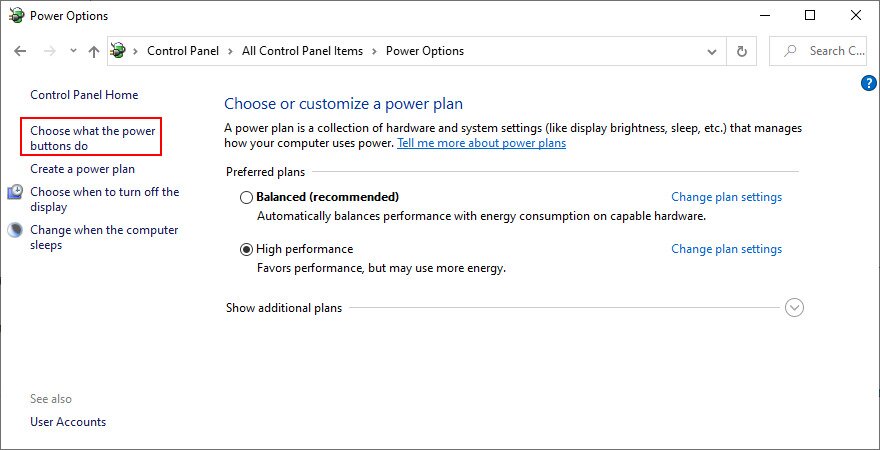
- Click Choose what the power buttons do

- Click Change settings that are currently unavailable
- Uncheck Turn on fast startup and click Save changes

- Exit and restart your PC
- Check if your computer still crashes

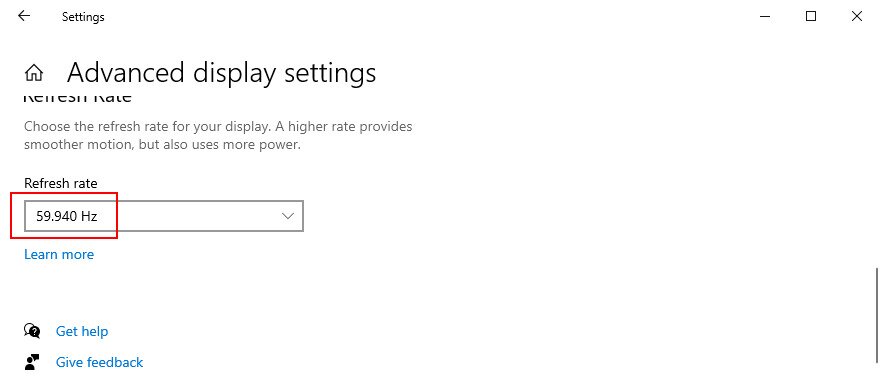
25. Change your monitor refresh rate
You might be underclocking or overclocking your monitor without even realizing it. As unconformable as it may be for the eyesight, incorrect refresh rate settings could send your computer into a spiral due to fatal graphics errors.
To fix it, just modify the monitor’s refresh rate on Windows 10:
- Right-click an empty spot on the desktop to open the context menu
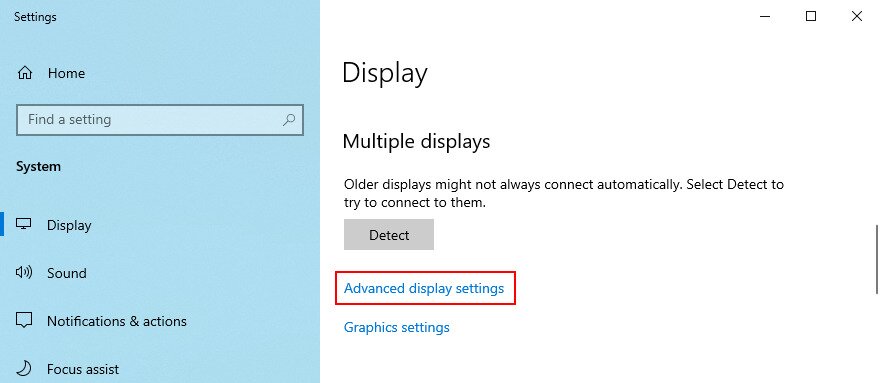
- Go to Display settings

- Scroll down to the end of the page and click Advanced display settings

- If you have two or more displays, select the primary one
- Open the Refresh rate menu and pick another value. It’s usually recommended to go lower, but you can test more possibilities

- Check if you are comfortable with the new settings. If so, click Keep changes. Otherwise, select Revert and then pick another refresh rate
- Once you find the right setting, restart your PC and check for additional system crashes

26. Disable overclocking
Gamers prefer overclocking software solutions to amp up their computer settings and enhance their gaming experience, particularly when the PC doesn’t meet the game’s minimum system requirements. But it’s not usually a good idea for your PC’s health.
If you’re using a dedicated tool for overclocking your RAM and speeding up your PC, disable that setting since it could be the reason why your computer freezes and shows the PAGE FAULT IN NONPAGED AREA (it’s directly tied to the RAM).
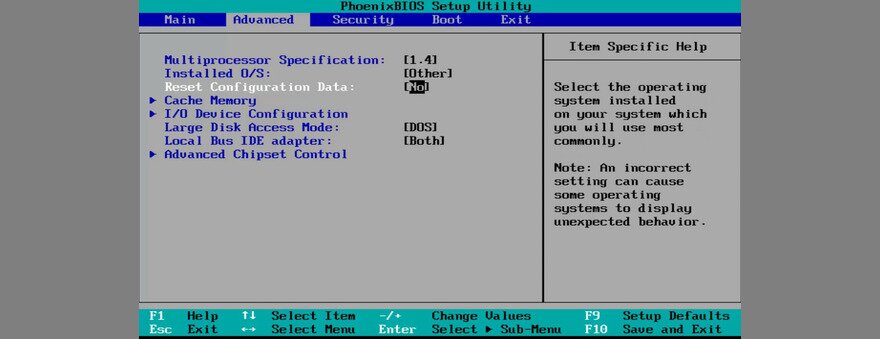
You might have to take one step further and uninstall the overclocking tool from your PC. However, if the overclocking setting was configured in BIOS, skip this step and check out the next solution.
27. Reset BIOS
If you configured BIOS settings, such as overclocking or caching, maybe you made a wrong move that triggered system crashes. It’s not necessary to identify and repair the exact BIOS settings since you can reset the entire BIOS configuration to default. Here’s how:
- Restart Windows
- Before system boot, press the key shown for accessing BIOS setup mode
- Go to the advanced section
- Locate and enable the setting that restores BIOS to default

- Quit to Windows
- Check system crashes
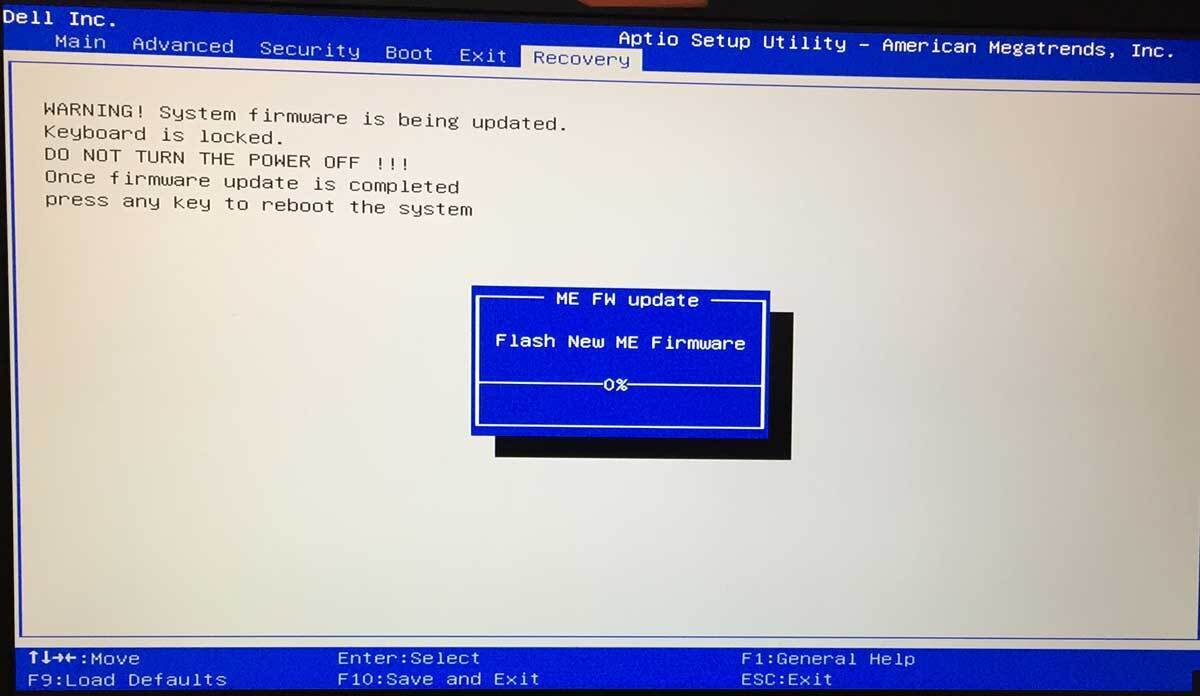
28. Update BIOS
If the PAGE FAULT IN NONPAGED AREA stop code wasn’t resolved in the previous solution, you should update BIOS to the latest version if you have never done this. In addition to improving the BIOS, you might also get access to new options.
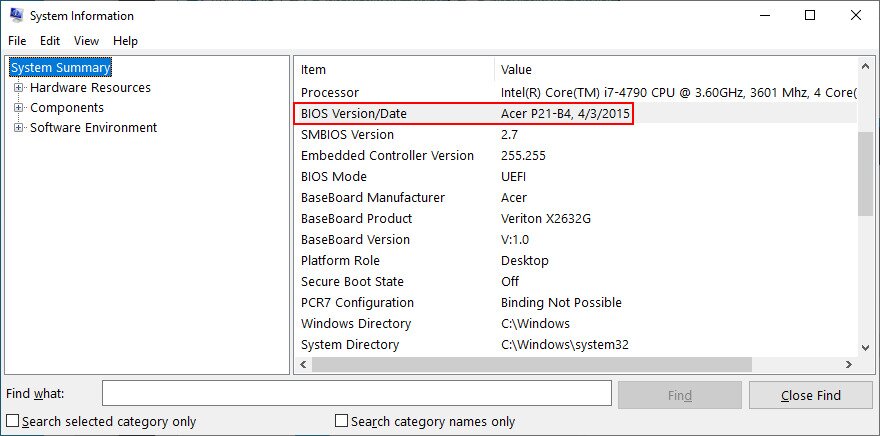
How to update BIOS:
- Find an empty pen drive and plug it into your PC
- On the Windows desktop, click the Start button, type System Information, and launch this app
- Select the System Summary section
- Check out the information shown at BIOS Version/Date and BaseBoard Manufacturer

- Visit the official website of your BIOS manufacturer to find and download a newer BIOS version
- Unzip the downloaded file the USB flash drive
- Restart your computer and enter BIOS mode
- Create a backup of the current BIOS version and save it to the pen drive
- Begin the BIOS update. It may take a while

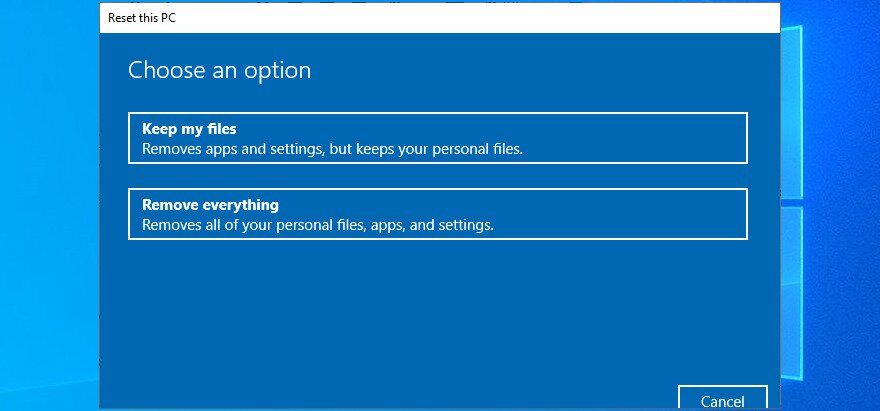
29. Reset Windows 10
The last resort is resetting Windows 10 to factory mode. You don’t have to back up your personal files since they will be left untouched. But your entire set of games and applications installed on the Windows drive will be gone, so you will have to reinstall everything from scratch.
How to reset Windows 10:
- Press the Win key, type Reset this PC, and hit Enter
- Click Get started

- Select Keep my files

- Follow the instructions
- After PC restart, configure the initial Windows settings

CONCLUSION: Stop code PAGE FAULT IN NONPAGED AREA can be fixed
To review, PAGE FAULT IN NONPAGED AREA is a blue screen error that tells you about a critical system file which can’t be found by Windows in the system memory. Your computer shuts down in an effort to prevent major data loss.
There are multiple approaches toward fixing this issue, but you should start with something as simple as hard-rebooting your PC and running Windows Update. Next, you can repair hard disk errors and corrupt system files, check your device drivers, run a malware scan, and clean boot Windows 10 or start it in Safe Mode.
It’s also a good idea to reinstall your drivers using Display Driver Uninstaller. Plus, you can repair and reinstall .NET Framework, check your memory using Windows Memory Diagnostic, remove and reseat the memory slots, temporarily disable your antivirus and firewall, check the storage space, and run Hardware and Devices troubleshooter.
Furthermore, you can disable hardware acceleration, roll back Windows, use Event Viewer, uninstall recent software, unplug external devices, fix the system registry, check the Windows page file, disable Fast Startup, change your monitor refresh rate, turn off overclocking, reset and update BIOS, or reset Windows 10.
How did you manage to get rid of the PAGE FAULT IN NONPAGED AREA stop code on your computer? Let us know in the comments below.
